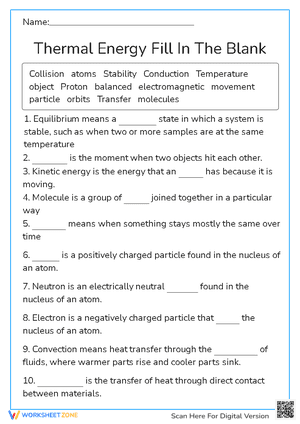
When you plan a thermal energy unit, the hardest part usually is not the demonstration, it is getting every student to explain what they just watched. A pan handle heats up, a room warms near a heater, and a hand feels warmth from a lamp across the room. Students can describe what happened, but naming the mechanism and applying it to a new scenario is a different skill. Heat transfer worksheets give you a low-stakes way to check that transfer of understanding before it shows up on a unit test.
For grades 4-8, this matters because conduction, convection, and radiation sound similar in casual conversation but behave very differently in a model. A worksheet that asks students to sort examples, label diagrams, or write short explanations forces them to commit to a specific mechanism rather than a vague sense that heat moved. That written commitment is what a teacher can actually check, correct, and reteach.
Conduction, Convection, and Radiation: What Worksheets Should Ask
Not every heat transfer worksheet is built the same way, and the difference matters for what students actually learn. Conduction happens through direct contact between materials, like a metal spoon left in a hot pot. Convection happens through the movement of a fluid or gas, like water circulating in a pot or air moving through a room. Radiation moves as electromagnetic waves and needs no medium at all, which is why sunlight warms your skin across empty space.
The strongest worksheets do not just define these terms, they ask students to classify new, unfamiliar examples using the definitions. A worksheet item about a car seat heating up in direct sun is asking students to reason about radiation without ever using the word directly, which is a much better test of understanding than a matching column.
Aligning Heat Transfer Worksheets with NGSS MS-PS3-3
MS-PS3-3 asks students to use models to compare the directional transfer of heat energy through conduction, convection, and radiation. That phrase, directional transfer, is easy to skip past, but it is the whole point of the standard. Students are not just naming a mechanism, they are tracking where heat energy moves from and to, and defending that direction with a model or diagram.
Worksheets built for this standard should include at least one item where students draw or interpret a directional model, such as arrows showing heat moving from a hot object to a cooler one, rather than only text-based classification. If every item on a worksheet is multiple choice vocabulary, you are practicing recall, not the modeling practice the standard actually asks for. A mix of diagram labeling, short written justification, and classification items keeps the worksheet closer to what MS-PS3-3 expects on an assessment.
Pairing Worksheet Practice with Labs and Demonstrations
Heat transfer is a poor fit for a worksheet-only lesson. Teacher-led demonstrations, lab stations, and physical models give students something concrete to reason about, and the worksheet works best as the step that follows, not replaces, that experience. A demonstration where students hold their hands near a candle without touching it, then compare that to touching a warmed metal rod, gives them two direct experiences of radiation and conduction before they ever see a worksheet question about either one.
A practical sequence many teachers use is: run a short station rotation with three simple setups, one for each mode of heat transfer, then hand out a worksheet the same class period while the observations are fresh. Waiting until the next day to assign the worksheet often means students are relying on memory of the label rather than memory of the observation, which weakens the connection you are trying to build.
Classroom Implementation
Heat transfer worksheets work best when they are placed deliberately inside a unit rather than assigned as filler. A few implementation habits make a real difference in how well students retain the material.
- Use a short worksheet immediately after a demonstration or lab station, while the observation is still fresh, rather than saving it for homework.
- Rotate worksheet formats across the unit, mixing diagram labeling, scenario classification, and short written explanation so students are not just pattern-matching one item type.
- Reserve one worksheet specifically for review before the unit test, focused on scenarios that mix all three modes of heat transfer in the same set of items.
- Pull two or three worksheet items for a quick formative check partway through the unit, rather than waiting until the end to find out which students are still confusing conduction and convection.
These habits keep the worksheet tied to instruction instead of functioning as a standalone assignment, which is where most of the learning value actually sits.
Frequently Asked Questions
1. What grade level typically covers heat transfer worksheets?
Heat transfer worksheets are most common in grades 4 through 8. Upper-elementary teachers often introduce the ideas informally, while middle school teachers use them to directly support the NGSS MS-PS3-3 standard.
2. How do heat transfer worksheets align with NGSS MS-PS3-3?
MS-PS3-3 asks students to use models to compare the directional transfer of heat energy through conduction, convection, and radiation. Worksheets that include diagram labeling and directional reasoning, not just vocabulary recall, align most closely with that standard.
3. What is the difference between conduction, convection, and radiation on a worksheet?
Conduction items usually involve direct contact between materials, convection items involve movement of a fluid or gas, and radiation items involve electromagnetic waves that need no medium, such as sunlight warming a surface from a distance.
4. How can teachers use heat transfer worksheets alongside hands-on labs?
Many teachers run a short demonstration or lab station first, then hand out a worksheet the same class period so students can connect what they observed to the vocabulary and models on the page.
5. How often should heat transfer worksheets be used during a thermal energy unit?
A common pattern is one worksheet after each major demonstration or lab station, a short formative check partway through the unit, and one review worksheet that mixes all three modes before the unit test.














 Interactive Worksheet Maker
 Quiz Maker
 Word Search Maker
 Crossword Puzzle Maker
 Word Scramble Generator
 Sentence Scramble Generator
 Handwriting Worksheet Generator
 Name Tracing Generator
 Fill In The Blank Generator