Comprehensive Shoulder Muscle PDF Worksheets for High School Anatomy
These shoulder muscle pdf worksheets give anatomy and biology teachers structured, print-ready materials for one of the most demanding identification units at the secondary level. Each worksheet targets the glenohumeral joint's layered musculature — from the superficial deltoid and trapezius down through the four rotator cuff muscles — with diagram labeling, origin-insertion charting, and muscle-action matching built into every task. The set provides both anterior and posterior views, which is the minimum a teacher needs for students to understand how these muscles wrap continuously around the torso and attach to the scapula, clavicle, and humerus from multiple angles.
The Specific Skills Each Worksheet Builds
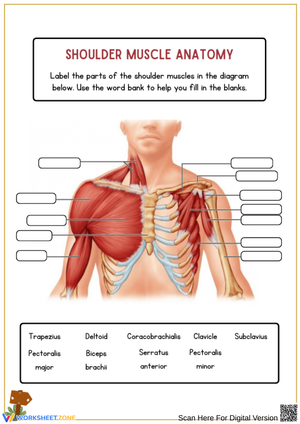
Each worksheet targets a distinct layer of shoulder anatomy, which prevents students from trying to absorb 15 muscle names in a single sitting. Labeling tasks ask students to mark specific muscles on anatomical diagrams and connect each label to a description of its attachment points. The origin-insertion chart requires students to write out the proximal and distal attachment for each major muscle — not just identify the muscle by name — so they engage with the scapula, clavicle, and humerus as three-dimensional anchor points rather than flat diagram features. Muscle-action matching tasks ask students to pair each muscle with its primary movement at the glenohumeral joint. Specific skills covered across the set include:
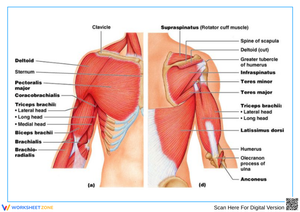
- Labeling the deltoid's anterior, lateral, and posterior heads on a color-coded diagram and naming the movement each head produces
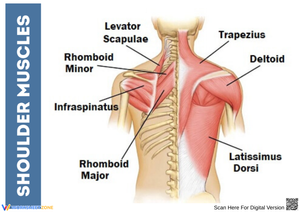
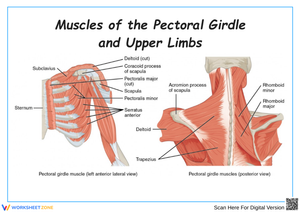
- Distinguishing shoulder joint muscles (inserting on the humerus) from shoulder girdle muscles (inserting on the scapula or clavicle)
- Identifying all four SITS muscles in both isolated rotator cuff views and full posterior-shoulder diagrams
- Writing origins and insertions for the trapezius, latissimus dorsi, pectoralis major, and serratus anterior
- Matching muscles to their agonist roles in abduction, adduction, flexion, extension, medial rotation, and lateral rotation
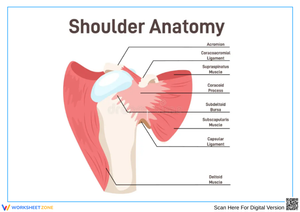
Why the Rotator Cuff Demands Its Own Worksheet
The supraspinatus, infraspinatus, teres minor, and subscapularis — the SITS group — are consistently the hardest set of muscles in this unit for students to retain because no surface landmark corresponds to any of them. Students can press a hand against the deltoid and feel it contract during abduction. The rotator cuff is invisible at the surface, and its four members are distributed across the anterior and posterior faces of the scapula, which means even a clearly drawn diagram reads as confusing noise until students understand the underlying mechanical logic. The reason all four exist as a functional group is the same: the glenoid cavity is intentionally shallow, trading stability for range of motion, and the SITS muscles compensate by compressing the humeral head against that cavity during every arm movement. Once students grasp that stabilization function, they stop conflating the subscapularis (anterior scapular face, medial rotation) with the infraspinatus (posterior scapular face, lateral rotation). Adding clinical context — rotator cuff tears are the leading shoulder injury in overhead athletes and one of the most common surgical repairs in adults over 40 — gives students a concrete reason to care which specific muscle is compromised and why its function matters.
Student Errors Worth Catching Before the Unit Moves On
The most persistent mistake in student work on this unit is treating the deltoid as a single-function muscle. Students label it correctly and write "abduction" as its only action, missing that the anterior head produces flexion and medial rotation while the posterior head produces extension and lateral rotation. That distinction matters structurally: the same shoulder produces opposite rotational forces depending on which fiber group activates, and students who miss it will misread movement analysis diagrams when sports medicine or kinesiological content appears later in the course. A second, equally common error is classifying the trapezius as a shoulder joint mover rather than a scapular stabilizer. The trapezius inserts on the scapula and clavicle, not the humerus, and its job is to create a fixed proximal anchor so the glenohumeral joint can generate force against resistance. Students who miss this distinction diagram it incorrectly and then cannot explain why serratus anterior failure causes scapular winging — or why winging destabilizes the entire shoulder complex. The worksheet tasks that separate girdle muscles and joint muscles into distinct labeled columns are specifically built to surface this confusion before it carries forward into the unit assessment.
Lesson-Planning Strategies to Get the Most From These Worksheets
These shoulder muscle pdf worksheets work most effectively when introduced incrementally across the unit rather than distributed as a packet on day one. Open with the anterior labeling worksheet as a guided class activity — project your own copy and walk through the superficial layer while students color-code in real time, beginning with the pectoralis major and anterior deltoid before adding the trapezius and serratus anterior. Reserve the rotator cuff worksheet for the third or fourth day of the unit, after students have handled a bone specimen or 3D model of the posterior scapular surface, because the infraspinatus fossa and subscapular fossa are nearly impossible to visualize from a flat image without prior tactile experience. Add a kinesthetic element when distributing any labeling worksheet: have students stand, perform each major movement, and press their opposite hand against the activating muscle — feeling the anterior deltoid engage during forward flexion, then shifting to the posterior deltoid during extension. That physical reference connects each worksheet label to a real proprioceptive event, and the retention difference on subsequent quizzes is consistent and measurable. Use the origin-insertion chart worksheet as a ten-minute warm-up the day before the unit test — completed from memory, it functions as distributed retrieval practice rather than passive review, and it surfaces any remaining confusion about attachment sites while there is still time to address it in class.
Differentiating the Set Across Ability Levels
These shoulder muscle pdf worksheets separate naturally into a surface-layer track and a deep-layer track, which makes level-based adjustments straightforward. Students who need additional support work with the anterior and posterior labeling worksheets focused on the six most clinically visible muscles — deltoid, trapezius, pectoralis major, latissimus dorsi, supraspinatus, and subscapularis — and hold the rhomboids, serratus anterior, and teres muscles until those six are solid. For students working above grade level, the standard labeling task becomes a foundation: after completing it, ask them to annotate each muscle with both its agonist role in one movement and its antagonist role in the opposing movement. The posterior deltoid is an agonist in shoulder extension and an antagonist during forward flexion — writing both forces a level of functional analysis that goes well beyond naming. Laminating a set of the labeling worksheets and supplying dry-erase markers creates a low-stakes repetition station where students can attempt, erase, and re-attempt the same diagram multiple times; the erasability removes the discouraging accumulation of crossed-out errors that tends to shut struggling students down before they work through the full label set.
Standard Alignment
These worksheets align with NGSS HS-LS1-2, which asks students to develop and use a model to illustrate the hierarchical organization of interacting systems that provide specific functions within multicellular organisms. In practical classroom terms, that standard is met when students move from naming individual muscles to explaining how the rotator cuff operates as a coordinated stabilization system — and then connecting that system to the skeletal and nervous systems that provide its anchor points and motor control. Instructionally, this standard typically lands mid-course in a dedicated anatomy and physiology class, after the skeletal system unit is complete and before the transition to neuromuscular control. Working through these labeling and function-matching tasks during that window gives students the concrete anatomical grounding the standard requires before any systems-level synthesis begins.
Frequently Asked Questions
What are the four muscles of the rotator cuff, and why do they function as a group?
The rotator cuff consists of the supraspinatus, infraspinatus, teres minor, and subscapularis — abbreviated with the SITS acronym. They function as a group because all four attach to the humeral head and collectively compress it against the glenoid cavity, stabilizing a joint that is structurally shallow by design. Without that active compression, the humerus would slide out of alignment under load. Each muscle also contributes a rotational function: the supraspinatus initiates abduction, the infraspinatus and teres minor produce lateral rotation, and the subscapularis produces medial rotation.
How are shoulder joint muscles different from shoulder girdle muscles, and does the set cover both?
Shoulder joint muscles — the deltoid, rotator cuff group, and related muscles inserting on the humerus — are direct movers of the arm at the glenohumeral joint. Shoulder girdle muscles — the trapezius, rhomboids, serratus anterior, and levator scapulae — originate on the axial skeleton and insert on the scapula or clavicle, making scapular positioning and stabilization their primary role. Both groups are covered in the set. One worksheet addresses the girdle muscles separately so students understand that stable scapular control is a prerequisite for efficient glenohumeral mechanics — a concept that reliably gets lost when both groups appear together on the same unlabeled diagram.
Are these worksheets appropriate for introductory biology, or are they calibrated for a dedicated anatomy course?
The labeling worksheets covering the superficial muscles are appropriate for introductory high school biology. The rotator cuff worksheet, origin-insertion chart, and the shoulder muscle pdf worksheets focused on muscle-action analysis are better matched to a dedicated anatomy and physiology course, where that depth of functional detail fits within the curriculum scope. Teachers in introductory courses typically assign the anterior and posterior labeling worksheets only and reserve the deep-layer tasks for students pursuing advanced coursework.
How long does a typical labeling worksheet take to complete in class?
A labeling worksheet runs 12 to 18 minutes for students working independently without notes. The origin-insertion chart takes closer to 20 to 25 minutes. Used as a guided activity with a projected key, most students complete the labeling tasks in under 15 minutes — which makes a single worksheet viable as a focused warm-up at the start of a 50-minute period without cutting into direct instruction time.
Clear All