These face muscle worksheets pdf give anatomy and physiology teachers a print-ready resource set for one of the highest-stakes identification units in the high school muscular system sequence — the muscles of the human head. Each worksheet targets a specific skill within the unit: blind labeling from a lateral-view diagram, muscle-to-action matching, functional group sorting between the expression muscles and the mastication group, and short-answer questions connecting structure to innervation.
Structures Covered in Each Worksheet
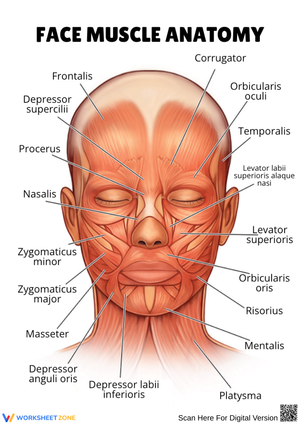
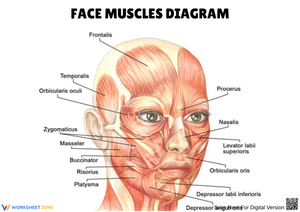
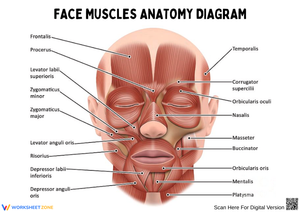
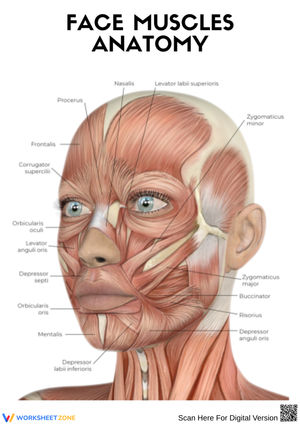
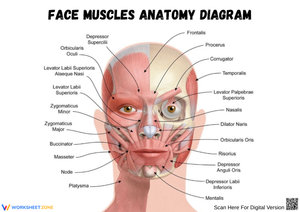
The set addresses the two functional categories that appear on state exams and in clinical health science coursework. The muscles of facial expression — controlled by cranial nerve VII — include the frontalis, orbicularis oculi, orbicularis oris, zygomaticus major and minor, buccinator, and risorius. The muscles of mastication — driven by cranial nerve V — center on the masseter and temporalis, with supporting coverage of the medial and lateral pterygoids for advanced sections. Throughout both groups, each worksheet asks students to record not just the name but the primary action, forcing them to connect Latin descriptors to observable function rather than stopping at identification.
Why This Topic Demands Diagram Work Over List Memorization
Facial muscles present a spatial challenge that gluteal or quadriceps labeling doesn't: these structures are small, overlap heavily at the corners of the mouth and orbit, and their names derive from Latin root words that only become meaningful once students have physically located the structures multiple times. A read-and-memorize approach produces test-day recognition without genuine spatial understanding. The labeling component in a face muscle worksheets pdf forces students to commit to a specific location on the diagram — they draw the line to the structure, not to a general region — and that commitment is where durable spatial memory forms. The format also makes partner-check reviews fast: one student reads the muscle name, the other points to the corresponding structure on an unlabeled diagram, and gaps in understanding surface in about three minutes of back-and-forth.
Frequent Student Errors Worth Watching For
The most consistent mistake in the expression group involves the two orbicularis muscles. Students who correctly distinguish oculi (eye) from oris (mouth) in their notes will still reverse the label arrows on a timed diagram because the circular shape of both muscles is visually identical — spatial memory overrides vocabulary memory under time pressure. Catching this during a worksheet review is easy; catching it on a unit test is too late. The buccinator causes a different and more persistent error: students routinely place it at the jaw angle rather than in the cheek wall, conflating it with the masseter because both structures are associated with chewing mechanics.
In the mastication group, the temporalis is consistently undersized on student diagrams. Students see the fan shape described in lecture and draw it as a small patch just above the ear. On an actual skull, the temporalis spreads from the temporal line down toward the zygomatic arch — significantly larger than most students expect. Any worksheet that asks students to shade or outline the muscle boundary, rather than simply place a label line, exposes this misconception in a way a matching exercise cannot.
Where These Worksheets Fit in a Unit Plan
The labeling worksheets work cleanly as a structured warm-up — ten minutes on the day after the introductory lecture, then again 48 hours later with the word bank removed. Spaced retrieval over that short interval produces meaningfully better retention than one extended session, and the format makes it easy to execute without additional planning time. The matching and short-answer worksheets fit naturally at the end of a lab period when students have been working with a skull model or anatomy poster and need to consolidate what they observed into written form before the bell.
One of the most effective in-class moves is pairing the expression muscles worksheet with a physical mimicry sequence: students contract each labeled muscle in order — raising the frontalis, squinting the orbicularis oculi, pulling the zygomaticus major into a smile — while their partner identifies which structure is contracting. The masseter is the best entry point because it is directly palpable. Students clench their jaw and press two fingers against the angle of the mandible; the muscle belly under their fingertips makes the anatomy immediate in a way no printed diagram can replicate, and that physical anchor transfers back to the worksheet during the next labeling session.
Standard Alignment
These worksheets support NGSS HS-LS1-2, which requires students to use a model to illustrate how structural features at the organ and system level relate to function. Facial muscle labeling operationalizes that standard directly: students explain how the bone-to-skin insertion pattern of the orbicularis oris produces lip puckering, or how the parallel fiber arrangement of the masseter generates the bite force needed for mastication. Most state anatomy and physiology frameworks — including Texas TEKS for Anatomy and Physiology and Florida health science CTE standards — embed facial muscle identification in the first-semester muscular system unit, typically placed after the introduction of muscle tissue types and neuromuscular junction mechanics. These worksheets fit that curricular placement without modification.
Adapting These Worksheets Across Student Levels
A face muscle worksheets pdf is straightforward to modify in Adobe Reader or Google Drive before printing. For introductory biology students, use the word-bank version and limit required structures to the seven most commonly tested: frontalis, orbicularis oculi, orbicularis oris, zygomaticus major, buccinator, masseter, and temporalis. For CTE health science or advanced anatomy students, remove the word bank, add a column for cranial nerve innervation, and introduce one clinical scenario — Bell's palsy works best because it produces unilateral paralysis of CN VII muscles while leaving mastication (CN V) fully intact, which students find genuinely interesting to reason through rather than simply memorize. Students who need additional support with fine-motor label placement benefit from a larger-format diagram; students ready for extension can work with a cross-section that shows muscle depth and layering rather than a simple surface view.
Frequently Asked Questions
Which muscles should I prioritize if the unit is only one week?
Start with the masseter — it is directly palpable, functionally obvious, and the strongest muscle in the head by cross-sectional force. Add the frontalis, orbicularis oculi, orbicularis oris, and zygomaticus major for the expression group, then include the temporalis. Those seven structures cover the majority of state exam requirements and give students a working map of the face before they attempt the smaller, deeper muscles in later lessons.
How does Bell's palsy help students understand cranial nerve anatomy?
Bell's palsy results from inflammation of cranial nerve VII, which controls the muscles of facial expression. Patients lose the ability to raise the eyebrow on the affected side (frontalis), close the eye fully (orbicularis oculi), or produce a symmetric smile (zygomaticus major) — but chewing remains completely intact because mastication runs through CN V. Asking students to predict which muscles would be paralyzed, then confirming with a clinical photograph, turns what could be rote memorization into active diagnostic reasoning about structure and function.
Can these worksheets serve as summative assessments rather than practice?
The no-word-bank labeling version works directly as a quiz without modification. A face muscle worksheets pdf used for practice becomes a summative tool simply by collecting it under timed conditions — the content structure doesn't need to change. For a more formal assessment, pair the blank labeling diagram with two or three short-answer questions about muscle action and nerve innervation. That combination produces evidence of both identification accuracy and conceptual understanding on a single assessment.
What is the most reliable way to help students stop reversing the orbicularis labels?
Have students write the Latin translation directly on the diagram during their first attempt: oculi → eye, oris → mouth. Then 24 to 48 hours later, require them to label a new blank diagram from memory without any annotations. The retrieval effort during that second attempt — especially after an uncertain first try — is what cements the distinction. Students who reverse the labels once almost never repeat the error after a single spaced retrieval session, because the cognitive work of self-correcting makes the correct mapping memorable in a way rereading the answer never does.