Neck Muscle PDF Worksheets for High School Anatomy
These neck muscle pdf worksheets give anatomy and biology teachers a direct path through one of high school physiology's most spatially disorienting units. The cervical region layers superficial structures — the platysma, the sternocleidomastoid — over progressively deeper groups, and students routinely superimpose them on diagrams, misplace attachment points, and confuse directional actions. Each worksheet targets a specific layer or function, limiting how much students are asked to hold in working memory at once.
The Specific Skills Targeted
Students work through four broad task types across the set:
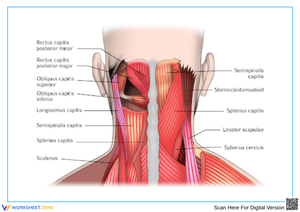
- Labeling from multiple views — anterior, posterior, and lateral diagrams move from major superficial muscles (sternocleidomastoid, trapezius, platysma) to deeper structures (scalenes, splenius capitis, splenius cervicis, infrahyoid group)
- Origin-and-insertion matching — students connect muscle names to specific bony landmarks and vertebral levels rather than recognizing shapes on a pre-labeled diagram
- Action classification — marking each muscle's primary movement and distinguishing unilateral from bilateral contraction effects for muscles like the SCM
- Cross-system integration — one worksheet connects the scalenes to their role as accessory respiratory muscles, placing the neck unit inside a broader physiology context
Mistakes Students Make That These Worksheets Help You Catch
The most persistent error involves the sternocleidomastoid's rotational action. Students almost universally write that the SCM rotates the head toward the contracting side — exactly the opposite of the correct answer. This error is durable because it is counterintuitive, and repeating the correction in lecture rarely fixes it. What works is having students place a finger on one SCM and slowly turn their head away from that side, feeling the contraction. That physical confirmation changes how students encode the relationship and holds through assessment in a way that a labeled diagram alone does not.
A second pattern: students who first encountered the platysma during a facial muscle unit consistently omit it from neck diagrams. It spans from the mandible to the clavicular region and belongs in both anatomical contexts, but students operating from their earlier category — "that's a face muscle" — skip it entirely here. Worksheets that present the platysma in anterior neck views without surrounding facial landmarks force recognition in a new frame and break that categorical error.
The infrahyoid group causes trouble of a different kind. Students perceive these as minor structures and leave them blank on labeling tasks. When infrahyoids appear on assessments, those gaps are immediate and obvious. Several worksheets include close-up diagrams of the anterior midline where the infrahyoids are the only structures being labeled — removing the surrounding landmarks students typically use to orient themselves and requiring genuine recall of each muscle's name and position.
Why Labeling Builds Understanding Here More Than in Other Units
Neck anatomy cannot be understood without a three-dimensional mental model of how superficial and deep muscles layer over each other and where attachment points fall relative to the cervical vertebrae and hyoid bone. These neck muscle pdf worksheets build that spatial model by presenting anterior, posterior, and lateral views as separate labeling tasks — students who work through all three perspectives develop positional recall that multiple-choice questions simply do not produce. A student who correctly labels the same structure from the side and from the back has internalized its position in a way that reading a description never achieves.
The "tech neck" connection provides a natural motivational anchor midway through the unit. When students calculate the effective load on the splenius capitis and upper trapezius as the head flexes forward 30, 45, or 60 degrees, they connect biomechanics to something they experience daily. The physics is already present once students understand muscle origin and lever mechanics — the worksheet that introduces this calculation requires no additional content and raises the stakes on the material considerably.
Recommended Lesson-Planning Strategies for These Worksheets
The most effective placement for labeling worksheets is the day after initial lecture, not the same day. Students who attempt to label during their first introduction to the cervical musculature are managing new vocabulary, spatial orientation, and diagram interpretation simultaneously — accuracy suffers and errors compound. Running the lecture one day and the worksheet the next allows overnight processing. The improvement in first-attempt labeling accuracy when this sequence is followed is immediate and visible in the work.
Origin-insertion worksheets work better as the anchor for a 10-minute station during a lab rotation than as solo seat work. Students who talk through why the SCM attaches to the mastoid process — connecting that attachment site to the muscle's line of pull — retain the relationship more reliably than students who complete the same task in silence. The action-classification worksheets serve well as the exit activity on the final lecture day before a quiz; students who cannot correctly classify the scalenes or the splenius capitis during that check can receive targeted review before the assessment rather than discovering the gap on it.
Standard Alignment
These worksheets support NGSS HS-LS1-2, which expects students to develop and use models that illustrate how tissue-level structures support whole-organism function. In anatomy courses, this standard is addressed when students move past naming structures and begin explaining how the spatial relationship between a muscle's origin, insertion, and line of pull determines the motion it produces. The labeling and action-classification tasks here operate at exactly that level — not "what is this muscle called" but "why does its attachment to the mastoid process mean it rotates the head away from that side."
Adjusting the Worksheets for a Range of Learners
The most direct adjustment is the word bank. For students who need additional structure, a word bank limited to the major superficial muscles — sternocleidomastoid, trapezius, platysma — makes the labeling task achievable without reducing the diagram's complexity. For advanced students, removing the word bank entirely and requiring identification of all three scalene subdivisions, the full infrahyoid group, and the splenius pair raises the demand considerably using the same diagram. Both versions can run simultaneously in the same class period without either group being aware the tasks differ.
For students who need more than the labeling format provides, these neck muscle pdf worksheets pair well with palpation activities — having students locate the SCM, the posterior border of the trapezius, and the sternohyoid on their own necks before transferring those locations to the diagram. For the highest-performing students, assigning the action-classification worksheet and then asking them to draw a fully labeled diagram from memory reveals gaps that recognition tasks routinely hide. A student who can label a provided outline may still be unable to reconstruct the spatial relationships independently — that production task makes the distinction clear immediately.
Frequently Asked Questions
Do these worksheets work for both anatomy electives and general biology courses?
The major-muscle labeling worksheets — SCM, trapezius, platysma, scalenes — are appropriate for a general biology muscular system unit. The origin-insertion and action-classification worksheets belong in dedicated anatomy electives, where students are expected to work at that level of specificity. Most teachers use the labeling worksheets across both courses and reserve the deeper-content worksheets for anatomy sections only.
Can these worksheets be used for summative assessment, or are they better as practice tools?
Teachers who use neck muscle pdf worksheets for summative grading typically pull one or two blank-diagram labeling tasks from the set rather than assigning every worksheet as a test. The blank-diagram format — no word bank, no reference materials — gives a clear picture of retention. The action-classification worksheets hold up well as quiz components because they require applying knowledge rather than recognizing a name on a labeled image. As formative tools, the worksheets work best when students complete them with notes available and then self-check against an answer key.
What background knowledge should students have before starting this unit?
Students benefit from prior exposure to basic directional terminology — anterior, posterior, lateral, medial, superior, inferior — and a working understanding of how origin, insertion, and action relate to each other mechanically. A brief introduction to the hyoid bone and its position relative to the larynx is also useful before the infrahyoid worksheets specifically, because students who lack that reference point cannot place those muscles in the correct anatomical position. Without that foundational vocabulary in place, the labeling tasks become vocabulary exercises rather than anatomy exercises.
How long does each worksheet typically take in class?
A standard labeling worksheet covering eight to twelve structures takes most students between 12 and 20 minutes depending on familiarity. Origin-insertion matching worksheets covering the same number of muscles run longer — closer to 20 to 25 minutes — because students must process two pieces of information per structure. The action-classification worksheets are typically the fastest once students clear the bilateral-versus-unilateral conceptual hurdle for muscles like the SCM, after which they can work through the remainder systematically.
Clear All