These chest muscle worksheets give anatomy teachers a targeted set of activities built around four muscles — pectoralis major, pectoralis minor, serratus anterior, and the intercostal layers — in formats that progress from first recognition to independent recall. Each worksheet targets a specific skill, so a teacher can pull individual activities for warm-ups and formative checks or run the full sequence across a two-day unit block.
Muscles Covered and Why Each One Earns Its Place in the Unit
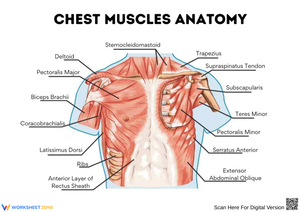
The pectoralis major anchors the set because students already have a physical reference for it — they can feel it activate during a push-up or a throwing motion. Its origin spans the clavicle, sternum, and upper costal cartilages, making origin-insertion labeling genuinely demanding. The pectoralis minor sits beneath it and stabilizes the scapula by drawing it anteriorly and inferiorly. Because the minor produces no visible surface movement, students treat it as a secondary detail — a misconception the activities in this set directly address. The serratus anterior runs along the lateral rib cage and protracts the scapula; a weakened serratus produces a winged scapula, and that clinical consequence gives teachers a concrete, memorable anatomical example. The intercostal muscles — external, internal, and innermost — occupy the rib spaces and drive the expansion and compression of the rib cage during breathing. Most students arrive believing the diaphragm does all the respiratory work; the intercostal material corrects that assumption with evidence they can feel in their own bodies.
What Each Worksheet Asks Students to Do
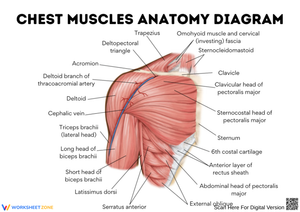
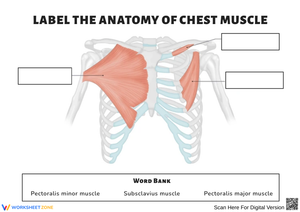
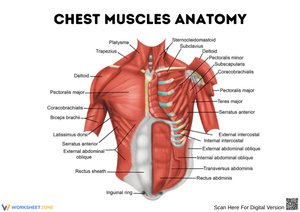
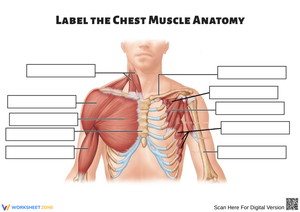
- Labeling diagrams — Students identify and label muscles on an anterior torso view that shows the depth relationship between the pectoralis major and minor. A word-bank version and a blank version allow the same diagram to function as guided practice or independent assessment.
- Coloring activities — Assigning distinct colors to each muscle layer forces deliberate engagement with depth and spatial position. When the pectoralis minor is shaded beneath a semi-transparent pectoralis major, the layered anatomy becomes concrete in a way that a written description cannot replicate.
- Function-matching activities — Students connect each muscle to its primary action: horizontal adduction of the arm, scapular stabilization, scapular protraction, or rib cage expansion during inhalation. This format makes the structure-function relationship explicit and directly testable.
- Fill-in-the-blank passages — Short paragraphs with targeted blanks reinforce origin, insertion, and action vocabulary in context. Students who complete these accurately leave with a functional study guide ready for unit review.
- Short-answer diagram response — Students draw directional arrows on a lateral rib-cage view showing rib movement during inhalation and exhalation, then write a sentence distinguishing the roles of the external and internal intercostals. This format reveals whether students hold a mechanical understanding of breathing or are simply memorizing names.
Errors That Surface Predictably in Student Work on This Material
The most consistent labeling error is placing the pectoralis minor's leader line at the surface of the chest rather than beneath the major. Students who correctly write both muscle names on the word bank will still draw the minor's line to the wrong layer, because they haven't built a three-dimensional model of the chest — they're matching text to diagram without thinking about depth. The coloring worksheet addresses this before it becomes an assessment problem: students cannot color the minor without first deciding where it sits in relation to the major.
On function-matching activities, a predictable error appears consistently: when asked which muscle expands the rib cage during inhalation, a substantial number of students write "diaphragm." This isn't a memory failure — they remember the word from earlier instruction. The error is conceptual. Students picture respiration as a single-muscle action and haven't yet built a model in which the rib cage itself is a movable structure with its own muscular layer. A third recurring error involves the pectoralis minor's function: students frequently describe it as "moving the arm," conflating it with the major. This happens specifically when diagrams don't clearly show the minor's insertion on the coracoid process of the scapula rather than on the humerus. A labeled insertion-point diagram corrects that confusion more efficiently than re-explaining it verbally.
Building These Worksheets Into a Two-Day Lesson Sequence
Open day one with two minutes of kinesthetic setup before any paper comes out: students perform a slow wall push-up with one hand placed on the opposite pectoral, then take a deliberate deep breath and feel their ribs expand. That physical anchor takes less time than taking attendance and significantly reduces the blank-stare response when students first encounter the labeling diagram. Follow immediately with the coloring worksheet — the slow, deliberate work of choosing colors and filling in muscle boundaries produces more careful spatial learning than reading a pre-labeled image.
On day two, run the function-matching worksheet as an eight-minute warm-up before the lesson moves on. Students who completed the coloring activity the previous day can answer most questions from memory; those who struggled get an immediate self-diagnostic. Reserve the short-answer intercostal diagram for the last fifteen minutes as a formative check — the results tell you precisely which students understand the respiratory role of the chest muscles and which still conflate it entirely with diaphragm function. Sequencing chest muscle worksheets this way applies a spaced retrieval principle: the overnight gap between the coloring activity and the function-matching forces a genuine first retrieval attempt, which produces more durable retention than completing both activities back-to-back in a single period.
Adapting the Set for a Range of Learners
Across the set, chest muscle worksheets use a consistent anatomical diagram as the base, which means modification lives in the task demand rather than requiring separate materials. For students new to anatomy vocabulary, the word bank on the labeling diagram removes the spelling-and-recall burden so attention stays on spatial identification — the appropriate priority in grades 6 through 8. High school students should work from the blank version; generating muscle names from memory is the retrieval practice a unit test will demand. The coloring worksheet works across levels without modification, because the task itself — making a spatial decision about where one muscle ends and another begins — is inherently calibrated by what each student already knows.
For students ready to go further, extending the fill-in-the-blank passage to include the subclavius adds a layer most K-12 curricula skip. A more engaging extension for student-athletes: ask students to identify the chest muscles most active in a specific sport they play — pitching, freestyle swimming, or serving in volleyball — and justify the answer using origin, insertion, and action. Students who compete in those sports invest in that question in a way they won't invest in a generic real-world prompt. For students who freeze facing a blank torso diagram, making a partially labeled reference available during the first attempt — then setting it aside for a second independent version later in the week — provides a structured path toward independence without permanently lowering the demand.
Frequently Asked Questions
What grade levels are these worksheets suited for?
Labeling and coloring formats are appropriate from grade 6 onward when supported by a word bank and simplified action descriptions. The fill-in-the-blank passages and short-answer diagram activities carry enough vocabulary demand to fit grades 9 through 12 more naturally. A middle school teacher can use the same labeling diagram by restricting the task to muscle names and one primary action per muscle, leaving origin-insertion detail to a later course.
How do I address the pectoralis major and minor confusion before it shows up on an assessment?
The root cause is almost always depth, not naming. Students who mix up the two on a labeling diagram typically know which name belongs to which muscle — they just draw leader lines to the wrong layer. Before distributing any labeling worksheet, show a lateral cross-section image or 3D model that makes the depth relationship explicit. The coloring activity reinforces the same concept through the act of spatial positioning rather than labeling, and is worth assigning before any labeled assessment.
How long does each worksheet take to complete in class?
Coloring and labeling worksheets run 15 to 20 minutes for students who have had prior instruction on the muscles. Function-matching and fill-in-the-blank formats run 10 to 12 minutes. The short-answer intercostal diagram — which includes arrow-drawing and a written explanation — takes closer to 15 minutes. For students encountering the muscles for the first time, add five to seven minutes to each of those estimates.
Do these worksheets address the respiratory system, or only upper-limb movement?
The intercostal material builds a direct, assessable connection between the muscular and respiratory systems. A worksheet asking students to draw inhalation and exhalation arrows on a lateral rib-cage diagram — and then explain the opposing roles of the external versus internal intercostals — addresses a cross-system concept that appears on integrated anatomy and physiology assessments. This is where chest muscle worksheets carry instructional value beyond the muscular system unit: the same material supports respiratory system review without requiring a separate lesson.