Knee Muscle PDF Worksheets
These knee muscle pdf worksheets give anatomy and physiology teachers a structured, diagram-based set of exercises that moves students from naming muscles to understanding how those muscles produce and control movement at the joint. Each worksheet addresses a distinct layer — the quadriceps group, the hamstring group, the accessory stabilizers, and the functional relationships among all of them — so teachers can sequence the materials across several class periods without gaps in conceptual progression.
The Specific Skills Targeted
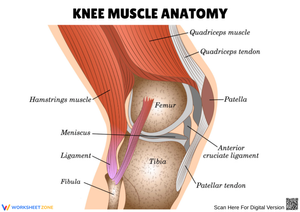
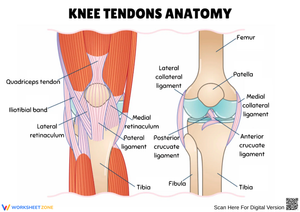
The set covers four interconnected content areas. Quadriceps identification asks students to label all four heads of the quadriceps femoris — rectus femoris, vastus lateralis, vastus medialis, and vastus intermedius — and indicate which muscles are superficial and which are deep. Hamstring anatomy uses separate posterior-view diagrams to have students distinguish the lateral biceps femoris from the medial pair (semitendinosus and semimembranosus) and trace each muscle's insertion onto the tibia or fibula. Accessory muscle mapping focuses on the muscles students most often omit — the popliteus, gastrocnemius, sartorius, and gracilis — and asks students to explain the mechanical role each plays at the knee specifically, rather than at the joint they more commonly associate it with. Antagonistic pair analysis rounds out the set: students receive descriptions of movement phases during walking and label which muscles are actively contracting versus lengthening, an exercise that separates rote naming from functional understanding.
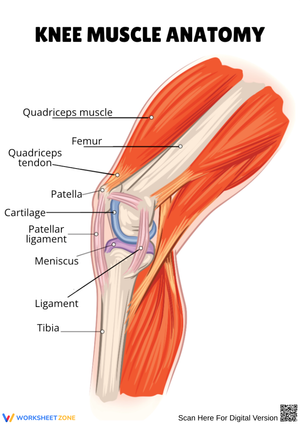
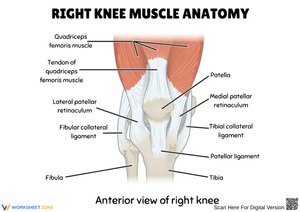
A separate exercise addresses connective structures, specifically the difference between the quadriceps tendon and the anterior cruciate ligament. Students apply the functional rule — muscle-to-bone versus bone-to-bone — to classify three additional structures rather than relying on name recognition alone.
Why the Knee Is the Right Entry Point for Teaching Antagonistic Pairs
The quadriceps-hamstring relationship is the clearest antagonistic pair in the secondary anatomy curriculum, but clarity does not mean simplicity. Students who can recite that "quadriceps extend and hamstrings flex" still struggle when asked to explain what happens to the hamstrings during a standing broad jump — they understand concentric contraction but not the equally important role of eccentric lengthening. The diagrams in this set include annotated movement-phase breakdowns covering swing phase, loading response, and terminal extension. Students mark which muscle group is doing concentric work and which is under eccentric load. That distinction is where the concept actually lands, and it rarely lands through lecture alone.
The popliteus adds a level of nuance well suited to students who move quickly through basic labeling tasks. Because it rotates the femur laterally to release the fully extended knee from its close-packed position, students have to reason about the joint from the inside out rather than from a diagram's surface. This tends to be the question that generates the most productive confusion in an anatomy unit — and productive confusion, specifically the kind that students resolve through their own reasoning, drives retention far better than a clean explanation delivered too early.
Mistakes Students Make That These Worksheets Help You Catch
The single most common labeling error across middle and high school anatomy is placing the vastus intermedius on the lateral surface of the thigh rather than beneath the rectus femoris. Because the vastus intermedius is entirely deep and invisible in surface anatomy, students who successfully label the other three quadriceps heads will skip it or misplace it. Diagrams that pair a cross-sectional view with the anterior surface view correct this reliably — students need to see the layering, not just the front face.
With the hamstrings, the error pattern shifts to insertion points. Students correctly identify the biceps femoris as lateral but then write "tibia" as its insertion because they remember the other two hamstrings insert on the tibia and apply that rule broadly. The biceps femoris inserts on the fibular head — a precise anatomical detail that appears on assessments and matters enormously in sports medicine contexts. These knee muscle pdf worksheets include close-up insertion diagrams that make the fibular-versus-tibial distinction visual rather than verbal, which is where most students need the correction to stick.
A third error appears in the antagonistic pair exercises: students mark the gastrocnemius as inactive during knee flexion because they categorize it mentally as an ankle muscle. Pointing to its proximal attachment at the femoral condyles before students complete that worksheet prevents the confusion, but having the landmark labeled in the diagram itself lets students catch the error independently rather than relying on teacher redirection.
How to Build These Worksheets Into Your Lesson Plans
The labeling exercises work well at the start of a unit as pre-assessment — distribute one before instruction begins, collect it ungraded, and use the results to see which muscle names are already familiar. Most students can identify "hamstrings" as a group but cannot name the individual muscles or specify medial versus lateral positioning. That gap tells you precisely where direct instruction needs to go first. After the teaching sequence, the same worksheet format becomes a post-assessment, making growth visible in a form students find satisfying.
The antagonistic pair analysis worksheets belong later in the sequence, after students have internalized the individual muscle names. Using them too early — before the naming is secure — creates cognitive overload, and students focus so hard on recalling muscle names that they miss the functional reasoning entirely. A reliable placement is the second or third day of the unit, once the labeling work is done and students need something that requires application rather than recall.
These knee muscle pdf worksheets also function well as lab station materials. Set up three stations — anterior thigh, posterior thigh, and accessory muscles — and rotate small groups through each. Students complete a worksheet at each station and compare answers before moving on. The rotation format distributes the cognitive demand across the period rather than concentrating it, which keeps engagement steady through a content-heavy topic.
Adjusting the Worksheets for Different Student Levels
For students who need additional support, the labeling worksheets work effectively with a word bank, or with one muscle per group pre-labeled so students have an orientation point before filling in the rest. Limiting the number of structures required in a single sitting — asking students to label only the quadriceps on day one rather than all knee muscles at once — prevents the shutdown that happens when a diagram presents too many blank lines simultaneously. The accessory muscle worksheet, in particular, should be delayed or simplified for students who are still consolidating the primary movers.
Students who move through the labeling tasks quickly can extend their work by annotating each muscle's origin-to-insertion path with a force vector — a simple arrow indicating the direction of pull — and then predicting the resulting joint angle change. This reframes anatomy as biomechanics and gives advanced students a genuine reasoning task rather than additional identification work. For ELL students, the Latin roots embedded in muscle names (vastus meaning "large," rectus meaning "straight," semi meaning "half," bi meaning "two") provide a vocabulary entry point that makes the terminology less arbitrary and easier to retain across a multi-day unit.
Standard Alignment
These worksheets align to NGSS HS-LS1-2, which asks students to develop and use a model to illustrate the hierarchical organization of interacting systems that provide specific functions within multicellular organisms. In classroom terms, this standard appears in units where students move from identifying individual structures — bones, muscles, tendons — to explaining how those structures operate as an integrated system. Knee musculature is an instructionally strong choice for this standard because the joint involves enough distinct structures that the hierarchy is genuinely present, not artificially imposed: four quadriceps heads, three hamstring muscles, multiple stabilizers, tendons, and ligaments all interact to produce and constrain movement. The antagonistic pair analysis exercises directly address the "interacting systems" language of the standard by asking students to describe how two muscle groups regulate each other through a full gait cycle.
Frequently Asked Questions
Can these worksheets be used in physical education as well as anatomy classes?
Yes. The functional movement sections — particularly the antagonistic pair exercises and the gait phase analysis — translate directly into physical education contexts, especially units on injury prevention or exercise science. PE teachers typically skip the insertion-point detail and focus on the functional descriptions, which these knee muscle pdf worksheets support without requiring the teacher to modify the materials significantly. The tendon-versus-ligament comparison is also a natural fit for PE units covering common knee injuries like ACL tears.
What prior knowledge do students need before using these worksheets?
Students should be familiar with basic anatomical directional terms — anterior, posterior, medial, lateral, superficial, and deep — and should understand what a joint is before attempting the labeling exercises. The functional worksheets additionally require students to know the difference between a muscle contracting concentrically and lengthening eccentrically. That distinction should be taught explicitly before the antagonistic pair exercises are assigned; students who encounter it for the first time inside the worksheet tend to skip the reasoning and guess.
Are these materials appropriate for middle school, or are they aimed at high school anatomy?
The labeling exercises and the tendon-versus-ligament comparison work well at the middle school level, particularly in 7th or 8th grade life science units on body systems. The antagonistic pair analysis and the gait phase breakdowns are better suited to high school, where students have enough abstract reasoning ability to work through the concentric-versus-eccentric distinction with limited teacher support. In practice, many teachers use both levels in the same classroom — the labeling worksheets go to all students, and the functional analysis worksheets go to students who are ready for that next step.
How do I keep early finishers productively engaged?
The accessory muscle worksheet includes an extension task asking students to predict what movement would become impossible or significantly impaired if the popliteus were injured, and to justify their answer using the muscle's origin, insertion, and mechanical action. Students who complete that extension can apply the same structural reasoning to the sartorius or gracilis. This "what if" reasoning keeps early finishers working on genuine analysis rather than busywork, and it generates responses worth discussing with the whole class during the debrief.
Clear All