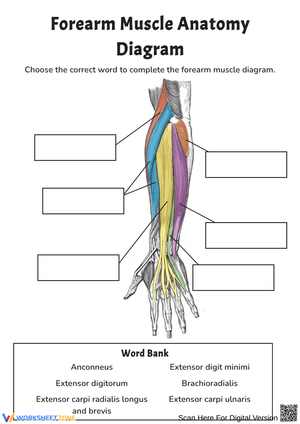
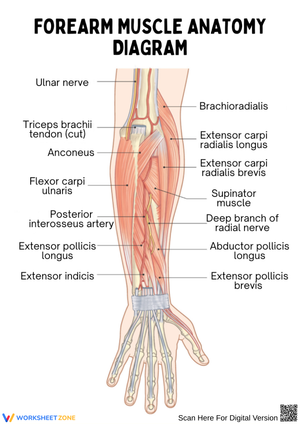
These forearm muscle printable worksheets give high school anatomy teachers a structured path through one of the densest regions of the muscular system — 20 muscles split across anterior and posterior compartments, organized into superficial, intermediate, and deep layers, each with distinct origins, insertions, and functional roles. The set keeps students moving through that complexity at a pace that allows actual retention rather than surface-level cramming the night before a test.
What's Inside the Set
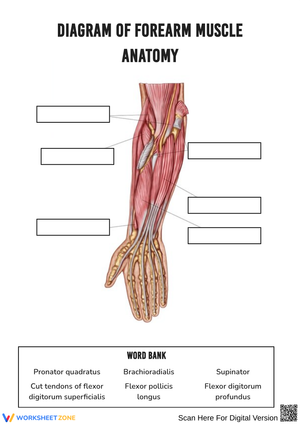
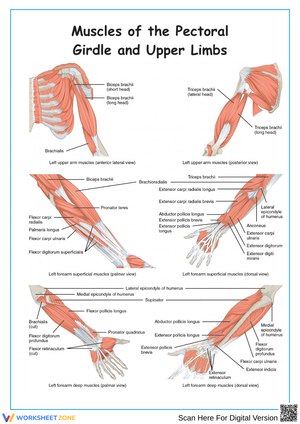
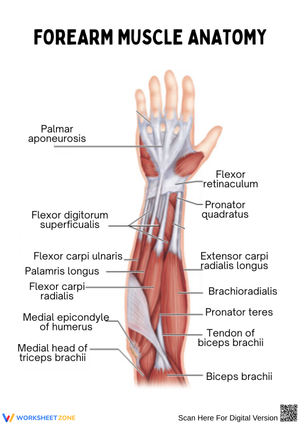
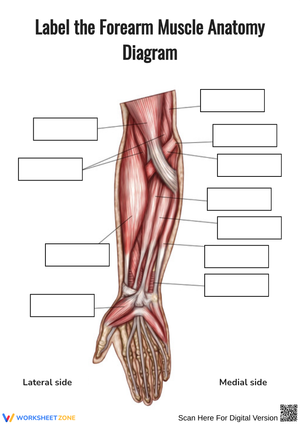
Each worksheet targets a defined anatomical slice. Some focus on a single compartment — anterior or posterior — with blank diagrams where students label muscle names and trace the broad path from origin to insertion. Others require students to sort all 20 muscles by compartment and layer, which builds the categorical thinking that makes information retrievable during a practical exam. A third category pairs function with anatomy: students match each muscle to its primary movement — flexion, extension, pronation, supination — and mark which compartment it occupies.
One worksheet specifically addresses the brachioradialis, a muscle that consistently surprises students because it sits in the posterior compartment yet acts as an elbow flexor rather than extending the wrist or fingers. That exception, handled deliberately, becomes a pivot point for teaching students to look past surface-level location when predicting function. A prompt in the set asks students to explain the discrepancy in a short written response rather than simply selecting from a list — so the reasoning shows up in their work, not just the result.
Mistakes Students Make That These Worksheets Help You Catch
The most consistent error in forearm anatomy is conflating compartment location with movement direction. Students who correctly learn that anterior compartment = flexion will still write "extension" for the brachioradialis because they assume posterior always means extensor. Catching that reasoning in a written response — rather than inferring it from a wrong circled answer — gives the teacher something specific to address before the unit exam.
Layer confusion is the second predictable stumbling block. Students who correctly identify the flexor digitorum superficialis in isolation will still draw it below the flexor digitorum profundus when labeling from memory. That spatial reversal matters beyond the quiz because the two tendons navigate the carpal tunnel in a specific stacking arrangement, and misreading that relationship creates real gaps when students later study carpal tunnel syndrome or flexor tendon injuries. The layered diagrams in this set ask students to annotate each muscle with its layer designation alongside its name, building the spatial habit before it becomes a clinical error.
How to Build These Worksheets Into Your Lesson Plans
The anterior compartment worksheets work well as an exit task on the day students first encounter the flexor group — five minutes, no notes, students fill in what stuck. Compare those attempts against the blank diagram completed at the unit's start, and you have a readable picture of what the class absorbed. The posterior compartment worksheets follow the same pattern a few sessions later. Both run again in the week before the unit exam as spaced retrieval practice, which consistently outperforms a single concentrated review session for anatomy retention at the high school level.
Station rotations suit this content well. One station runs blank anterior compartment diagrams; a second handles function-matching across both compartments; a third presents the brachioradialis exception alongside a brief clinical prompt about lateral epicondylitis. A fourth station — no paper involved — has students flex and extend their wrists while pressing a hand over the medial epicondyle, actually feeling the superficial flexors fire beneath the skin. That kinesthetic anchor makes the two-dimensional forearm muscle printable worksheets easier to complete accurately, because students are mapping a diagram they have already felt on their own arm.
Adjusting the Worksheets for a Range of Learners
Students who need additional support get the word bank — but the design choice matters. Arrange it sorted by compartment rather than alphabetically, so students still make a categorical decision before selecting an answer. That structure provides support without removing the thinking step that builds durable memory. Students who freeze at fully blank diagrams start with the partially labeled version, where either the name or the positional number is provided, and move to completely blank diagrams only after completing the guided version and being able to explain why each muscle is placed where it is.
For students who have already internalized all 20 names, the meaningful extension is clinical application. Assign a brief case description — a patient presents with weakness in wrist extension and finger extension following a lateral humeral fracture — and ask them to identify the likely affected muscles, the relevant nerve, and the functional deficits the patient would report. That transition from recall to anatomical reasoning is where a rigorous anatomy course is actually headed, and it surfaces clearly in how students respond.
Standard Alignment
These forearm muscle printable worksheets address NGSS standard HS-LS1-2, which calls for students to develop and use a model to illustrate how the hierarchical organization of interacting systems provides specific body functions. In classroom terms, students demonstrate how layered muscle groups within a compartment produce coordinated movements at the wrist and fingers. The function-matching worksheets in this set directly serve that standard by requiring students to connect structural position to functional output — not simply recite names from memory.
Frequently Asked Questions
Do these worksheets cover both compartments, or just one?
The set covers the anterior and posterior compartments in full, including all three layers of each. Each compartment has dedicated diagrams so students work through one side of the forearm at a time before moving to combined activities that require sorting all 20 muscles across both regions simultaneously.
How do I handle students who freeze when they see a fully blank diagram?
Start with the partially labeled version first. The forearm muscle printable worksheets in this set include diagrams that supply either the muscle name or the positional label — never both at once — giving students a reference point without surrendering the full answer. Move to completely blank diagrams only after students have completed the supported version and can articulate why each muscle belongs where it does.
Can the same worksheets serve review purposes without just repeating the same labeling exercise?
Yes. The function-matching and clinical application prompts shift the cognitive task without requiring new materials. A student who labeled the flexor carpi radialis correctly on Tuesday revisits it on Friday through a prompt asking which movements are lost when this muscle is damaged and how activities like gripping a pen or using a keyboard are affected. That shift from recall to application is where understanding consolidates into something students can actually use beyond the exam.