Hamstring Muscles Worksheets PDF for 11th Grade
These hamstring muscles worksheets pdf for 11th grade give anatomy and health science teachers a set of targeted exercises covering the posterior thigh musculature — labeling all three muscles of the hamstring group, mapping their origins and insertions to specific bony landmarks, and analyzing how these muscles function simultaneously across the hip and knee joints. Each worksheet targets a specific aspect of hamstring anatomy or mechanics, so teachers can use individual resources within a lesson without committing to the full set. The resources work as pre-lab preparation, in-class guided practice, or a unit review before a musculoskeletal assessment.
What the Set Covers
The three muscles of the hamstring group — biceps femoris, semitendinosus, and semimembranosus — appear in multiple worksheets with increasing analytical depth. The set moves from identification toward applied biomechanics, addressing these core areas:
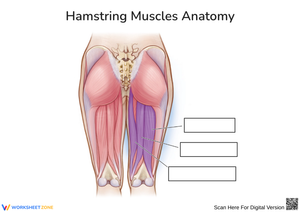
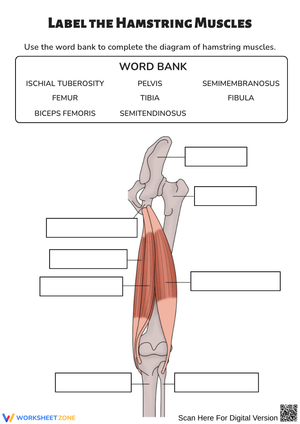
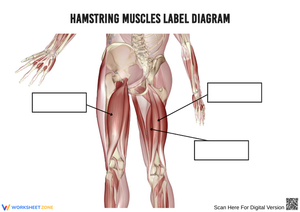
- Posterior thigh diagram labeling, with students distinguishing lateral from medial muscle positioning
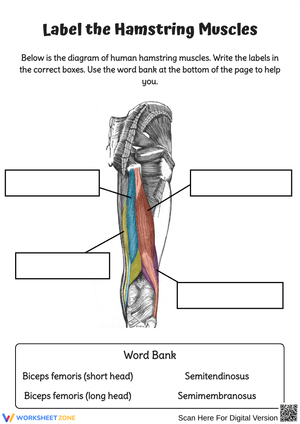
- Origins and insertions table work, including separate entries for the long and short heads of the biceps femoris
- Biarticular mechanics and active insufficiency, using hip-and-knee positioning scenarios
- Agonist-antagonist analysis during specific movement patterns, including sprint mechanics and leg curl exercises
The biceps femoris receives particular attention because its long head and short head originate from different structures — the ischial tuberosity and the posterior femoral shaft, respectively. Students who study only a textbook summary miss the functional consequence of that difference: the short head cannot contribute to hip extension because it never crosses the hip joint. The worksheets treat that distinction as an explicit learning objective rather than a footnote.
The active insufficiency exercises push the set past standard identification work. Students predict which combined joint position produces the weakest hamstring contraction, then explain the mechanism — a task requiring them to integrate the biarticular anatomy they labeled earlier with an understanding of how muscle fiber length affects force output. That reasoning level appears on AP Biology assessments and in college-prep physiology coursework.
Common Errors Worth Catching Before They Calcify
The most persistent error at this level is treating the hamstring group as a single undivided structure. Students who can name all three muscles will still shade one uniform mass on a posterior thigh diagram. When each worksheet requires them to mark each muscle separately and use distinct colors, the confusion becomes visible and correctable. Students who have genuinely internalized the lateral-medial boundary draw three distinct structures; students who haven't reveal it immediately.
The short head of the biceps femoris generates a reliable second error. Students who generalize that all hamstrings originate from the ischial tuberosity will mark the short head incorrectly every time — and feel confident doing it, because the generalization is almost true. Worksheets that include a separate row for each head of the biceps femoris in the origins table force students to confront the exception directly before it becomes a test-day mistake.
Active insufficiency produces a third consistent error worth addressing before students touch the related worksheet questions. Most students write that the hamstrings feel weaker at full hip flexion because the muscle is "stretched too far." That inverts the mechanism. Active insufficiency describes a shortened muscle that can no longer generate adequate tension at a second joint — not an over-lengthened one. The hamstrings lose force when the hip is already flexed and the knee is simultaneously being asked to flex: the muscle has been shortened at the hip end and has little contractile range left for the knee. A brief physical demonstration before the worksheet — students sitting upright versus leaning forward while trying to pull the heel toward the seat — gives them the sensory reference they need to write the explanation correctly.
How to Build These Worksheets Into Your Lesson Plans
The identification and labeling worksheets work best early in a musculoskeletal unit, after students have been introduced to origin and insertion as concepts but before instruction moves into force generation or injury mechanics. Assigning one the evening before a lab session — whether that lab uses plastic anatomical models, virtual dissection software, or cadaver photographs — gives students enough familiarity with the three muscles that they arrive looking for specific structures rather than passively observing an undifferentiated mass of tissue.
For in-class use, the hamstring muscles worksheets pdf for 11th grade agonist-antagonist analysis exercises fit well into a 20-minute guided-practice block during movement mechanics instruction. Pair them with a brief physical check: have students press their fingertips into the back of the thigh just above the knee crease while they slowly flex and extend against light manual resistance from their other hand. Feeling the biceps femoris activate on the lateral side while the semimembranosus and semitendinosus engage medially gives students a tactile anchor that makes the diagram work more meaningful. Students can annotate their worksheets in real time as they process the sensation.
The active insufficiency worksheet functions well as an exit ticket. Three to five minutes at the end of a lesson on biarticular muscles is enough time for students to answer one application question — "Why does a sprinting athlete have reduced knee flexion force available from the hamstrings when the hip is near full extension?" — and the responses give immediate formative data before the next session.
Standard Alignment
The content across this set aligns with NGSS HS-LS1-2 (From Molecules to Organisms: Structures and Processes), which requires students to develop and use a model to illustrate the hierarchical organization of interacting systems within multicellular organisms. The hamstrings offer a direct application: students trace structure from individual muscle fibers, to whole muscles with distinct attachment geometries, to a multi-muscle group operating within the larger locomotor system. That cell-to-tissue-to-organ-to-system progression is precisely what HS-LS1-2 targets. Anatomy teachers in NGSS-aligned states find this content fits the standard without needing to reframe it, and the biomechanics application questions support the science practice component of that standard as well.
Differentiating the Set Across Student Levels
Students who struggle with anatomical terminology work more effectively when they have a pre-labeled reference diagram available alongside each worksheet. This reduces the cognitive load of decoding unfamiliar Latin-derived terminology — semimembranosus and semitendinosus are genuinely difficult for students new to this vocabulary — so attention stays on understanding function rather than on spelling. The hamstring muscles worksheets pdf for 11th grade resources allow for this kind of side-by-side arrangement without requiring any modification to the worksheets themselves.
For students who move through identification tasks quickly, the biomechanics application questions in the set provide real challenge. Asking a student to explain how a hamstring strain at the musculotendinous junction impairs both hip extension and knee flexion — and to specify which head of the biceps femoris produces the greatest functional loss depending on injury location — requires simultaneous integration of origin-insertion knowledge, force generation principles, and injury anatomy. That level of synthesis is appropriate for students working toward AP Biology, sports medicine, or pre-health pathways.
Pair work also serves the mid-range learner well. Having one student verbally trace an origin-insertion sequence while a partner checks the diagram catches the quiet errors that confident solo work misses — particularly the ischial tuberosity error on the biceps femoris short head, which students will mark without hesitation until they have to say it aloud to someone who can ask a follow-up question.
Frequently Asked Questions
Do these worksheets include only diagrams to label, or do students also analyze function?
Each worksheet combines identification and analysis. The identification components ask students to name muscles, mark origins and insertions on specific bony landmarks, and distinguish lateral from medial positioning. The analysis questions require written explanations — why the hamstrings produce both hip extension and knee flexion, how hip angle affects available contraction force, and how these muscles stabilize the knee during rapid extension. The two components reinforce each other: students who complete the labeling first bring concrete anatomical reference to the written questions rather than reasoning in the abstract.
What background knowledge do students need before using these worksheets?
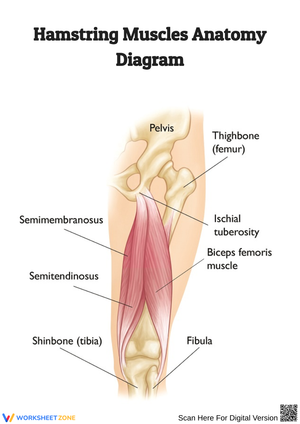
Students need working familiarity with the major bones of the lower limb — femur, tibia, fibula, and pelvis — because the worksheets reference specific landmarks including the ischial tuberosity, the head of the fibula, and the medial tibial condyle. If the skeletal unit hasn't been covered yet, providing a brief reference diagram of those landmarks alongside each worksheet prevents terminology confusion from stalling the anatomical work. This set does not re-teach skeletal anatomy; that foundation needs to come from prior lessons.
Can physical education or health science teachers use these resources, or are they written only for biology classes?
Physical education and health science teachers have used these worksheets effectively in units on injury prevention and movement mechanics. The hamstring muscles worksheets pdf for 11th grade content is grounded in anatomy, but the application scenarios — sprint mechanics, knee stability during deceleration, the tissue mechanics of a hamstring strain — map directly onto kinesiology and PE curricula. The vocabulary is consistent with both biology and sport science contexts at this grade level.
How do the worksheets handle the biceps femoris, given that its two heads originate from different structures?
Several worksheets treat the dual-head origin of the biceps femoris as an explicit teaching point rather than a passing detail. Students complete a table with separate rows for the long head and short head, record the distinct origin structure for each, and then explain the functional consequence — the short head's femoral origin means it contributes only to knee flexion, not hip extension. Many textbook summaries collapse this into a single entry, so the worksheets address the distinction as a primary objective rather than a supplementary note.
Clear All