These 3rd grade tulip worksheets printable resources give teachers a ready-built set for the spring life science unit — covering the tulip's full life cycle, underground bulb anatomy, and the persistent student confusion between bulbs and seeds. The work spans labeled diagrams, life-cycle sequencing, and bulb-to-seed comparison tasks, each building the precise vocabulary students need before any written assessment.
Skills These Worksheets Target
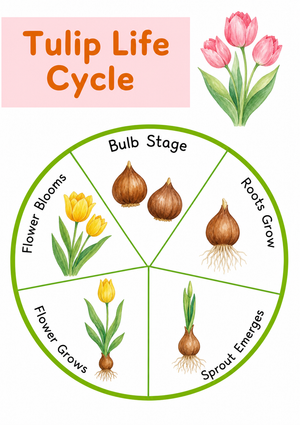
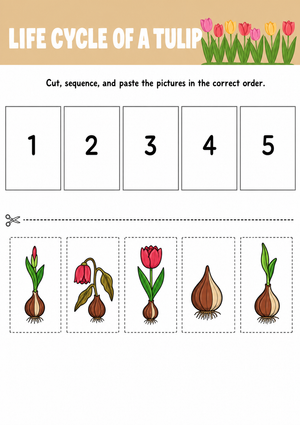
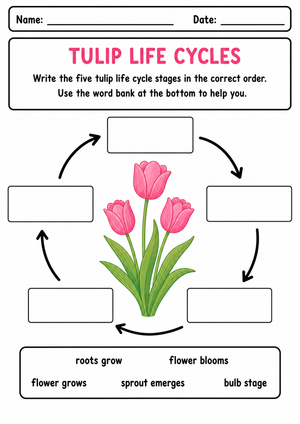
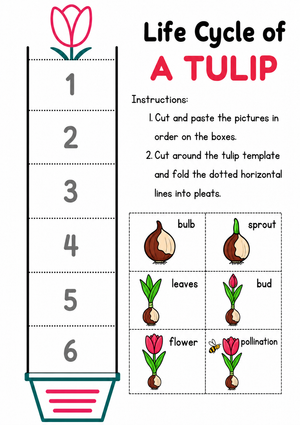
The set focuses on four content areas that appear directly in third-grade life science instruction. First, students sequence the tulip's life cycle through five stages: dormancy, sprouting, leaf emergence, bud formation, and bloom. This is not the generic "seed to plant" arc most students have already encountered — the tulip cycle introduces vernalization, the cold-period requirement that triggers spring growth, which makes it a richer and more demanding model than annual flowers or common classroom vegetables. Second, students label a cross-section of the bulb, identifying the basal plate, fleshy scales, and the dormant shoot nestled inside. Third, they name the above-ground flower structures — petals, stamen, and pistil — and record a function for each. Fourth, comparison tasks ask students to contrast a tulip bulb with a typical seed, examining energy storage method, size, and what the plant can accomplish before photosynthesis even begins.
Mistakes Students Make That These Worksheets Help You Catch
The most reliable error to watch for is the bulb-as-seed conflation. Hand a third grader a tulip bulb and a packet of marigold seeds, and a significant portion will describe the bulb as "a really big seed." This isn't careless — it reflects a genuine gap in how students categorize plant reproductive structures. The correction matters because a bulb is a modified leaf structure carrying a fully formed, dormant plant along with a large stored energy supply, not an embryo the way a seed is. Worksheets that pair cross-section diagrams of both side by side make this structural distinction visible in a way that verbal explanation alone usually does not.
A second pattern is sequencing the life cycle as linear and terminal. Students write: sprout → grow → bloom → die. They omit dormancy entirely or drop it at the end as a synonym for death, rather than recognizing it as an active, recurring phase. When the sequencing worksheet presents dormancy twice — once at the start and once at the close of the cycle — that structural decision alone tends to produce the "aha" moment about perennial plants that a single-pass diagram rarely achieves.
A third error shows up in the flower anatomy work: students consistently misidentify the pistil as the pollen-producing structure because it occupies the visual center of the flower. The stamen, plural and smaller, gets overlooked or labeled backward. Having students draw an arrow from each structure to a written function, rather than simply placing a label, forces them to confront what each part actually does rather than where it sits.
Standard Alignment
The primary standard these worksheets address is NGSS 3-LS1-1, which asks students to develop models showing that organisms have unique and diverse life cycles but share common stages: birth, growth, reproduction, and death. The tulip is a strong vehicle for this standard because its cycle departs from the familiar annual-seed model, requiring students to apply the framework to a genuinely different organism rather than repeat the same bean-sprout sequence. The anatomy and flower-parts work also connects to understanding how physical structures support survival and reproduction, a thread that runs through the broader LS1 framework across the third-grade band.
Fitting These Into Your Spring Science Unit
A three-day sequence tends to work well. On day one, pair a short text about geophytes with the bulb anatomy worksheet and hand each student an actual tulip bulb to peel while they complete the cross-section labeling. The weight difference between a dry autumn bulb and a spring-sprouted one is worth noting aloud — students can hold both and register that the sprouted bulb is lighter because it has spent stored energy pushing the shoot upward. That physical evidence lands harder than any diagram explanation. Day two shifts above ground, with the flower anatomy worksheet alongside a real or photographed bloom. Day three tackles the life cycle sequence, which works well as a cut-and-paste task during the main science block or as a Monday warm-up when recent content recall is being tested.
These 3rd grade tulip worksheets printable sets also work as science center rotations during the two weeks surrounding a classroom bulb-planting project. Students who finish planting early move directly to the sequencing worksheet, using the physical act of pressing a bulb into soil to anchor the dormancy stage in memory before the abstract diagram work begins.
Adjusting the Set for a Range of Learners
For students still building science vocabulary, the 3rd grade tulip worksheets printable labeling tasks work better when a word bank is provided and terms are introduced in a brief mini-lesson before students work independently. The anatomical vocabulary here — pistil, stamen, basal plate, vernalization — is genuinely demanding for third grade, and encountering an unfamiliar term mid-task tends to stall students who would otherwise manage the diagram work without difficulty.
Students who move through the material quickly benefit from an open-ended extension attached to the comparison worksheet: ask them to identify a second geophyte — garlic, onion, and daffodil all work — and predict whether its cycle would match the tulip's based on the shared bulb structure. That task requires applying what they've learned rather than restating it. For students needing additional support, the life cycle sequencing worksheet can be completed using image cards only, deferring the written caption work until the correct sequence itself is secure.
Frequently Asked Questions
Do these worksheets include answer keys?
Yes. Each worksheet comes with a corresponding answer key that includes the correct labels, sequences, and comparison responses. The anatomy answer keys list the function of each structure alongside the name, so teachers can reference them during class discussion without pulling a separate resource.
When in the unit should the flower anatomy worksheet be introduced?
The flower anatomy work is most effective after students have handled an actual bulb and understand that the above-ground tulip structure exists to serve the underground one. Introducing the flower parts before that foundation is in place tends to produce rote label-memorizing rather than functional understanding. Most teachers find day two of the unit — once the bulb biology is established — is where the flower anatomy worksheet produces the most durable learning.
Can these be used as part of a general plant unit rather than a dedicated tulip study?
The 3rd grade tulip worksheets printable format is specific enough that the set works best inside a focused tulip or geophyte unit rather than as a general plant-parts review. The labeling tasks, life cycle stages, and bulb-seed comparison all assume tulip-specific vocabulary and structure. That said, the comparison worksheet serves as a natural bridge to a broader class discussion about how different plants store energy — onions, garlic, and daffodils share enough structural overlap to extend the conversation productively.
How long does each worksheet take to complete?
The labeling worksheets — bulb anatomy and flower parts — typically run eight to twelve minutes when vocabulary has been pre-taught. The life cycle sequencing worksheet takes longer if students are cutting and pasting, usually fifteen to twenty minutes including cleanup. The comparison worksheet, which calls for written responses, takes the most time and works better positioned as an independent work task during a longer science block than as a quick warm-up activity.