9th Grade Eye printable worksheets: Comprehensive Biology Resources
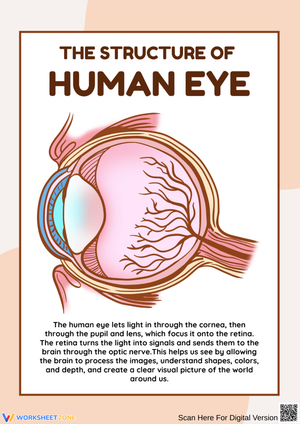
These 9th grade eye printable worksheets give biology teachers a set of standalone resources that move students from basic structure identification into the functional physiology that ties the eye to the nervous system. Each worksheet addresses a distinct layer of complexity — structural anatomy, light refraction, photoreceptor distribution, or refractive error correction — so teachers can pull one to fill a specific gap or deploy the full set across a complete unit. The resources include labeling exercises, light-pathway tracing tasks, ray diagrams for accommodation, and applied case studies on vision defects.
Anatomy and Physiology Skills These Worksheets Build
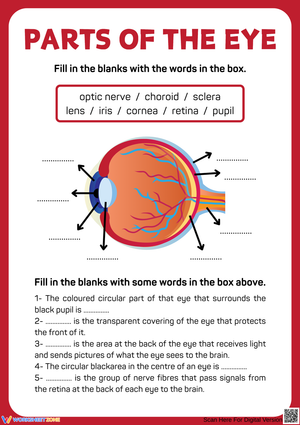
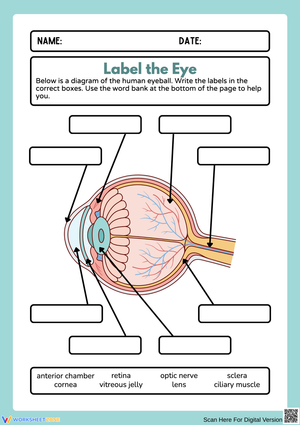
The 9th grade eye printable worksheets in this set move students across two distinct skill types simultaneously — anatomical identification and functional explanation. On the anatomy side, students label and distinguish the three tunics: the fibrous layer (sclera and cornea), the vascular layer (choroid, ciliary body, and iris), and the nervous layer (retina). Labeling alone isn't the goal; each worksheet asks students to state what each structure does, which catches the extremely common situation where a student correctly places the ciliary body on a diagram but cannot explain how it controls lens curvature.
On the physics side, students trace the path of light from cornea through aqueous humor, pupil, crystalline lens, and vitreous humor to the fovea centralis, annotating where refraction occurs at each interface. Accommodation exercises push deeper — students draw the lens in its rounded and flattened states and explain which ciliary muscle state produces each shape. Additional skills across the set include:
- Comparing rods and cones by location, light threshold, and function — the retina holds roughly 120 million rods concentrated in the periphery and approximately 6 million cones packed into the fovea
- Distinguishing aqueous humor from vitreous humor by composition, location, and functional role — anterior pressure regulation versus posterior structural support
- Analyzing myopia, hyperopia, and astigmatism using ray diagrams that show where light converges relative to the retina, then matching each condition to the corrective lens type
- Connecting the optic disc's complete absence of photoreceptors to the functional blind spot and explaining the anatomical reason for it
- Mapping the visual pathway from retinal phototransduction through the optic nerve to the occipital lobe, reinforcing that visual processing is a nervous system function, not purely an eye function
Frequent Student Errors Worth Watching For in This Unit
Several predictable misconceptions surface in eye anatomy work, and knowing them going in shapes how you structure direct instruction before students commit the wrong idea to memory.
The humor confusion is nearly universal. Students encounter "aqueous" and "vitreous" and assign functions arbitrarily. The error that appears most consistently on assessments is writing that the vitreous humor maintains intraocular pressure — which inverts the actual relationship. The aqueous humor is the pressure-regulating fluid in the anterior chamber; the vitreous humor is the gel that holds the posterior eye spherical. Students who mislearn this carry it all the way to the unit exam without correction if the distinction isn't made explicit early.
Accommodation direction is another reliable trouble spot. Many students correctly identify that ciliary muscles change lens shape but get the direction backwards — they write that the lens flattens when focusing on a near object. The actual relationship: the lens rounds (increases curvature) for near focus and flattens for distant objects. Worksheets that include side-by-side ray diagrams showing both states force students to commit to a specific directional claim rather than describe the concept in vague, untestable terms.
Photoreceptor geography trips up most students at least once. Cones in the periphery and rods in the fovea — the exact reversal of reality — appears regularly in unit assessments. The confusion probably traces to how the cells are introduced: rods first, cones second, and students lock onto that order. Diagrams that shade the foveal region distinctly and label the cone-dense macula help, but they need to appear more than once across the unit for the correct geography to hold.
Finally, students who successfully complete the "disappearing dot" blind spot demonstration still write, on formal assessments, that the optic disc contains a low density of photoreceptors rather than none at all. At the 9th-grade level, where anatomical precision is the expectation, that distinction matters. The blind spot mapping exercise described in the classroom section below — where students plot the actual extent of their blind spot using a moving target and recorded coordinates — forces more careful thinking about what it means for a retinal region to contain no receptors.
Recommended Lesson-Planning Strategies for These Worksheets
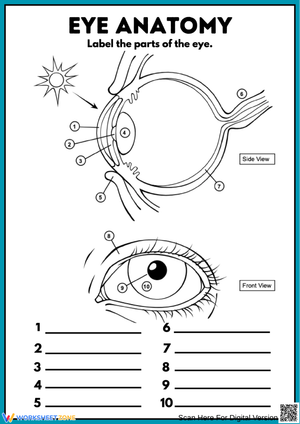
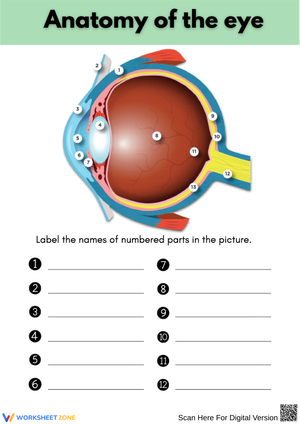
The blank labeling diagram works best as a day-one pre-assessment. It shows immediately which students carry accurate knowledge from middle school life science and which are working from partial or inverted impressions of eye anatomy. That information shapes how much time to spend on vocabulary and structural orientation before pushing into physiology — and it gives you a natural comparison point when students complete the same diagram style mid-unit.
Mid-unit, the 9th grade eye printable worksheets on light pathways and accommodation fit naturally alongside a cow eye dissection. The worksheet functions as a field guide during the dissection — students use it to identify the vitreous humor by its gel consistency, locate the tapetum lucidum (present in the bovine eye, absent in humans), and attempt to find the fovea on the intact retina without tearing it. Having the printed reference in hand keeps students oriented when the specimen looks nothing like a clean textbook diagram, which is most of the time.
The blind spot mapping exercise in the set asks one student to move a small, high-contrast target slowly across a white surface while a partner records the coordinates where the target disappears and reappears. The resulting data lets students calculate an approximate diameter for their own optic disc. It takes about 12 minutes and converts what usually registers as a novelty trick into a data-collection activity with a measurable anatomical result — the kind students are more likely to actually remember a week later.
The vision defects worksheet lands better when assigned after students have internalized the refraction pathway, not simultaneously with accommodation. Students need a confident understanding of where light is supposed to converge before they can reason about why it misses. Teachers who assign vision defects too early tend to get responses that describe symptoms without demonstrating any understanding of the structural cause.
Standard Alignment
These worksheets align with NGSS HS-LS1-2, which calls for students to develop and use a model to illustrate how cells and body systems receive and process information. The eye is one of the most accessible entry points for this standard — its structures are visible and discrete enough that students can reason about function from form, which is exactly what the standard requires. At the 9th-grade level, this standard typically appears early in a body systems unit, before students move into neuron signal processing more broadly. The eye serves as a concrete, spatial model of receptor function before the concept becomes more abstract at the cellular and molecular level.
Several state frameworks aligned to the Next Generation Science Standards also connect eye anatomy to the physics of refraction, which opens a legitimate cross-disciplinary link to physical science. Teachers working in schools with integrated science sequences can use the ray diagram exercises to reinforce both the biological and physical science dimensions of vision within the same lesson.
Differentiating These Worksheets Across Ability Levels
The labeling worksheets adjust easily across ability levels by changing the support structure without changing the core task. Students who need more guidance work from a diagram pre-populated with a word bank and a reference key. Students working toward greater independence label without the bank and add a brief function note beside each structure. That second version — identification plus function — is worth assigning to most students by mid-unit, because it reliably surfaces the specific mismatch of correct labeling paired with incorrect functional understanding.
The ray diagram exercises need some adjustment for students who haven't yet encountered refraction in a physical science course. A brief guided-practice insert — showing how to draw an incident ray and a refracted ray through a single converging lens before applying the same reasoning to the cornea and crystalline lens — closes that gap without requiring teachers to slow the biology content down significantly.
For students ready to go further, the vision defects worksheet extends naturally into a comparative case study: given a set of patient prescription data, students determine whether the defect involves corneal irregularity, axial length variation, or reduced lens flexibility, and propose a corrective approach. These 9th grade eye printable worksheets carry enough built-in variation across the set that most mixed-ability classrooms can work from the same resources at different depths, without requiring teachers to generate entirely separate materials for each tier.
Frequently Asked Questions
Do these worksheets work alongside a cow eye dissection?
They work well in that context — some of the strongest dissection lessons use a labeling worksheet as a structural guide so students know what they're looking for before they make the first cut. The bovine eye differs from the human eye in two ways worth flagging explicitly: it contains a tapetum lucidum, which produces the visible reflective layer in the posterior chamber, and the lens is considerably firmer than the diagrams suggest. Having a printed diagram in hand during the dissection helps students translate between the idealized illustration and the actual, often messy specimen in front of them.
How do these worksheets handle refraction for students who haven't covered it in physical science yet?
The light-pathway exercises introduce refraction in biological terms — the cornea bends incoming light rays toward the retina, the lens fine-tunes that focus — without requiring students to apply Snell's Law or calculate angles of incidence. The ray diagrams are conceptual rather than quantitative. Students who have covered physical optics can engage at a deeper level; students who haven't can still complete the exercises accurately using the biological reasoning alone. Teachers in integrated science programs sometimes use these worksheets as the context for first introducing refraction in the physics strand as well.
What's the most effective way to use these worksheets before a unit exam?
The function-focused worksheets — where students explain what each structure does rather than just name and locate it — serve the strongest review purpose. Spaced retrieval is more durable than re-reading notes the night before a test: assigning a review worksheet two or three days before the exam produces better recall on the test itself than assigning it the evening before. The vision defects worksheet works particularly well as a pre-exam activity because it asks students to integrate structure, refraction mechanics, and clinical outcome — three threads that a well-constructed unit exam will almost certainly pull on simultaneously.
Clear All