Hand printable worksheets: Anatomy Activities for the Classroom
These hand printable worksheets resources give anatomy and life science teachers a direct route into one of the curriculum's most structurally dense topics — a region with 27 bones, two separate muscle systems, and an opposable thumb whose functional significance students rarely grasp until they try picking up a pencil with their thumb taped back. Each worksheet targets a distinct layer of that content, from basic bone group identification to structure-and-function analysis grounded in how the hand actually moves. The set works across upper elementary through high school, with each worksheet stepping up in technical demand.
What Each Worksheet Covers
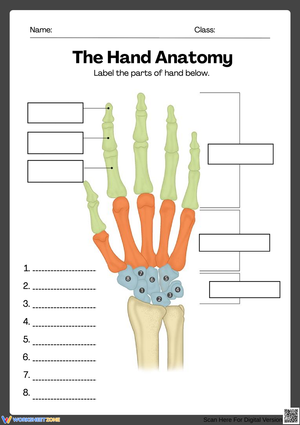
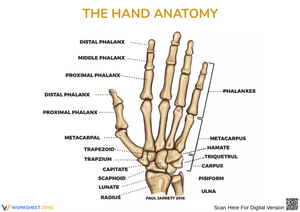
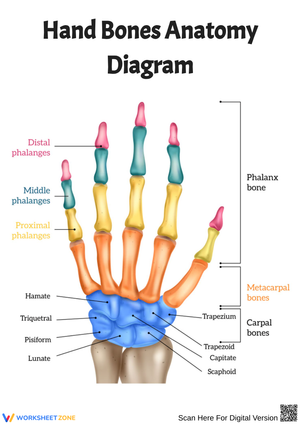
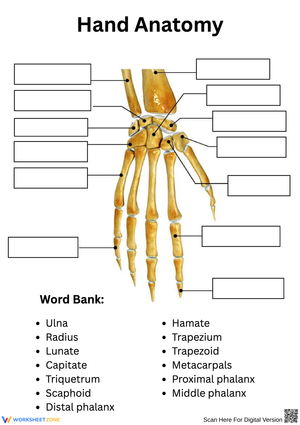
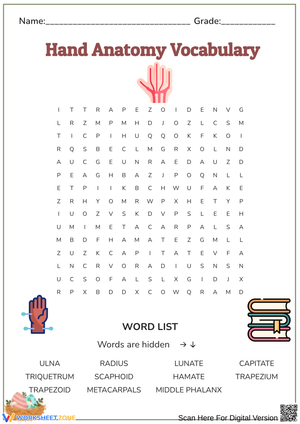
The skeletal content divides into three bone groups that appear in every labeling task at some level: the 8 carpals arranged in two rows across the wrist, the 5 metacarpals forming the palm, and the 14 phalanges distributed across fingers and thumb. Labeling worksheets present accurate palmar and dorsal views with blank callout lines or numbered reference points. Basic versions ask students to identify the three groups by region; advanced versions require naming individual carpal bones — scaphoid, lunate, hamate — and distinguishing the proximal, middle, and distal phalanges on each digit.
Several worksheets address the two-muscle-system architecture that gives the hand its range. Students mark the origin points of extrinsic muscles in the forearm and trace tendon pathways across the wrist to show how grip and flexion are generated at a distance. Intrinsic muscles — the thenar group at the thumb's base, the hypothenar group along the pinky side, and the lumbricals running between metacarpals — appear on separate diagrams where students label each structure and match it to the specific motion it controls. One worksheet presents six grip types (pinch, power, lateral pinch, hook, span, and precision) and asks students to identify which muscle groups and bone segments are primarily engaged in each.
Comparative anatomy is also part of the set. Two worksheets place homologous limb diagrams side by side — human hand, bat wing, whale flipper, dog foreleg — and direct students to identify shared bone structures before writing an evidence-based claim about what the comparison suggests about vertebrate evolution. This work targets argument-from-evidence reasoning, not just anatomical recall.
Sequencing These Worksheets Within Your Unit Plan
The worksheets work best when they follow direct manipulation rather than opening it. Before any diagram reaches student desks, have them press a finger against the inside of their opposite wrist while flexing each finger individually — they will feel distinct tendons shift under the skin, and that tactile moment makes tendon diagrams immediately meaningful rather than abstract. The basic skeletal labeling worksheet fits well on the same day as that brief exploration.
A straw-and-string model activity is a reliable sequence builder. Students construct a simplified hand using drinking straws for bones, kitchen string threaded through the straws for flexor tendons, and tape at the joints for ligaments. When they pull the trailing string ends, the straw fingers curl. Running this activity the day before the structure-and-function hand printable worksheets tasks means students arrive at the diagram already holding a physical theory about what tendons do. The shift from model to worksheet happens in the same class block, and students transfer labels with noticeably less confusion about which structures cross the wrist versus which stay within the hand.
For a Friday review block or the opening 12 minutes after returning from a school break, the comparative anatomy worksheets are particularly productive. Students complete the diagram identification portion independently while the room settles, then move into a brief whole-group discussion about the evolutionary claim. These worksheets also serve as a natural entry point for teachers running a comparative anatomy unit rather than a body systems unit — the framing shifts slightly, but the content stands on its own.
Student Errors That Show Up Consistently in This Unit
The carpal-metacarpal boundary is where most students go wrong first. On a standard palmar view, students who correctly identify "wrist" as the carpal region frequently draw that boundary too far distally, folding the metacarpals into the wrist zone. The result is a diagram where the palm disappears anatomically — students have labeled carpals and phalanges with nothing in between. The most direct fix: have students count backward from the five metacarpophalangeal joints, which are the visible knuckles. Those landmarks mark the distal edge of the metacarpal region, and working inward from there resets the boundary without re-teaching the whole diagram.
Phalange numbering trips up students at every level. The proximal-to-distal convention — counting outward from the knuckle toward the fingertip — runs counter to students' intuition, which assumes "first" means the part they use most deliberately, i.e., the fingertip. In actual student work, the most consistent error is labeling the distal phalange as "proximal" on the index finger, with confusion compounding across the remaining digits. Using the thumb as the anchor case is effective: with only two phalanges and no middle position, the proximal-distal distinction is unmistakable there, and students can apply the same logic to the four fingers once the principle clicks.
On the comparative anatomy worksheets, students regularly conflate homologous structure with similar function, writing claims like "the bat wing and human hand are related because both are used for movement" — which describes analogy, not homology. The worksheets address this by explicitly prompting students to reference bone count and arrangement in their evidence, but teachers still need to intercept this reasoning pattern during the writing step rather than after papers are collected.
Adapting the Set Across Grade Levels and Learner Profiles
For grades 4 and 5, remove individual bone naming and focus on three-group identification with color-coding — one color per region, applied directly to the diagram before any labels are written. This visual sorting step gives younger students a spatial map before vocabulary enters the picture, keeping working memory free for the conceptual task rather than the retrieval task. These students also benefit from tracing their own hands onto the worksheet margin and marking the knuckle joints as physical reference points before labeling begins.
Middle school students handle the full skeletal labeling and basic muscle identification without significant modification. For English language learners at any grade, providing a labeled reference diagram alongside the blank one shifts the task from cold recall to verification — students still have to understand and accurately place each term, but vocabulary acquisition in a second language is not what gets measured. That adjustment takes 30 seconds to make during copying and meaningfully changes what the worksheet actually assesses.
At the high school level, the hand printable worksheets tasks extend naturally into clinical annotation. Students add margin notes describing one injury associated with each structure they have labeled — scaphoid fracture from a fall on an outstretched hand, carpal tunnel syndrome from repetitive tendon compression, trigger finger from a locked flexor tendon sheath. This annotation layer connects anatomical precision to applied reasoning and produces writing substantive enough to function as a brief formative assessment of real comprehension.
Standard Alignment
The skeletal labeling and structure-function worksheets align with NGSS MS-LS1-3, which asks students to construct an argument supported by evidence that the body is a system of interacting subsystems composed of groups of cells. In classroom terms, this standard requires students to move past naming structures and demonstrate how those structures operate together to produce a function — exactly the reasoning the muscle-tendon diagrams and grip-analysis tasks demand. The comparative anatomy worksheets support NGSS MS-LS4-2, which addresses how anatomical similarities among organisms provide evidence for evolutionary relationships. Teachers running an integrated life science course can use the hand anatomy set to address both standards concurrently without carving out a separate instructional block.
Frequently Asked Questions
Which worksheets are appropriate for a 5th-grade body systems unit?
The basic three-group skeletal labeling worksheet and the tracing-and-identification worksheet are the right entry points at grade 5. Individual carpal naming and muscle-tendon diagrams are not developmentally appropriate at that level — elementary standards address major structures and broad function, not fine anatomical nomenclature. The three-group approach covers enough structural detail to meet those standards without burying students in terminology they won't revisit until middle school.
Do students need prior anatomy vocabulary to use these worksheets?
No prerequisite vocabulary is assumed. Each worksheet includes a reference section with key terms defined in plain language. Students who have already covered basic cell and tissue types will move through the muscle identification sections more efficiently, since they understand why muscle tissue generates force rather than treating it as an arbitrary fact to memorize — but prior knowledge is useful, not required.
What is the most effective approach to teaching the eight carpal bone names?
The mnemonic Some Lovers Try Positions That They Cannot Handle — Scaphoid, Lunate, Triquetrum, Pisiform, Trapezium, Trapezoid, Capitate, Hamate — is widely used. It works best when students write it out themselves in the same order they are labeling the diagram rather than memorizing it separately from the anatomy. Students who construct their own sentence using those same eight first letters retain the sequence significantly longer than students who borrow a pre-made phrase, because building the mnemonic forces an additional retrieval pass through the bone names.
How does sequencing change when using these worksheets in a comparative anatomy unit versus a body systems unit?
In a body systems unit, lead with the skeletal and muscle labeling worksheets and use comparative anatomy as a closing synthesis activity. In a comparative anatomy unit, open with the homologous structure comparison and use detailed human hand labeling as the follow-up that grounds the evolutionary argument in precise anatomical evidence. The hand printable worksheets materials work in both sequences without modification — it is entirely a sequencing and framing decision based on where in the course the unit falls.
Clear All