These heart anatomy worksheets printable give middle and high school biology teachers structured materials for the part of cardiovascular instruction that most textbooks underserve — the gap between "students can name the chambers" and "students can trace deoxygenated blood from the vena cava to the pulmonary arteries without reversing direction." The set covers chamber identification, valve function, blood flow sequencing, and major vessel recognition in formats that move from basic recall toward functional application. Each worksheet stands alone, so teachers pull the one that fits the day's lesson rather than working through a fixed sequence.
Structures and Skills Covered Across the Set
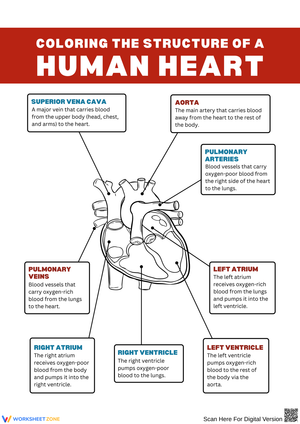
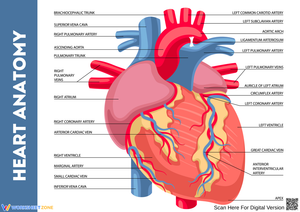
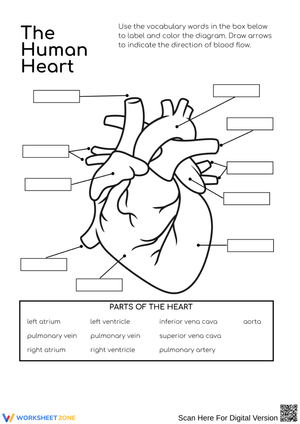
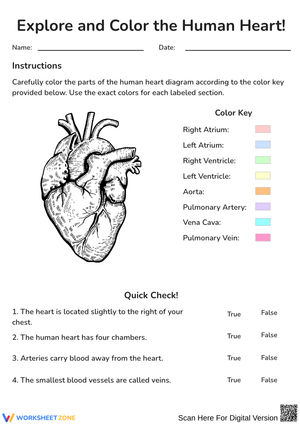
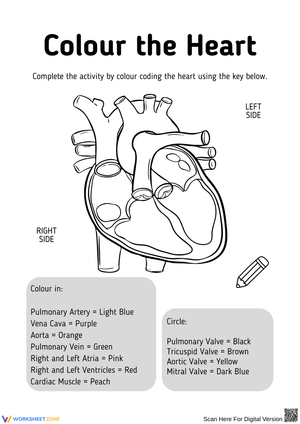
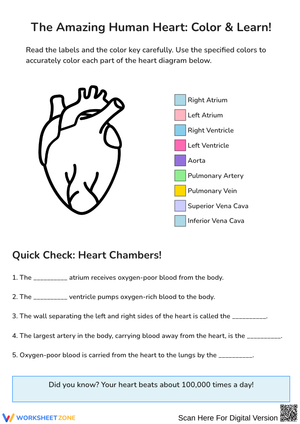
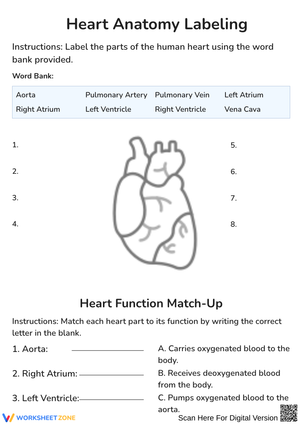
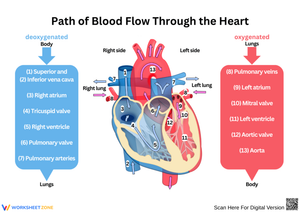
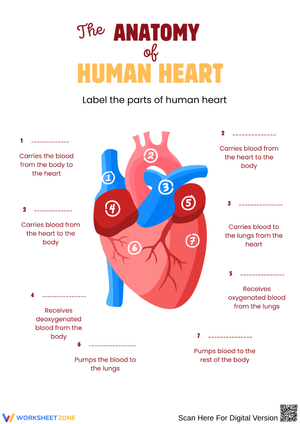
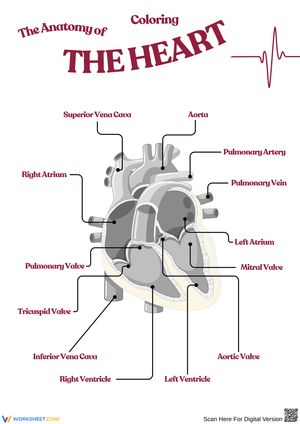
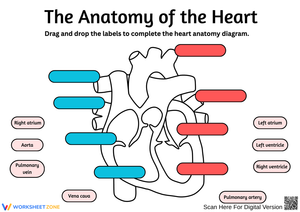
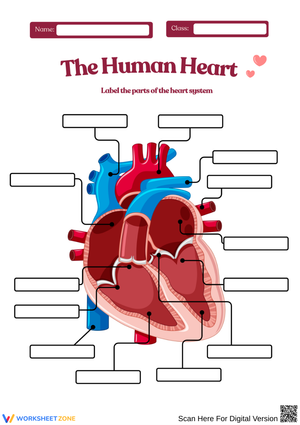
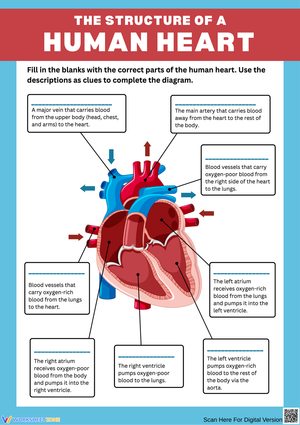
Each worksheet targets a distinct layer of anatomical understanding, moving students from simple recognition toward reasoned explanation. The labeling diagrams ask students to identify and mark the four chambers — right atrium, left atrium, right ventricle, left ventricle — along with the major inlet and outlet vessels: the superior and inferior vena cava, the pulmonary arteries and veins, and the aorta. More advanced sheets extend the diagram to include all four valves (tricuspid, pulmonary, mitral, and aortic), the septum, and the three-layer heart wall: epicardium, myocardium, and endocardium.
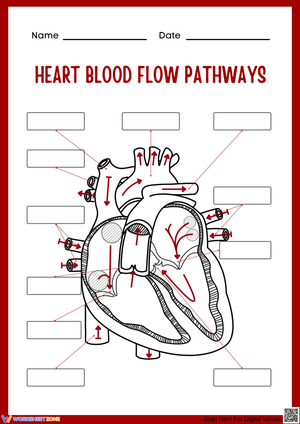
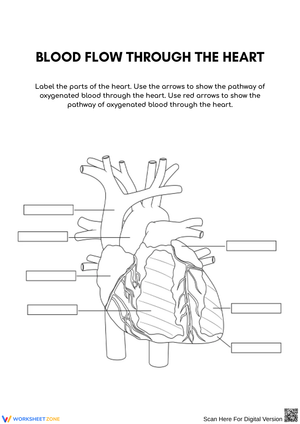
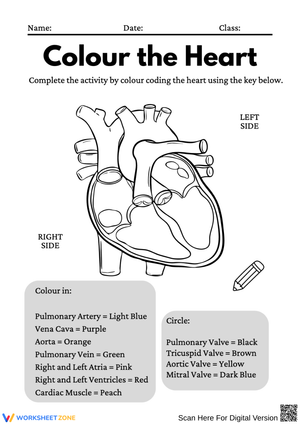
Color-coding activities run alongside the labeling work. Students shade structures and pathways in red or blue according to whether the blood at that point carries oxygen — a step that forces thinking about function, not just location. Sequencing worksheets present the twelve main steps of the complete cardiac cycle out of order; students number them correctly, then write one sentence explaining why a specific step must precede another. Vocabulary matching sheets pair terms like myocardium and sinoatrial node with functional definitions rather than anatomical positions alone, closing the loop between nomenclature and physiology.
Frequent Errors Teachers Should Anticipate and Correct
Two misconceptions appear in nearly every class, regardless of how clearly the content was introduced. The first is the left-right orientation problem: the standard anterior heart diagram is drawn as if looking at a patient facing you, so the heart's anatomical right side appears on the viewer's left. Students who learned "right atrium" from a labeled diagram but haven't internalized this inversion will reverse the sides on every unlabeled assessment. The most direct correction is physical — have students press their own fist to their chest and locate their anatomical right side before touching the diagram at all.
The second persistent error involves the pulmonary artery. Most students absorb the rule that arteries carry blood away from the heart, so they assume the pulmonary artery must deliver oxygenated blood — because they associate arterial flow with the body-supply loop. In actual student work, this shows up as confident red shading on the pulmonary artery in color-coding activities, a systematic error rather than a random one. Addressing it before the color-coding worksheet, not after, prevents students from practicing the wrong answer. A single declarative statement during direct instruction — "the pulmonary artery is the one vessel that breaks the oxygenated-artery pattern, and here is why" — resolves it faster than re-teaching after graded work comes back.
Building These Worksheets Into Your Lesson Plans
The labeling diagram works best as guided practice during direct instruction, not as independent homework. Project the same diagram on the board, label one structure at a time while explaining its function, and have students mark their own worksheet simultaneously. This prevents the most damaging homework pattern — students filling in labels from memory without understanding spatial relationships, then arriving the next day with a complete-looking sheet that contains errors they've now rehearsed twice.
The sequencing worksheet has a natural home in the review block that follows a blood flow lecture. Give pairs of students one worksheet and a single pencil between them. One student writes a step, narrates their reasoning aloud, and passes the pencil. The partner corrects or confirms before writing the next step. This structure surfaces gaps that silent individual work conceals — students who fill in a word bank without speaking often cannot explain why blood must pass through the tricuspid valve before reaching the right ventricle.
Before students work on the two-dimensional labeling tasks, a short three-dimensional modeling activity improves diagram performance on formal assessments. Have students shape the four chambers from colored clay and route pipe cleaners through the model to represent the major vessels. The transition from holding a physical object to marking a flat diagram sharpens spatial recall — students who built the model beforehand locate the pulmonary valve on the printed diagram without prompting. These heart anatomy worksheets printable fit directly into that instructional sequence as the consolidation step after hands-on construction.
Why This Format Serves Cardiovascular Learning at This Level
Heart anatomy places an unusually high demand on working memory. A student trying to simultaneously hold twelve structure names, their spatial positions relative to one another, and the directional logic of blood flow is asking more of working memory than it can reliably sustain. Worksheets that isolate one layer at a time — naming first, then color-coding function, then sequencing the full circuit — reduce that demand by presenting a single task before layering in the next. This aligns directly with cognitive load theory: when students work within working memory limits rather than against them, retention extends past the unit test. The students in a class who work through the set in this order consistently outperform those who attempt the complete blood-flow sequence on the first day of the unit.
Standard Alignment
These worksheets align with NGSS MS-LS1-3, which requires students to use evidence to support the argument that the body is a system of interacting subsystems composed of groups of cells. In practice, that standard demands more than reciting chamber names — students must explain how valves, chambers, and vessels interact to maintain continuous circulation. The labeling tasks build the structural vocabulary; the sequencing tasks require students to articulate why each structure depends on what precedes it. For high school courses, the same worksheets connect to HS-LS1-2, which addresses how organisms maintain function through the coordinated interaction of subsystems. Teachers in states that follow NGSS use this set to satisfy both the content and the evidence-based explanation demands of those performance expectations.
Adapting the Worksheets Across a Mixed-Ability Class
For students still building scientific vocabulary or struggling with spatial reasoning, use the labeling worksheets with the word bank intact and limit the initial diagram to the four chambers and four major vessels. Removing valves and wall layers from the first attempt reduces visual noise without altering the core learning target. These students also benefit from completing the color-coding step before the labeling step — assigning directional logic to the blood (right side equals deoxygenated, heading toward lungs) gives them an organizing frame that makes the names retain meaning faster than memorization alone.
Advanced students need the word bank removed entirely. Extend their diagram to include the sinoatrial node, atrioventricular node, and bundle of His, then ask them to annotate the electrical conduction pathway in a third color on the same sheet. Written explanation prompts — "describe what would happen to blood pressure and oxygenation if the mitral valve failed to close completely" — shift the assessment from recall toward analysis. These heart anatomy worksheets printable handle that full range without requiring teachers to build separate versions; the word bank is the primary lever that shifts difficulty, and adding a written reasoning prompt moves any worksheet from recognition into applied thinking.
Frequently Asked Questions
At what grade level is heart anatomy typically introduced in US classrooms?
Basic chamber identification and the concept of oxygenated versus deoxygenated blood appear most consistently in grades 5 through 8 within life science courses. At that level, the focus stays on the four chambers and the general path of blood through the pulmonary and systemic circuits. High school anatomy and physiology courses return to the same structures with added specificity — valve mechanics, the conduction system, and the functional consequences of structural defects — which is why these worksheets remain useful well past middle school.
How do I explain the difference between pulmonary and systemic circulation without losing the class?
The most reliable approach is the two-loop model: one short loop from heart to lungs and back to reload oxygen, one long loop from heart to the rest of the body and back to offload it. Draw both loops as actual ovals before touching the anatomical diagram — abstract first, then anatomical. Once students can see the loops on their own, they can locate each vessel within the correct loop rather than trying to memorize which side carries which blood type in isolation. The sequencing worksheets reinforce this by having students label each step with the loop it belongs to before ordering the full cycle.
What distinguishes a basic worksheet from an advanced one for this topic?
A basic worksheet provides a word bank, limits the diagram to chambers and major vessels, and asks students to sequence six to eight steps of blood flow. An advanced worksheet removes the word bank, adds valves, wall layers, and the conduction pathway to the diagram, and includes written explanation prompts that ask students to predict outcomes rather than recall names. These heart anatomy worksheets printable include both levels so teachers do not need to build separate versions from scratch — the structural difference between a guided and an open-ended sheet is deliberate throughout the set.
Can these worksheets replace a dissection lab?
No — and that is worth stating directly. A sheep or pig heart dissection gives students tactile information that no printed diagram replicates: the density of the ventricular wall compared to the atrial wall, the actual diameter of the aorta, the texture difference between the endocardium and the surrounding myocardium. What the worksheets do is prepare students to make sense of what they encounter during dissection and consolidate what they observed afterward. Teachers who run dissection labs consistently report that students who completed the labeling worksheets first locate structures faster, make fewer orientation errors during cutting, and write more precise post-lab explanations. The two approaches serve different purposes, and neither replaces the other.