Hamstring Muscles Printable Worksheets for 10th Grade
These hamstring muscles printable worksheets for 10th grade give anatomy and health science teachers a focused set of resources covering the posterior thigh group—where each muscle originates and inserts, how they function across two joints, and what happens structurally when they fail under athletic load. The set moves from identification through functional reasoning, so students are building conceptual understanding rather than reciting terms. Each worksheet stands alone, which means individual pieces slot into different moments across a unit without requiring teachers to commit to a fixed sequence.
What the Set Covers
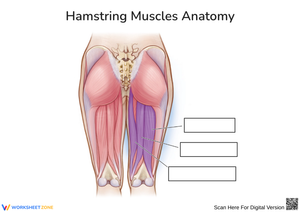
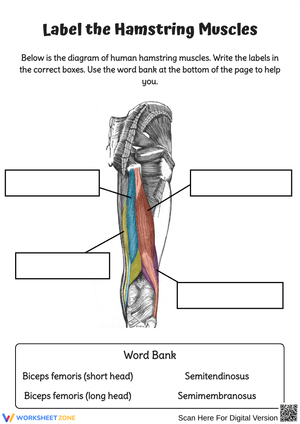
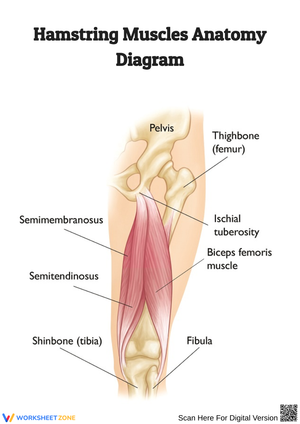
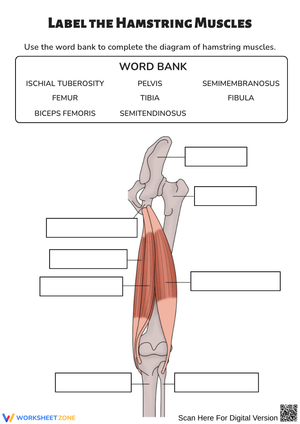
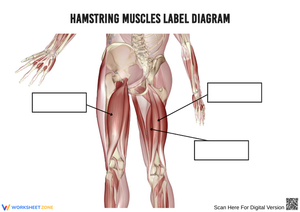
Three muscles make up the hamstring group, and each one receives specific attention. The biceps femoris sits on the lateral side of the posterior thigh and has two heads: the long head originating from the ischial tuberosity, and the short head from the linea aspera on the posterior femur. Both heads converge at the head of the fibula—that lateral insertion point is a reliable identifier on any posterior-view diagram. The semitendinosus shares the ischial tuberosity origin but inserts on the medial surface of the proximal tibia; its name signals its anatomy directly, since nearly half the muscle's total length is a cord-like tendon. Deepest and most medial is the semimembranosus, characterized by a flat membranous proximal section before inserting onto the medial condyle of the tibia. Because it sits partly underneath the semitendinosus in a standard posterior view, students who have genuinely understood the diagram will place it correctly; students who are guessing from labels will miss it consistently.
Beyond identification, each worksheet addresses function. All three muscles cross the knee, producing flexion. The long head of the biceps femoris, semitendinosus, and semimembranosus also cross the hip, producing extension—that biarticular quality is what makes hamstring biomechanics interesting at this level and, clinically, what makes these muscles prone to strain under speed. The worksheets connect the muscles to gait mechanics: their eccentric role during late swing phase, when they decelerate the forward-swinging lower leg before heel contact, and their concentric role during stance phase hip extension. Motor innervation via the tibial and common fibular branches of the sciatic nerve is also addressed, giving students a complete structural-to-functional picture.
Building These Worksheets Into Your Anatomy Unit
These hamstring muscles printable worksheets for 10th grade fit naturally at two points in a musculoskeletal unit: early, as the labeling exercises establish the anatomical framework, and later, when biomechanics and clinical application come into play. The identification worksheets work well as a low-stakes entry point on the day you introduce the posterior thigh—students mark medial versus lateral positioning in two colors, which forces a spatial commitment before class discussion confirms or corrects their choices. That decision point, made before the answer is given, is where the learning actually sticks.
The biomechanical and clinical worksheets are better placed mid-unit or just before a summative assessment. A particularly effective move is to hand students the injury analysis worksheet—which asks them to identify which muscle and which phase of running is implicated in a described hamstring strain—after they have palpated their own posterior thigh during slow resisted knee flexion. Having students press one heel back against a chair leg while prone, then release it slowly, gives them a proprioceptive reference that makes the worksheet questions land differently than they would with a cold diagram. The whole thing takes about four minutes and requires no equipment. Students reference that sensation in their written explanations for weeks.
Errors Students Make That These Worksheets Help Surface
The most persistent spatial error is conflating the semitendinosus and semimembranosus. Students who have memorized "semi— means medial" know both muscles belong on the medial side, but they routinely reverse which one is superficial and which is deep. This matters because the worksheet diagrams ask students to layer the muscles correctly in a posterior view, and a reversed answer signals the student has a word, not a concept. Pointing out the naming logic explicitly before students start helps: the semitendinosus has a tendon long and prominent enough to palpate through the skin; the semimembranosus gets its name from the flat, membrane-like quality of its proximal attachment, which sits beneath it and out of easy view.
A second consistent problem involves the short head of the biceps femoris. Students who correctly place the long head at the ischial tuberosity will often extend that origin to the short head as well on their diagrams, making the short head biarticular by accident. The short head originates from the linea aspera—it never crosses the hip, contributes nothing to hip extension, and is strictly a knee flexor. Worksheets that require students to write or draw each head's origin separately, rather than selecting from a list, catch this confusion far more reliably than multiple-choice formats. A third pattern worth watching for is functional: students frequently predict that the hamstrings only flex the knee, skipping hip extension entirely because the knee action is more visually intuitive when looking at a posterior-thigh diagram. Asking students to trace each muscle's path across joint axes—literally drawing a line from origin through both joint centers to insertion—surfaces this gap before it reaches a test.
Standard Alignment
These worksheets align with NGSS HS-LS1-2, which asks students to develop and use models to illustrate the hierarchical organization of interacting systems that provide specific functions within multicellular organisms. The posterior thigh group is a strong vehicle for this standard because the three muscles represent distinct structural components whose collective behavior—stabilizing and mobilizing both the knee and the hip—cannot be explained by any single muscle acting alone. Students move from labeling individual structures to diagramming coordinated system behavior across two joints, which is exactly what the standard's "interacting systems" language asks for at the tissue and organ level.
At the state level, these materials also support health science and physical education frameworks addressing musculoskeletal function, injury prevention, and introductory kinesiology—content commonly assessed in integrated science courses and anatomy electives at the sophomore level. Teachers running dual-enrollment health science pathways have found the clinical application worksheets well-matched to competency standards around injury identification and rehabilitation reasoning.
Adjusting the Set for a Range of Learners
For students who are building anatomical vocabulary for the first time, the identification worksheets are most effective when paired with a word bank that includes brief functional cues alongside each term—listing "biceps femoris — lateral, two heads, fibula insertion" rather than the muscle name alone. That retrieval support lets lower-readiness students participate in the labeling task without freezing, and it models the associative thinking the biomechanics questions demand. Without those cues, students with weaker prior knowledge often skip to guessing placement, which produces errors that are hard to untangle once reinforced.
Students who have the labeling content solidly in place move more productively into the functional and clinical worksheets. Asking them to explain eccentric versus concentric contraction in their own words—using the hamstrings' gait cycle behavior as their example—and then predict which contraction type carries greater injury risk and why gives them an analytical layer that most standard worksheet formats do not reach. Students working above grade level can also be asked to integrate the antagonist relationship with the quadriceps: if a sprinter has a quadriceps-to-hamstring strength ratio significantly greater than 1:1 in favor of the quads, what does that predict about injury likelihood during sprint deceleration? These hamstring muscles printable worksheets for 10th grade are built to support that kind of extension without requiring additional materials.
Frequently Asked Questions
Which muscle in the group is most commonly injured, and why?
The long head of the biceps femoris is the most frequently strained muscle in the posterior thigh group. Its length and biarticular position—crossing both the hip and knee simultaneously—means it operates under tension at two joints during high-speed running. The musculotendinous junction of the long head, where muscle fiber transitions into tendon, is the most vulnerable site; this zone is mechanically weaker during rapid eccentric loading, which is precisely what occurs when the hamstrings decelerate the swinging leg in late swing phase of a sprint.
How should I sequence the worksheets within a unit?
Labeling and identification worksheets belong early—before you cover biomechanics in class, not after. Used that way, the errors students make give you genuine diagnostic information before instruction begins, which is more valuable than confirming what students already heard. Biomechanics worksheets fit best mid-unit, after direct instruction on origin-insertion relationships and joint crossings. Clinical application worksheets, which require students to reason about injury mechanisms and muscle imbalances, work well as a culminating review or pre-assessment checkpoint before a summative evaluation. Each worksheet functions independently, so adjusting that sequence to your pacing is straightforward.
Do these resources include answer keys?
Yes. Each worksheet in the set includes a corresponding answer key with diagram labels, expected written responses for the functional reasoning questions, and brief explanatory notes on the most commonly missed items—particularly the origin distinction between the biceps femoris long and short heads, and the depth relationship between the semitendinosus and semimembranosus.
Are these materials appropriate for a standard biology course, or do they require an anatomy elective context?
The hamstring muscles printable worksheets for 10th grade work in both settings, though how you use them differs. In a standard biology course, the identification and basic function worksheets provide the concrete, observable example of structure-function relationships that NGSS LS1 standards require. In an anatomy elective or health science pathway, the full set—including clinical application and biomechanical analysis—supports the deeper content coverage those courses call for. Teachers in both contexts have pulled different worksheets from the same set within a single unit, using the labeling activities broadly and reserving the clinical materials for students working through more advanced content.
Clear All