10th Grade Forearm Muscle Worksheets Printable
These 10th grade forearm muscle worksheets printable give anatomy teachers a sequenced path through one of the most label-dense regions students encounter in high school science — 20 muscles spread across two compartments and three depth layers, with enough functional anatomy built into each exercise to keep the content from collapsing into pure name memorization. The set includes blank diagrams, compartment color-coding tasks, origin-and-insertion tables, and functional matching exercises that move students from surface identification toward understanding how anatomical structure drives movement.
The Specific Skills These Worksheets Build
Each worksheet targets a defined slice of forearm anatomy so students are not staring at all 20 structures in one sitting. The progression moves from visible surface muscles inward through the depth layers, then outward again toward function and clinical application.
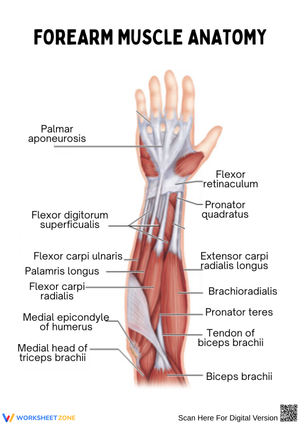
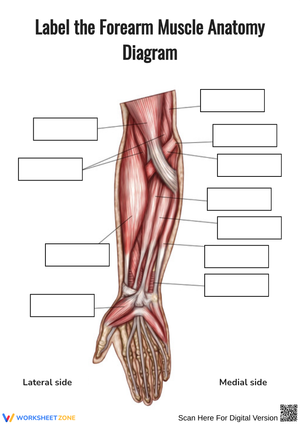
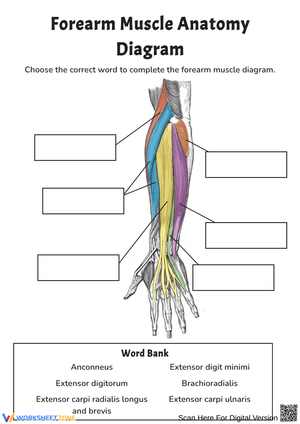
- Labeling the superficial muscles of both the anterior and posterior compartments on blank diagrams
- Identifying the three layers of the anterior compartment — superficial, intermediate, and deep — and assigning the correct muscles to each
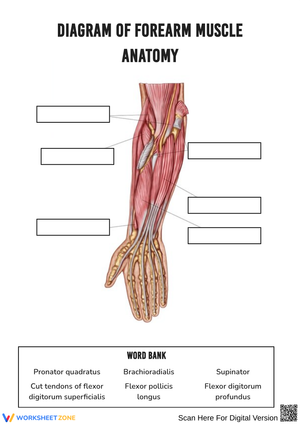
- Completing origin-and-insertion tables for muscles including the brachioradialis, flexor digitorum superficialis, pronator teres, and extensor digitorum
- Matching muscles to their primary actions: flexion, extension, pronation, and supination
- Applying anatomical knowledge to short clinical scenarios built around lateral epicondylitis and medial epicondylitis
The functional matching exercises carry more instructional weight than they first appear to. Students who can correctly label the extensor digitorum on a diagram still frequently place Tennis Elbow on the medial side of the elbow — the opposite of where the condition originates. Working through a case study that traces the pain back to the lateral epicondyle and extensor muscle origins forces structural reasoning that a labeling task alone cannot produce.
Mistakes Students Make on Forearm Diagrams — and Why They Make Them
The most persistent error in student work on this material involves the two flexor digitorum muscles. The flexor digitorum superficialis and the flexor digitorum profundus share an almost identical name, both act on the fingers, and they sit directly in front of each other in the anterior compartment. Students consistently place the profundus in the intermediate layer rather than the deep layer, or reverse their insertion points entirely. The distinction matters mechanically: the superficialis attaches to the middle phalanges, while the profundus reaches the distal phalanges and is the only finger flexor capable of bending the fingertip independently. A worksheet that asks students to trace each muscle's tendon path — rather than simply write its name — forces them to work through that difference directly.
A second pattern worth addressing before students begin: most 10th graders have internalized "anterior equals flexors, posterior equals extensors" as a reliable rule. That heuristic breaks down with the brachioradialis, which sits on the lateral border of the forearm — anatomically within the posterior compartment — but functions primarily as an elbow flexor. Students routinely move it into the anterior compartment on color-coding exercises, or list supination as its action because it occupies the lateral side. Flagging this exception before the compartment color-coding worksheet prevents those errors from propagating across the entire exercise.
A third issue appears specifically on origin labeling tasks. In anatomical position, the medial side of the forearm is the pinky side — the same side as the medial epicondyle, where most superficial flexors originate. Students who have not firmly anchored directional terms to the upper limb often write that the extensors originate from the medial epicondyle, reversing the entire functional organization of the forearm on the page. A two-minute directional check — asking students to hold their arm in anatomical position and identify medial before they begin — is faster than correcting every paper afterward.
How to Build These Worksheets Into Your Anatomy Unit
The most productive sequence starts with a surface-only diagram before any lecture on depth layers. Students label what they can identify from the image alone, mark where they are uncertain, and compare their attempts after instruction. That first worksheet functions simultaneously as a diagnostic and an anchor. When you introduce 10th grade forearm muscle worksheets printable that address the intermediate and deep layers, students already have a visual reference for the superficial structures — the new material connects to something they have already worked through rather than something entirely unfamiliar.
The self-palpation routine belongs alongside any worksheet in the set. While students complete a blank anterior compartment diagram, ask them to press their other hand against their own forearm and slowly make a fist. They feel the flexors contract beneath their fingers. When they spread their fingers wide, the tendons of the extensor digitorum shift visibly under the skin on the dorsal surface. That three-minute pause — connecting the two-dimensional diagram to their own body — sharpens muscle placement accuracy more reliably than a second pass through the same exercise on paper.
For the clinical application exercises, a brief whole-class conversation before independent work prevents a predictable problem. The lateral versus medial epicondyle distinction is counterintuitive: Tennis Elbow involves the lateral side, which surprises students who assume the backhand swing loads the medial forearm. Five minutes of discussion before anyone picks up a pencil eliminates the kind of systematic error that takes twice as long to correct afterward.
Adjusting the Set for Different Student Levels
Students still building foundational anatomical vocabulary work through each worksheet most effectively when a muscle name bank appears alongside the diagram. Removing that word list is the simplest adjustment for students ready to practice retrieval without that kind of guided support — the same diagram functions as a recognition task or a full recall task depending solely on whether the name list is present. No separate materials are required to create that distinction.
For students who move quickly through labeling exercises, the origin-and-insertion tables are where meaningful challenge lives. Assigning those students the additional step of writing one explanatory sentence per muscle — for instance, why the pronator teres originating from the medial epicondyle positions it to rotate the radius across the ulna — shifts the task from anatomical memorization toward anatomical reasoning. The 10th grade forearm muscle worksheets printable in this set include open-response lines built into the tables for exactly this kind of extension work, so no additional handouts are needed.
Students who struggle with spatial reasoning in two-dimensional anatomy diagrams need the compartment color-coding exercise before any labeling begins. Color-coding asks only for boundary recognition — anterior versus posterior — which requires a simpler spatial judgment than identifying individual structures within a compartment. Students who accurately color both regions are ready to add muscle names. Students who are still mixing up the two compartments on the coloring task need that directional concept reinforced before labeling is introduced.
Standard Alignment
These worksheets align with NGSS HS-LS1-2, which asks students to develop and use a model to illustrate how the hierarchical organization of interacting systems provides specific functions within multicellular organisms. The forearm is a clean case for this standard: students model how superficial, intermediate, and deep muscle layers interact to produce coordinated wrist and finger movement. Using 10th grade forearm muscle worksheets printable within an HS-LS1 unit frames the labeling and functional-matching tasks as model-based reasoning rather than isolated vocabulary practice — a distinction that matters for both instruction and end-of-course assessment alignment. For districts embedding anatomy within a broader life science sequence, these exercises also address the conceptual core of HS-LS1.A (structure and function), specifically the principle that body systems are organized to carry out specialized functions at the tissue and organ level.
Frequently Asked Questions
What is the difference between the anterior and posterior compartments of the forearm?
The anterior compartment occupies the front of the forearm when the body is in anatomical position — palm facing forward. It contains the flexor muscles, which bend the wrist and fingers inward and pronate the forearm. The posterior compartment occupies the back of the forearm and houses the extensor muscles, which straighten the wrist and fingers and assist with supination. The medial epicondyle serves as the common origin for most superficial flexors; the lateral epicondyle is the common origin for most superficial extensors. That origin distinction is the clearest structural marker separating the two compartments and the one most worth reinforcing before students begin any diagram task.
Which muscle is primarily responsible for rotating the palm to face upward?
The supinator, located in the deep layer of the posterior compartment, is the primary muscle for supination. Worksheets covering functional anatomy typically ask students to contrast the supinator with the pronator teres and pronator quadratus, which rotate the palm downward. Students frequently also name the biceps brachii as a supinator, which is accurate, but the biceps is an arm muscle acting at the elbow joint rather than a forearm compartment structure — worth clarifying before students complete any forearm-specific labeling or matching task.
How do students identify the brachioradialis on a forearm diagram?
The brachioradialis is the most laterally positioned and visually prominent structure on most forearm diagrams. It runs along the lateral border from the lateral supracondylar ridge of the humerus down to the styloid process of the radius, and it acts as an informal boundary marker between the anterior and posterior compartments in most textbook illustrations. It is also the only muscle in the posterior compartment classified as an elbow flexor, which makes it a reliable target for diagram questions — and a reliable source of confusion for students who expect every posterior compartment muscle to extend.
What are the three layers of the anterior forearm compartment?
The anterior compartment organizes its eight muscles into three depth layers. The superficial layer contains four muscles that originate from the medial epicondyle: the pronator teres, flexor carpi radialis, palmaris longus, and flexor carpi ulnaris. The intermediate layer holds a single muscle — the flexor digitorum superficialis. The deep layer contains three muscles that originate directly from the radius and ulna: the flexor digitorum profundus, flexor pollicis longus, and pronator quadratus. The intermediate layer is particularly worth emphasizing on any labeling exercise because students consistently try to absorb it into either the superficial or deep group rather than treating it as its own distinct level.
Clear All