2nd grade carrot worksheets printable
These 2nd grade carrot worksheets printable resources give teachers a clear path through one of second grade's trickier plant-science topics: the biennial life cycle of a root vegetable that does most of its biological work underground and out of student sight. The set covers carrot anatomy, growth-stage sequencing, plant-part labeling, and the relationship between leaf photosynthesis and taproot sugar storage — which is the actual biological reason carrots taste sweet. Teachers who have relied on beans and butterflies for plant life-cycle units will find this fills a real curriculum gap.
The Specific Skills Each Worksheet Targets
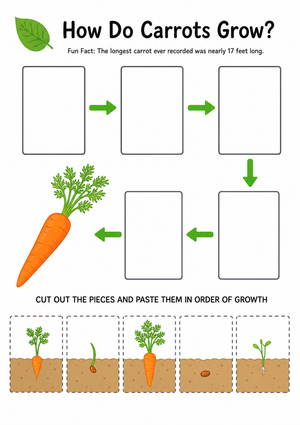
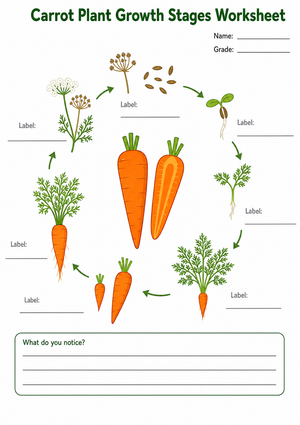
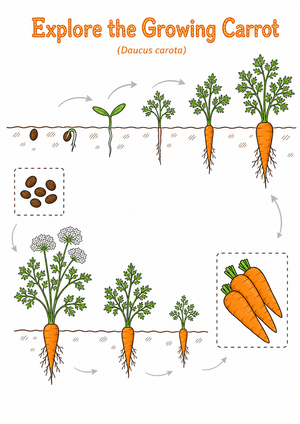
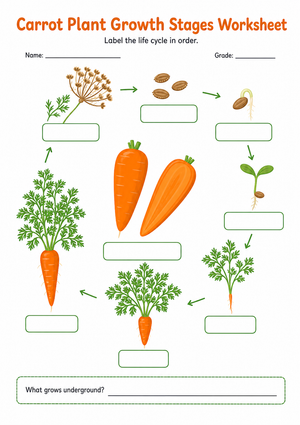
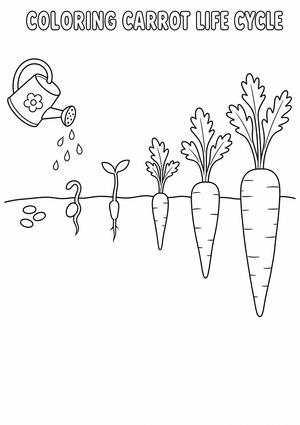
The sequencing worksheets walk students through six stages of the carrot's two-year biological cycle: seed, germination, seedling, vegetative growth, flowering, and seed production. Because most classroom plants never show flowering, this is often the first time Grade 2 students encounter the concept of a biennial organism — one that needs two full growing seasons to reproduce. Each worksheet isolates one or two stages rather than presenting all six at once. Seven- and eight-year-olds are still consolidating the ability to hold sequence information in working memory, and spreading the stages across separate worksheets keeps the task manageable without watering down the content.
Labeling activities focus on the taproot, stem, leaf, and root hairs. The cross-section diagram asks students to identify where the plant stores sugar and explain why the taproot grows thick and heavy over the growing season. A separate worksheet addresses environmental variables — what happens to taproot shape when soil is compacted, rocky, or too shallow — which introduces the idea of controlled observation before students are expected to write any formal investigation record.
- Sequencing the carrot life cycle in correct chronological order across both growing years
- Labeling the parts of a carrot plant using precise scientific vocabulary
- Identifying the taproot as an energy-storage structure distinct from fibrous roots
- Tracing the path of photosynthetic sugar from leaf to taproot
- Predicting how soil conditions affect taproot shape and development
- Distinguishing biennial from annual plant growth patterns
What Second Graders Consistently Get Wrong About Carrot Plants
The most persistent misconception is structural: students reliably label the orange carrot as the stem. This makes intuitive sense — the carrot looks like the vertical center of the plant, and stems are what they have seen holding plants upright. Correcting this takes more than pointing at a diagram. Students need to understand that a root grows downward, lacks nodes and leaves, and exists to store energy rather than transport it. The labeling worksheets address this by asking students to place the "taproot" label before any other, so the correction happens at the start of the activity rather than as a cleanup step after everything else is already filled in.
A second error appears consistently in life cycle sequencing: students who can name all six stages will still place flowering inside year one. They know flowering comes "after the plant grows" and assume that means the same growing season. Without direct instruction that the flowering stage requires a second year and a winter dormancy period, students diagram a one-year cycle even when the worksheet clearly marks a two-year timeline. Running a five-minute whole-class discussion before students attempt the sequencing worksheet — not after — reduces this error pattern noticeably in the finished work.
A subtler problem shows up when students diagram photosynthesis: they draw the sun's energy going directly into the taproot rather than into the leaves. The most effective correction is asking students to trace the path of sugar with a colored pencil — leaves first, then down the stem, then into the root — before they write any labels. Making the direction of transport visible and physical is more effective than re-explaining it verbally.
Building These Worksheets Into Your Science Unit
The sequence that holds up well is: introduce vocabulary on Monday through a shared read-aloud, complete the labeling worksheet on Tuesday as guided practice during science block, and return to the sequencing worksheet on Thursday after students have had two days to work with the terminology. The Friday review block — that reliable 15-to-20-minute stretch before the weekend — works well for the soil variables worksheet, where students predict what happens when a carrot grows in clay versus sandy soil. This spacing between introduction and practice is deliberate; distributing repetitions across days produces stronger retention than massing all the worksheets into a single period.
The clear-cylinder observation station pairs especially well with 2nd grade carrot worksheets printable labeling activities. Planting carrot seeds in a transparent container wrapped in dark construction paper — unwrapped only during the weekly Monday observation window — lets students watch the taproot thicken in real time without disturbing the plant. Students who have labeled the taproot on a worksheet and then watch it fatten in the cylinder over three weeks make a connection no static diagram alone delivers. The worksheet stops being an abstract exercise; it becomes a record of the actual plant growing on the science shelf.
For teachers running integrated literacy-science blocks, a brief carrot journal pairs cleanly with the worksheets. After completing each labeling activity, students write one sentence using a vocabulary term from that day's worksheet. Writing germination in a label slot and then using it in a sentence within the same hour embeds the word more firmly than either activity manages alone.
Standard Alignment
The primary alignment is NGSS LS1.B: Growth and Development of Organisms, which requires Grade 2 students to recognize that plants have unique life cycles with distinct stages of growth and reproduction. Carrots address this standard with particular specificity because the biennial structure forces students to think past the single-season narrative that dominates most Grade 2 plant units. The life cycle sequencing worksheets map directly to LS1.B, giving teachers a documentable student artifact for this standard without requiring a supplemental assessment tool.
The soil variables worksheet connects to NGSS 2-LS2-1, which asks students to investigate whether plants need sunlight, water, and specific growing conditions to survive. Predicting taproot shape across different soil types is a low-stakes entry point for controlled-observation thinking before students are expected to plan and record formal investigations. Teachers who need standards documentation across the unit will find both standards addressed in separate worksheets without redundancy.
Adjusting the Set for a Range of Learners
For students who struggle with reading-heavy directions, each 2nd grade carrot worksheets printable labeling activity works better when the word bank stays visible throughout the task rather than being folded away at the bottom. Some teachers print the term list on a separate strip and tape it to the desk so students can cross off labels as they place them — this removes the working memory demand of tracking what has already been used without changing the intellectual work of identifying plant parts.
One honest limitation worth flagging: the cross-section diagram is the worksheet most likely to stop lower-confidence students mid-task. The label lines inside the root diagram cross over each other, and students who feel uncertain which line belongs where often abandon the task rather than guess. Pre-tracing each label line in pencil before students begin removes that source of confusion without simplifying the underlying content.
Students working above grade level benefit most from the prediction and explanation tasks. Ask them to write why a carrot split during growth — a common outcome when the taproot hits a rock or dense clay pocket — which requires connecting the taproot-as-storage concept to an environmental obstacle. That is transfer, not recall. A few students each year will independently link this back to the sequencing worksheet's dormancy stage, which is exactly the kind of cross-topic reasoning worth recognizing in Grade 2 science.
Frequently Asked Questions
Do students need to be actively growing carrots in the classroom to use these worksheets?
No. The worksheets function as standalone activities during a plant science unit with or without a live plant. That said, even a minimal setup — a carrot top in a shallow water dish, or a seed started in a clear cup — gives students a real referent for the diagrams they are labeling. The live plant is not a requirement, but it makes the vocabulary stick faster, particularly for the taproot and leaf anatomy sections where students describe what they observe rather than what they remember from a diagram.
How does the sequencing worksheet handle the biennial life cycle when the school year only covers one growing season?
The sequencing worksheet includes all six stages with a clear visual divider marking where year one ends and year two begins. Students practice placing the flowering and seed production stages in the correct year without needing to observe those stages directly. A brief teacher introduction before the worksheet — five minutes covers it for most classes — makes the year-two stages legible to second graders who have not seen a carrot plant bolt or flower. The learning objective at this grade is recognition of the full cycle, not direct observation of every stage.
Are these worksheets appropriate for a fall science unit or only for spring planting?
These 2nd grade carrot worksheets printable activities fit both fall and spring units equally well. Carrots are cool-weather crops that grow best in temperatures between 60 and 70 degrees Fahrenheit, which maps to a September or October planting window as readily as a March or April one. Teachers running fall units often find that carrot growth aligns better with classroom observation schedules: cooler temperatures slow development enough that weekly checks show incremental, noticeable change rather than the rapid overnight growth that students miss between Friday and Monday.
Clear All