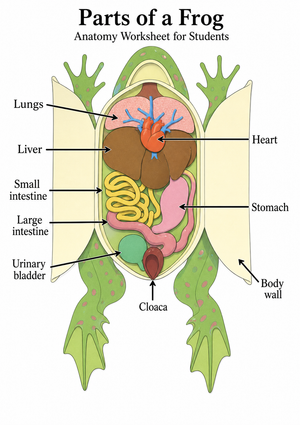
A frog dissection anatomy worksheet is often the difference between a class period that feels chaotic and one where every student, scalpel in hand or not, knows exactly what structure to find next. For middle school and high school life science teachers, the worksheet is not a side handout. It is the backbone of the lab, guiding students from external features to internal organs while giving you a formative record of what they actually observed.
This guide breaks down how to structure frog dissection anatomy worksheets across a typical two-session lab, how to tie them to structure-and-function standards, and how to support students who opt out of the physical specimen without losing the instructional value of the unit.
Structuring the Worksheet for External Anatomy First
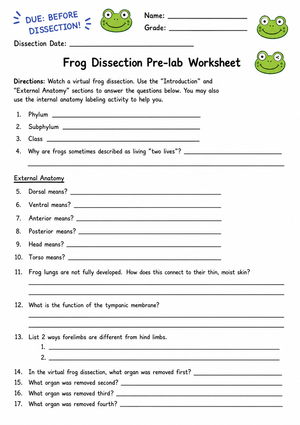
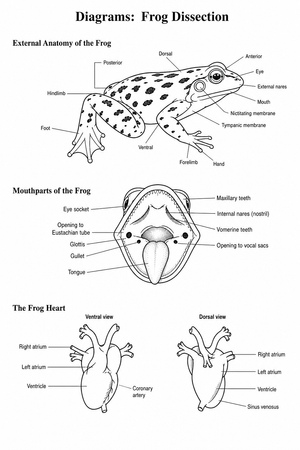
Most dissection labs run across two class periods, and your worksheet should mirror that split. Session one keeps the specimen intact and focuses on external anatomy: skin texture, nictitating membrane, tympanic membrane, forelimbs and hindlimbs, and the cloaca. A strong worksheet section here asks students to sketch and label a labeled diagram, then answer two or three short-response questions about adaptations, such as why frog skin stays moist or how limb structure supports jumping and swimming.
Keeping this section separate from internal anatomy matters for classroom management. Students who finish early should not be encouraged to start cutting before the class has reviewed safety expectations and identified external landmarks together.
Moving Into Internal Anatomy During the Second Session
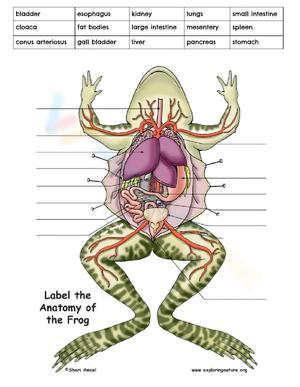
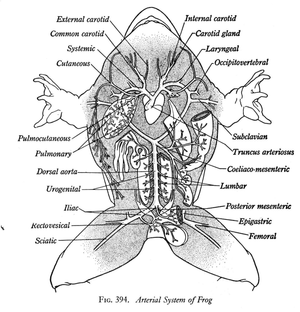
Session two is where the worksheet earns its keep. Once students make the initial incision, the worksheet should walk them through organ systems in a logical order: digestive structures first (esophagus, stomach, small and large intestine, liver, gallbladder), then respiratory and circulatory structures (lungs, heart chambers), and finally reproductive and excretory organs.
A literature review comparing dissection methods found that non-animal approaches, including models, videos, and virtual dissection software, were rated superior or equivalent to traditional dissection in 88 percent of the studies reviewed. That figure is worth sharing with department heads who are deciding how much lab time and budget to allocate to physical specimens versus digital tools, since it suggests worksheets paired with virtual platforms can meet the same learning goals for most classes.
Each internal anatomy section on the worksheet should pair a labeling task with a short structure-function prompt, such as asking students to explain why the frog's heart mixes oxygenated and deoxygenated blood, or how the large surface area of the small intestine supports nutrient absorption.
Aligning Frog Dissection Worksheets to NGSS Structure and Function
Frog dissection labs are commonly aligned to NGSS performance expectations such as HS-LS1-2, which asks students to use models to illustrate how systems of specialized cells interact to form tissues, organs, and organ systems that maintain homeostasis. A dissection worksheet becomes the model in this case: the labeled frog specimen or diagram, paired with written explanations of organ function, is direct evidence of a student's ability to connect structure to a larger biological system.
When you write worksheet questions, frame them around this crosscutting concept rather than pure recall. Instead of only asking students to name the liver, ask them to describe what would happen to digestion if the liver stopped producing bile, then have them cite the structure they observed as support for their answer.
Teacher Tips for Managing the Dissection Lab
A few practical habits make dissection days run smoother. Distribute the worksheet before the lab so students preview vocabulary and diagrams the night before. Assign lab roles, such as cutter, recorder, and reader, so every student has a job tied to a worksheet section. Keep a laminated reference diagram at each station for students who need a visual check beyond the worksheet.
Collect the worksheet at the end of each session rather than waiting until the full dissection is complete. This gives you a formative snapshot after external anatomy and lets you address misconceptions before internal anatomy begins.
Frequently Asked Questions
1. What grade levels are frog dissection anatomy worksheets appropriate for?
These worksheets work well in middle school life science and high school biology, with the depth of structure-function questions adjusted by grade level.
2. How do frog dissection worksheets support students who opt out of physical dissection?
The same labeling and function questions apply whether a student works with a physical specimen or a virtual dissection tool, so opt-out students complete an equivalent assignment.
3. What anatomical structures should a frog dissection worksheet cover?
A complete worksheet covers external features like skin and limbs, plus internal systems including digestive, respiratory, circulatory, and reproductive structures.
4. How can teachers align frog dissection worksheets to NGSS standards?
Frame labeling and short-answer questions around structure-and-function performance expectations such as HS-LS1-2, asking students to connect observed structures to organ system function.
5. How long does a typical frog dissection lab with worksheets take to complete?
Most labs run across two class periods, with the first session covering external anatomy and the second covering internal organ systems.












 Interactive Worksheet Maker
 Quiz Maker
 Word Search Maker
 Crossword Puzzle Maker
 Word Scramble Generator
 Sentence Scramble Generator
 Handwriting Worksheet Generator
 Name Tracing Generator
 Fill In The Blank Generator