These parts of a seed worksheets pdf give 2nd through 5th grade science teachers a printable set of labeling diagrams, structure-function matching activities, and monocot/dicot comparison exercises that build precise botanical vocabulary alongside genuine anatomical understanding. The worksheets cover the five structures students are most often tested on — the seed coat, the embryo, the cotyledon, the radicle, and the plumule — and ask students to do more than fill in blanks: they identify structures, explain function, and compare across seed types.
The Anatomy Students Are Expected to Know
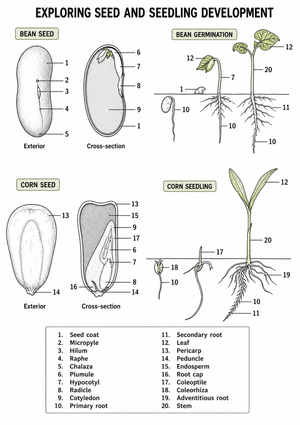
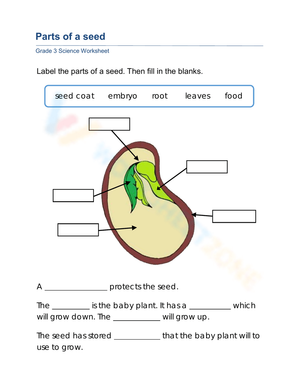
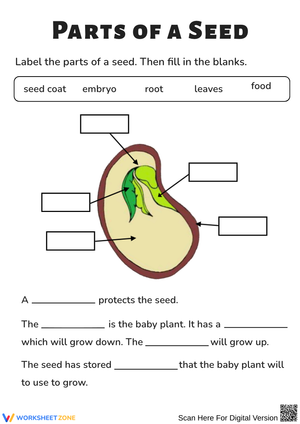
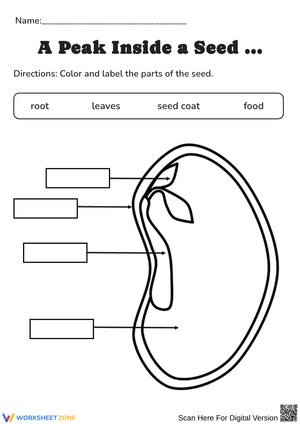
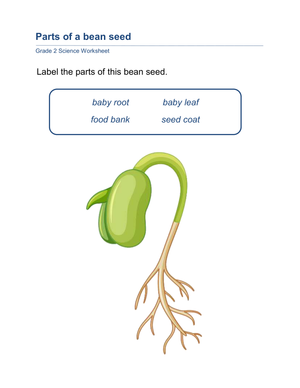
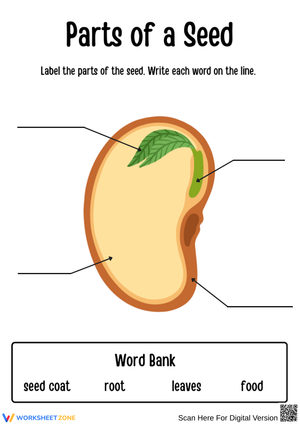
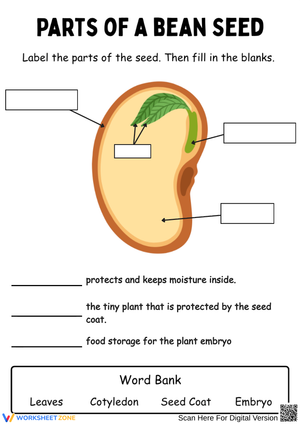
A seed carries a compressed version of an entire plant inside it, and unpacking that compression is what makes this topic both fascinating and cognitively demanding for elementary learners. The seed coat (testa) is the outermost layer — tough but permeable, protecting the embryo from physical damage and dehydration while still allowing water absorption at the start of germination. Inside the seed coat, the cotyledon stores the carbohydrates and proteins the embryo draws on before its first true leaves can run photosynthesis. This window of total nutritional dependence on stored reserves surprises most students, and it makes the cotyledon one of the more memorable structures in the unit once teachers explain it plainly. The embryo is the plant itself in miniature, organized into two structures worth teaching explicitly: the radicle, the embryonic root that anchors and hydrates first, and the plumule, the embryonic shoot that grows toward light. Each worksheet asks students to mark these structures on a cross-section diagram and write a brief functional description beside each label — a format that keeps the activity at the explanatory level rather than pure recall.
What Students Get Wrong, and Where to Catch It
The radicle-plumule distinction trips students up more reliably than any other pair in this unit. Even after direct instruction, a significant number reverse them — they associate "radical" with something energetic or upward and mislabel the shoot. A quick anchor that reduces this error: write radicle → root → runs downward on the board before students label their diagrams. That single line of explicit encoding cuts the reversal rate noticeably in most classes.
The cotyledon generates a different kind of confusion. Students who have heard "leaf" applied loosely to early plant growth will label cotyledons as "first leaves," which misses the storage-organ distinction the standard actually targets. Asking students to circle the cotyledon on their worksheet and complete the sentence "The cotyledon is not a leaf because..." forces the precise thinking that a multiple-choice label never demands. A smaller but worth-watching error: students who correctly identify the seed coat on a diagram will still write "skin" in open-response prompts, which signals surface vocabulary rather than real understanding. These worksheets include written-response fields specifically because fill-in-only formats let that shallow acquisition pass undetected.
Building These Worksheets Into Your Science Block
The most productive use of a parts of a seed worksheets pdf is not as independent seatwork after a lecture — it is the anchor document during whole-class instruction. Project a blank version of the seed diagram while students work on their printed copies. Label each structure together, pause at the cotyledon to ask what happens to it after the plant's first true leaves open, and let students amend their written descriptions in real time. That layered engagement — visual, verbal, written — processes the content three ways in under twenty minutes.
For the lab portion, a lima bean dissection paired with each labeling worksheet works extremely well. Soak the beans for twenty-four hours before the dissection, and add several drops of dark food coloring to the soaking water — the tinted water seeps into the seed and lightly stains the embryo structures, making the radicle and plumule stand out against the pale cotyledon tissue. Without this step, students squint at nearly identical tissue and guess. With it, the move from printed diagram to real specimen is immediate and clean. The observation sheets in the set give students a place to sketch and annotate what they find, then cross-reference those sketches with their labeled diagrams.
These worksheets also function as a reliable formative check. A five-minute blank-diagram exit task — no notes, no partner — reveals exactly who has processed the vocabulary and who has been copying labels without internalizing them. Keeping a few printed copies in the substitute folder is worth doing: a seed labeling activity with a written-response section runs smoothly without teacher facilitation.
Monocots and Dicots: Extending the Comparison
Several worksheets in the set place a corn seed cross-section beside a bean seed cross-section and ask students to mark the cotyledon(s), identify each seed type, and write a brief comparison. This exercise is harder than it looks. Students who hear "one cotyledon" often label all of the interior tissue of the corn seed as the cotyledon — including the embryo — because the material inside a monocot is visually nearly continuous. Asking students to distinguish food-storage tissue from embryo tissue in the same diagram, on the same worksheet, in the same sitting forces a precision that a single-seed labeling activity never demands. The two-seed comparison format makes the monocot/dicot distinction concrete in a way that definitions alone do not.
Standard Alignment
These worksheets address NGSS LS1.A: Structure and Function, which requires students to understand how both internal and external structures of organisms support survival, growth, behavior, and reproduction. In practical terms, the standard asks students to do two things in tandem: name a structure and explain what it does. A labeling activity that only requires identification meets half the standard. Each worksheet in the set pairs every label with a function prompt — students who mark the seed coat also write what it protects against; students who identify the cotyledon also explain why it depletes as the plant matures. That design keeps tasks at the explanatory level LS1.A requires rather than the recall level that makes anatomy feel like trivia.
For teachers working in states with modified NGSS frameworks, LS1.A maps consistently across the 2nd–5th grade science band in most state standards documents. The specific vocabulary — seed coat, cotyledon, embryo, radicle, plumule — appears on state science assessments in California, Texas, and New York, so regular practice with accurate labeling builds the retrieval fluency students need under timed test conditions.
Adjusting the Worksheets for a Range of Learners
A parts of a seed worksheets pdf set with a word bank serves most on-grade-level students without modification. For students still building scientific vocabulary, limiting the word bank to the five target terms and printing at a slightly larger size reduces visual processing load without simplifying the content. The goal is anatomical understanding, not reading stamina, and a dense diagram in small type creates barriers that have nothing to do with the science.
Students who finish labeling quickly benefit from the extension prompts built into several worksheets: predicting which structure disappears first during germination, comparing the seed coat's function to another protective structure they know (an eggshell, a walnut shell), or sketching what they expect the embryo to look like after 48 hours in damp soil. These tasks require no additional materials and keep fast finishers working with the content rather than waiting. For students receiving pull-out support, pairing the worksheet with a real split bean — held in hand while labeling the diagram — provides a tactile anchor that a printed diagram alone cannot replicate.
Frequently Asked Questions
What grade levels do these seed anatomy worksheets work for?
The set spans 2nd through 5th grade. The core labeling activities — seed coat, cotyledon, embryo — are appropriate for 2nd and 3rd grade, where plant structures are first introduced. The radicle/plumule distinction and monocot/dicot comparison worksheets are better suited for 4th and 5th grade, where plant classification and life-cycle analysis appear in most state frameworks. Several worksheets include both a basic and an extended version, so the same diagram serves different grade levels without reprinting a separate resource.
Can I pair these with a live dissection lab?
Print the parts of a seed worksheets pdf before the lab so students already know where each structure should appear. During the dissection, they annotate their printed diagrams with real observations — color, texture, approximate size relative to the whole seed. That dual-reference approach grounds the vocabulary in direct observation rather than memorization, and the completed diagrams serve as lab reports without requiring a separate form.
Do the worksheets come with answer keys?
Each worksheet comes with a completed answer key that provides both the structure name and a brief functional description for every label. This is useful when a substitute is covering the lesson or when you are teaching the content for the first time and want a quick reference for student questions during independent work time.
How long does a typical seed labeling worksheet take to complete?
A standard labeling-plus-function worksheet runs 12–18 minutes for most students at grade level. The monocot/dicot comparison worksheet, which involves two diagrams and a written comparison section, needs closer to 20–25 minutes. Neither is well-suited as homework — the anatomical detail warrants classroom context, where students can ask clarifying questions about what they are seeing on the diagram.