2nd Grade Stages of Seed Germination Worksheets Printable
2nd grade stages of seed germination worksheets printable resources give teachers a structured set of activities that take students through each phase of the process — from a dormant seed absorbing moisture to the moment the first true leaves unfurl above the soil line. The set covers sequencing, anatomy labeling, vocabulary matching, and observation logging, all matched to where seven- and eight-year-olds actually are with scientific language and diagram work.
What Students Practice Across the Set
Each worksheet targets a specific skill within the germination sequence rather than trying to cover the whole life cycle at once. At this grade level, moving too quickly through biological stages before students can draw or name what they just saw is one of the most common reasons the content doesn't stick.
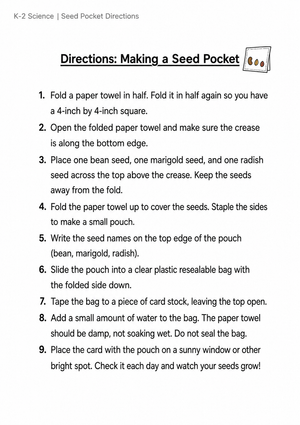
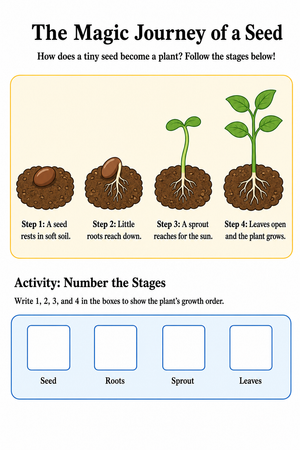
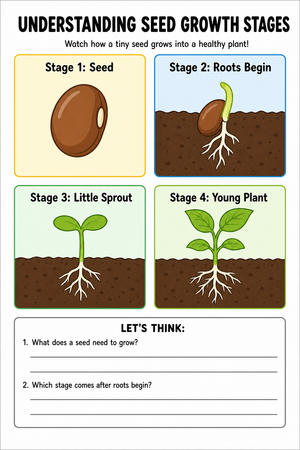
- Stage sequencing: Students cut out or number illustrated stages — the dry seed, the swollen seed with a cracked coat, the emerging radicle, the hypocotyl pushing upward, and the cotyledons opening. Getting the order right requires students to hold the logic of the process in mind, not just recognize a picture.
- Anatomy labeling: Cross-section diagrams ask students to mark the seed coat, embryo, cotyledon, and food store. This is where students first encounter the idea that a seed carries its own energy supply — a concept that connects directly to why light isn't needed until after germination begins.
- Vocabulary matching: Terms like radicle, imbibition, and sprout are paired with definitions and illustrations. Repeated encounters with the same term across multiple worksheets build retention without drilling.
- Observation recording: Open-format worksheets ask students to draw what they see in their seed baggie on day two, day four, and day seven, then compare their drawings to the illustrated stages. This is where the live experiment and the paper activity reinforce each other.
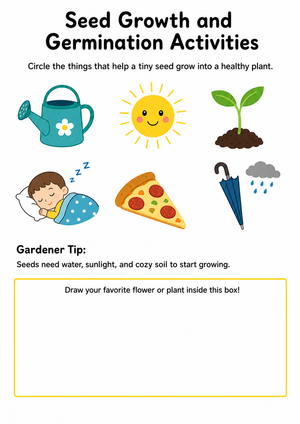
- Needs-of-germination sorting: Students sort items into what a seed needs to germinate — water, warmth, oxygen — versus what it needs only after germination begins — light. That distinction trips students up every year, and addressing it in a worksheet before the whole-group discussion prevents the misconception from hardening into fixed belief.
Mistakes Students Make That These Worksheets Help You Catch
The most persistent error at this level is conflating germination with full plant growth. Students frequently treat sprouting as the final step, then stall when asked where cotyledon-opening fits. A separate but equally common swap: placing radicle emergence after hypocotyl growth. Students are reading the visual size of the structures in the diagram rather than the biological sequence — the radicle looks smaller, so it gets placed last. Watching for that specific reversal during whole-class review tells you exactly who needs a re-teach before the sequencing assessment.
When asked what a seed needs to germinate, students almost universally say "sunlight" first. It's the most visible thing plants interact with in daily experience, so it feels like the obvious answer. Worksheets that explicitly separate germination requirements from post-germination requirements — and ask students to explain why a seed buried in dark soil can still sprout — address that substitution before it becomes settled understanding.
Standard Alignment
The set aligns to NGSS 2-LS2-1, which asks second graders to plan and conduct investigations to determine if plants need sunlight and water to grow. Germination sits at an interesting instructional moment within this standard because it temporarily complicates the "plants need light" rule — seeds don't need light to begin growing, but the resulting seedling absolutely does. That nuance is exactly what the standard targets: understanding that different stages of plant development carry different requirements. Worksheets that push students to distinguish germination conditions from seedling conditions aren't adding difficulty for its own sake; they're hitting the core conceptual tension the standard is built around.
Building These Worksheets Into Your Science Block
The seed-in-a-baggie observation is nearly universal at this grade level, and these worksheets slot directly into that experiment's daily rhythm. Tape zip-lock bags with a damp paper towel and a bean seed to a window with indirect light — direct sun through plastic overheats the seed and stops germination entirely, which is a frustrating thing to troubleshoot mid-unit. Once the bags are up, use one worksheet per observation day. Students spend the first five minutes sketching what they see, then return to their seats to complete the labeled-diagram or vocabulary section. That transition channels post-observation energy into something structured before the room loses focus.
For teachers running a shorter science block, the 2nd grade stages of seed germination worksheets printable set works well distributed across a two-week unit rather than front-loaded into one or two days. The anatomy-labeling worksheet functions as a reliable exit ticket at the end of the introductory lesson — it gives immediate data on which students grasped the internal seed structure before the class moves into sequencing. The vocabulary worksheets make solid Monday warm-ups during the unit, asking students to retrieve terms from the week before the lesson opens.
Adjusting the Set for a Range of Learners
Students still developing reading fluency do better when the vocabulary-matching worksheet includes an illustration next to each term rather than a text-only definition. If the version you're using has text-only definitions, sketching a small visual next to each word before copying takes about three minutes and significantly changes how many students can work independently. For students reading above grade level, the observation worksheets extend naturally by adding a prediction prompt before each observation day — students write what they expect to see, then note where they were right or wrong. That predict-observe-reconcile habit doesn't require a different worksheet, just a different instruction.
Students who struggle with fine motor control often find cut-and-paste sequencing stressful, especially when they're simultaneously managing the cognitive load of remembering stage order. Offering a numbered-list version — where students write the stage name rather than cut and glue — removes one source of friction without reducing the intellectual demand. The 2nd grade stages of seed germination worksheets printable set also works well with a small pulled group at a side table, where the teacher narrates each stage aloud as students complete the worksheet together, while the rest of the class works independently.
Frequently Asked Questions
Why do bean seeds work better than other seeds for the baggie experiment that pairs with these worksheets?
Bean seeds germinate reliably within five to eight days under typical classroom conditions, and the radicle is thick enough to see clearly through the plastic without magnification. Smaller seeds like tomato or basil germinate less predictably and produce a radicle that's easy to miss, which makes it hard for students to connect what's in their baggie to the diagram on their worksheet. Lima beans and navy beans are both dependable choices.
Do these worksheets hold up if I'm not running the hands-on experiment at the same time?
The sequencing, anatomy-labeling, and vocabulary worksheets stand independently and work as part of a diagram-based unit without any live plants. The 2nd grade stages of seed germination worksheets printable resources cover enough ground that teachers without access to materials for the live experiment still have substantial printed content to work from. A short time-lapse germination video fills most of the gap left by a missing physical experiment.
What order should these worksheets follow within a unit?
Start with the anatomy diagram — students need to understand what's inside a seed before the sequence makes sense. Move to the needs-of-germination sorting next, so requirements are clear before students begin tracking stages. Sequencing comes third, after students have seen either the experiment beginning or a visual demonstration. Save the observation logs for the days when the seeds are actually doing something worth drawing.
Clear All