Cursive Z Handwriting printable worksheets for 4th Grade
Cursive z handwriting printable worksheets for 4th grade give teachers a targeted resource for one of the more genuinely confusing letters in the cursive alphabet — a letter whose cursive form shares almost no visual resemblance with the block-print Z students have been writing since first grade. Each worksheet moves from traced stroke work through guided copying, independent production, and finally word- and sentence-level practice, so teachers get a clear picture of exactly where in that progression a student's formation breaks down.
Where the Letter Actually Breaks Down
Uppercase cursive Z is one of the few letters where students have almost no reliable visual anchor from print. The block capital uses three distinct strokes — top horizontal, diagonal, bottom horizontal — but the cursive version collapses those into a single looping motion that looks like none of them. In a typical 4th grade classroom, if you ask students to write a cursive Z without a model, you'll see something that resembles a 2, a reversed S, a flattened figure-eight, and a few genuinely invented shapes. All of them, probably, came from students trying to reconstruct the letter in good faith from incomplete memory.
Lowercase cursive z is faster to form but creates a different problem: the exit stroke. Most students can get through the body of the letter adequately. What breaks is the small curving tail that carries the pen forward into the next letter. A student writing zone or zero in cursive will often produce a passable isolated z and then lift the pen before connecting to the following letter, because the join from z was never explicitly taught. That disconnection is invisible on isolated-letter rows, which is exactly why word-level practice matters — the error only appears in connected writing.
A third factor is inconsistency in prior instruction. Many 4th graders had cursive in second or third grade but not both, or they encountered different models across years. A student who learned D'Nealian in second grade and then had no cursive in third carries motor memory that may conflict with the model on the worksheet. Repeated exposure to one consistent stroke sequence is the most reliable way to work through that, and it usually takes more than a single session to stick.
What Students Practice Across the Set
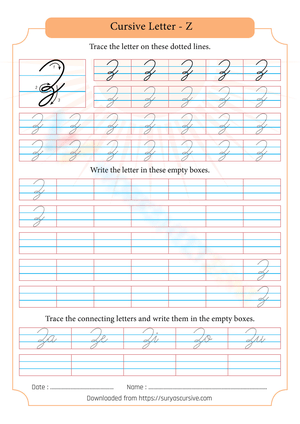
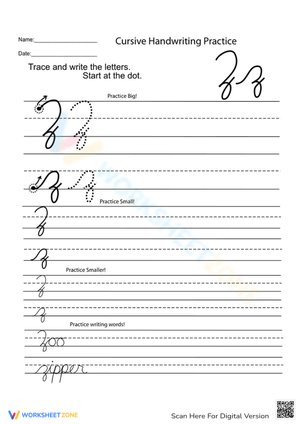
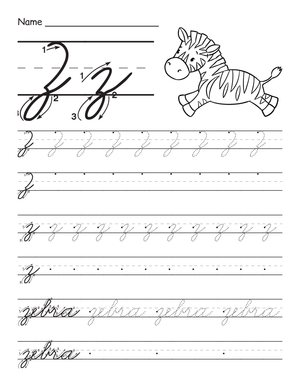
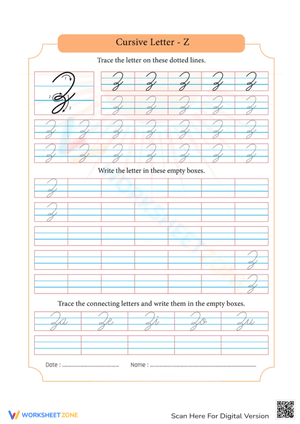
Each worksheet covers uppercase Z and lowercase z together, which matters because 4th graders routinely get one right while misforming or rushing the other. The sequence within each worksheet is deliberate: traced examples with directional arrows, lightly guided lines where a dotted model cues the stroke path, open lines with no visual support, and then words and short sentences that require the letter to appear in actual connected cursive.
- Directional tracing: Starting points and stroke arrows establish a consistent path before independent writing begins.
- Guided copying lines: Dotted or partially modeled letters let students repeat the form with decreasing visual support.
- Independent recall lines: Open lines without any model show whether the letter has moved into reliable memory.
- Word-level practice: Writing Z inside real words exposes connection and spacing errors that isolated-letter rows never surface.
- Sentence writing: Short sentences reveal whether students can maintain legibility across a full stretch of cursive, not just in an isolated letter.
The sentence-level work is worth calling out because it's the piece most handwriting practice skips. A student who writes a clean Z on an isolated line but falls apart writing "The zebra zigzagged" is showing a fluency gap, not a formation gap — and those two problems call for different responses. The set of cursive z handwriting printable worksheets for 4th grade includes both so teachers can identify which issue is actually present, rather than assigning more isolated-letter rows when connection is the real problem.
Fitting These Worksheets Into Your Weekly Lesson Plan
A focused cursive Z session runs well in ten to twelve minutes when the routine is predictable. The most reliable structure: model uppercase Z and lowercase z on the board or document camera while naming the stroke moves aloud — something brief and repeatable like "top loop, diagonal push, bottom curve, exit right" — then have students trace the first row while saying those same cues, then move through the guided lines and into independent practice. Keeping the verbal cue identical across sessions matters; students internalize the stroke path partly through the language used to describe it, and changing the wording mid-unit resets that learning.
For morning work, the tracing and guided sections need almost no teacher direction and function well as a quiet start before the day's first lesson. During small-group instruction, the independent-line and word sections work as a targeted correction activity for students whose formation is still inconsistent. In centers, each worksheet runs as a low-noise independent task beside a visible model card on the table. For sub plans, three written directions cover the full session: trace the model rows, copy the letter on the open lines, write the practice words at the bottom.
One specific move worth building into the close of any cursive Z lesson: ask students to circle their two best examples — one uppercase, one lowercase — and write one word explaining why those examples are clearer than the others. That ninety-second step turns handwriting from a pure copying task into an observation task. Students who do this consistently begin to notice stroke quality in their own writing across other subjects, which is where the real carry-over shows up.
Adjusting the Work for Students at Different Points in Cursive Development
Even in a single 4th grade classroom, students arrive at this work from very different starting points. Some have solid cursive habits already and need only a few repetitions before Z is consistent. Others are still working on basic slant and letter height and need the most structured version of the practice. The cursive z handwriting printable worksheets for 4th grade work across that range because the set includes options with varying levels of visual support — from tracing-heavy worksheets for students building the stroke from scratch to reduced-model versions for students ready to write from recall alone.
- Wide-line, tracing-first version: Extra space helps students control height and slant. Begin here for students whose overall cursive is still inconsistent.
- Standard guided version: Balanced mix of dotted models and open lines. The right fit for most students in a typical 4th grade class.
- Reduced-model version: Minimal visual cues. Good for students who have the stroke and need to write it from memory rather than copy it.
- Word-first version: Opens with word-level practice rather than isolated letters. Useful for students who form the letter alone but lose it in connected writing.
- Sentence-challenge version: More sentence lines, fewer isolated-letter rows. Matches students building fluency and consistency across a full line of cursive.
Differentiation can also work at the expectation level rather than requiring a different worksheet. One student completes only the tracing and guided rows; another completes the full worksheet and writes an original sentence. Both are working on the same target letter. Keeping the same worksheet for the whole class sometimes matters for classroom management — students at different stages are less visible to each other when the worksheet looks the same.
Frequently Asked Questions
Do these worksheets cover uppercase Z, lowercase z, or both?
Each worksheet includes both forms. Uppercase Z and lowercase z are different enough in cursive that students who learn one often misform the other, and these cursive z handwriting printable worksheets for 4th grade treat both as distinct skills that require separate, targeted repetition rather than assuming one transfers automatically to the other.
My students had inconsistent cursive instruction in earlier grades. Where should I start them?
Start with the tracing-first worksheet and spend one session on stroke description before students write independently. Students with mixed prior instruction often carry motor habits that conflict with the current model. Using consistent verbal cues — the same language every session — alongside tracing helps interrupt the old pattern and build a new one more reliably than repetition alone.
One of my students forms a correct Z in isolation but disconnects it from the next letter every time. Which worksheet helps most?
Use the word-first or word-heavy version and focus specifically on the exit stroke. Before the student writes each word, point to the exit tail on the model and say: "Keep the pen moving here — don't lift." In most cases the issue is habit rather than motor ability. The student stops at a natural completion point and hasn't yet internalized that the z stroke continues forward into the next letter. A few coached repetitions at the word level usually resolves it faster than returning to more isolated-letter rows.
Can one of these worksheets function as a quick formative check?
Yes. The independent-line section and the word row together give enough data to see slant consistency, letter size, connection quality, and overall formation. Collect those two sections after a practice session, flip through them quickly, and you have a workable picture of where each student stands. You're looking for whether the letter is recognizable across multiple attempts in connected writing — not a single clean model — so the check takes less than two minutes per student.
Clear All