4th Grade Seed Dispersal Worksheets Printable for Science Lessons
These 4th grade seed dispersal worksheets give students concrete practice with one of the more satisfying topics in elementary plant science — the idea that a seed's shape, weight, and surface texture are all doing a job. Rather than reading a definition and moving on, students sort examples by dispersal method, label seed structures, match features to functions, and write short explanations for why a particular seed travels the way it does. That progression from recognition to reasoning is where the understanding actually forms.
What's Inside the Set
Each worksheet targets one or more of the four dispersal methods Grade 4 science typically covers: wind, water, animal, and explosive self-dispersal. The set moves from identification tasks toward written justification, so teachers can assign worksheets in sequence or pull individual pages based on where a class is in the unit.
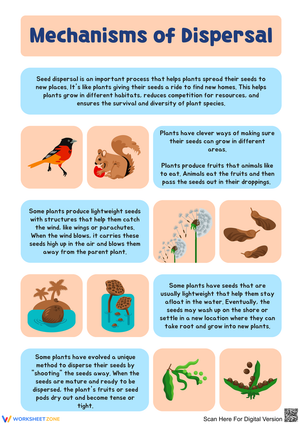
- Picture labeling: Students identify seed structures — wings, fluff, hooks, hard shells — and write the correct vocabulary term beside each image. This front-loads the language students need for later explanation tasks.
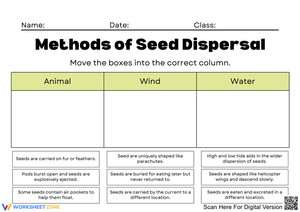
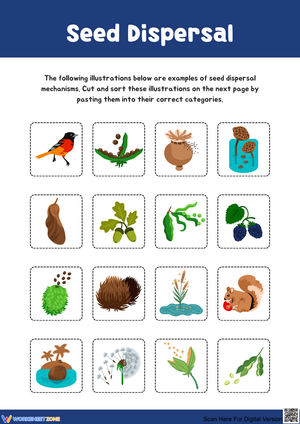
- Classification sort: Students place a set of seeds into four method categories and underline the structural feature that drove their decision. That underline step is intentional: it shifts the task from categorizing by feel to citing evidence.
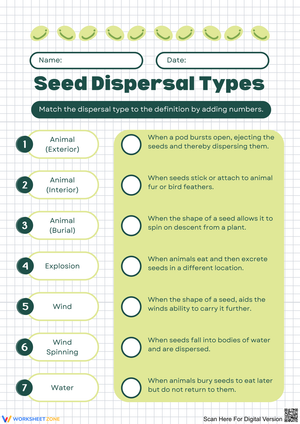
- Matching tasks: Seed features on one side, dispersal method on the other. Students draw a line and briefly explain the connection rather than just matching silently.
- Short reading passages: One to two paragraphs of content text followed by close-reading questions. These work well for science literacy practice alongside the hands-on tasks.
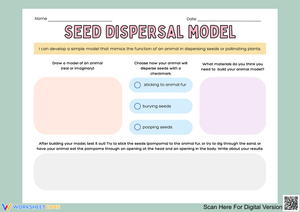
- Written explanation prompts: Open-ended questions that ask students to justify a classification — for example, explaining why a coconut's buoyant husk makes water dispersal possible rather than incidental.
- Exit slips: Brief end-of-lesson checks with one to three items, sized for the last eight minutes of a science block.
The seed vocabulary in these worksheets connects naturally to the broader plant life cycle — germination, reproduction, pollination — so the pages reinforce prior learning rather than treating dispersal as a standalone fact.
Standard Alignment
These worksheets align to NGSS 3-LS1-1, which asks students to develop models to describe that organisms have unique and diverse life cycles, and more directly to the plant reproduction and survival concepts addressed in 4-LS1 and state-level Grade 4 life science standards that cover how organisms survive and reproduce in their environments. The classification and evidence-citing tasks also support NGSS Science and Engineering Practice 6 (constructing explanations) and Practice 4 (analyzing and interpreting data). In classroom terms, this means the worksheets fit naturally at the point in a unit where students have been introduced to the life cycle and are now asked to explain how offspring spread — typically mid-unit, after germination, before an assessment of the full cycle.
How to Build These Worksheets Into Your Lesson Plans
A reliable sequence for a single science block: open with two or three physical objects or clear photographs (a dandelion seed head, a burr pulled from a wool sock, a coconut image), give students two minutes to notice and name what they observe, then move directly into a labeling or sorting worksheet while those observations are still fresh. The transition from seeing to classifying is where the concept lands. Waiting until the next day to do the worksheet tends to flatten that connection.
For centers, the set splits well across stations — a cut-and-paste sort at one table, a reading passage with questions at a second, a sketch-and-label task at a third. Whole-group teachers can use the same pages as guided practice first and independent work on a return visit. The sorting worksheet in particular works as a pre-assessment check before an end-of-unit test because it surfaces which method students are still conflating (animal and wind are the most common pair to blur).
One move that helps fourth graders write cleaner explanations: ask them to say the sentence aloud before they write it. A student who says "I put this one under animal dispersal because the hooks catch on fur" almost always writes a stronger answer than the student who goes straight to pen on paper. A thirty-second partner-talk before the writing prompt produces noticeably better written responses.
Frequent Student Errors Worth Watching For
The most consistent error across fourth-grade seed dispersal work is treating animal dispersal as a single category when it actually involves two distinct mechanisms: external attachment (hooks and barbs on fur or feathers) and internal passage (seeds eaten and later deposited). Students who sort correctly by the label "animal" often cannot explain which mechanism is at work, which becomes a problem when a written response asks them to describe how the seed travels. The worksheets address this by asking students to note whether an animal carries the seed on its body or through its body.
Wind and water dispersal also produce a predictable mix-up. Students see that both involve the seed moving passively — it isn't doing anything, the environment is doing it — and they conflate the two. A coconut does float, and water does move it, but students who understand only "the seed doesn't do anything" will misclassify maple samaras as water-dispersed if they happen to see one fall near a puddle. The labeling tasks in this set specifically ask students to identify the structural feature responsible for dispersal, not just the medium, which forces the distinction.
Explosive self-dispersal is often the method students find hardest to visualize without a demonstration. The term "self-dispersal" implies the plant is acting intentionally, which fourth graders will sometimes write — "the plant decides to shoot the seeds." Brief discussion of mechanical pressure building in a drying pod, rather than plant decision-making, clears this up before it calcifies as a misconception.
Adjusting the Worksheets for a Range of Learners
For students who need more scaffolding, the labeling and matching worksheets include a word bank covering the core vocabulary: wind, water, animals, burst, float, hook, wing, fur, and shell. Adding a sentence frame to explanation prompts — "This seed travels by ___ because its ___ helps it ___" — reduces the cognitive load on the writing mechanics and keeps attention on the science reasoning. Students who struggle with reading can complete the sorting and labeling tasks successfully while a partner reads the passage aloud.
For students ready to push further, the set includes extension questions that ask for comparative reasoning: which dispersal method is most effective in a dense forest canopy versus an open meadow, and why? A design challenge — sketch an imaginary seed for a coastal marsh and describe the structural features it would need — produces strong written responses from students who find the standard classification tasks too quick. These extensions stay attached to the same four-method framework, so the concept remains constant while the cognitive demand increases.
Frequently Asked Questions
Which dispersal methods do these worksheets cover?
The set covers all four methods standard to Grade 4 plant science: wind, water, animal, and explosive self-dispersal. Each method appears across multiple worksheet types — labeling, sorting, matching, and written explanation — so students encounter the same concept in different formats across the unit.
Can these be used as a sub plan or independent work?
The labeling, sorting, and matching worksheets are designed for independent completion without additional teacher setup. The short reading passages include their own questions, so a substitute can assign them without a science background. The exit slips work as a standalone check if a lesson runs short or a sub needs a timed closing activity.
How do I use these alongside a hands-on seed observation activity?
The most effective sequence is observation first, worksheet second. Even a two-minute look at a real burr, a maple samara, or a photo of a coconut husk gives students a reference image to anchor the classification task. After the worksheet, returning to the object and asking students to point out the feature they named in writing closes the loop between the abstract category and the physical structure.
What if my students are still on the identification level and not ready for written explanation?
Start with the labeling and cut-and-paste sorting worksheets, which require only recognition and categorization. The written explanation prompts can be introduced after students demonstrate consistent accuracy on the sorting tasks — typically after two or three practice sessions with the identification-level pages. The set is ordered to support that progression, but each worksheet also stands alone if you need to stay at one level longer.
Clear All