


Science activities for kindergarten help children explore the world through curiosity, play, and discovery. At this age, science isn’t about memorizing facts—it’s about asking questions, experimenting, and observing what happens next. These fun and simple experiments can be done with everyday materials at home or in the classroom. Whether it’s exploring colors, growing plants, or mixing up a foamy volcano, these activities make learning science exciting, engaging, and age-appropriate for little learners.
40+ science activities for kindergarten
These science activities for kindergarten are designed to make learning fun, engaging, and hands-on. Each experiment uses simple materials to spark curiosity, build early STEM skills, and encourage young learners to explore the world around them through play and discovery.
Simple everyday science activities for kindergarten
1. Sink or float challenge
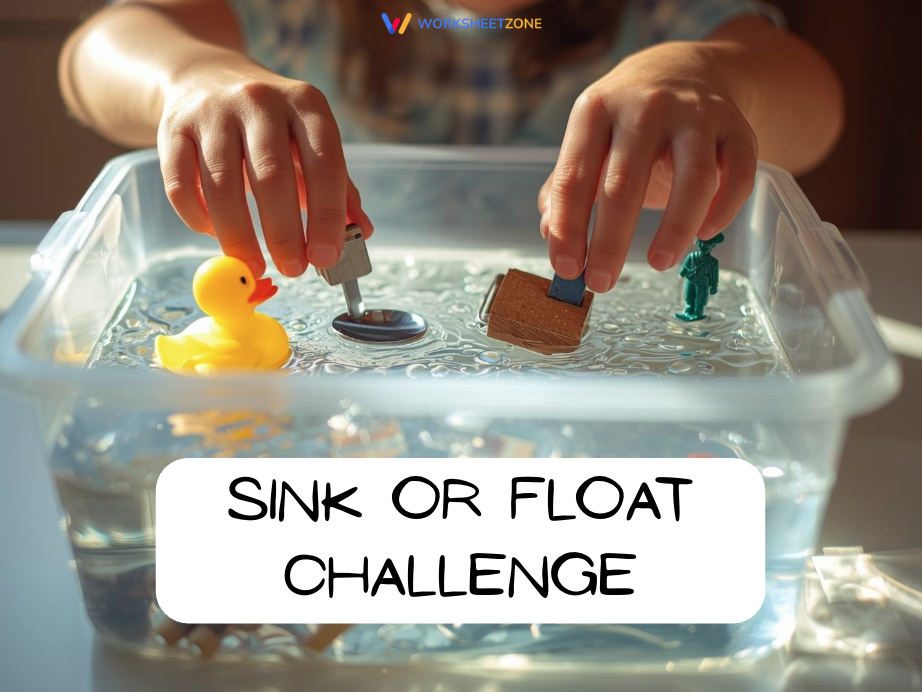
Discover which objects float or sink and learn about density in a fun water test.
Materials: Bowl of water, small toys, coins, spoons, plastic objects.
How to do it:
- Fill a bowl with water.
- Have children guess which items will float or sink.
- Drop each item in the water and observe the results.
2. Color mixing magic
A colorful way to explore primary and secondary colors using water and food dye.
Materials: Clear cups, water, food coloring (red, blue, yellow), spoons.
How to do it:
- Fill three cups with water and add one color to each.
- Mix colors (red + blue, blue + yellow, yellow + red) in new cups.
- Observe how new colors are formed.
3. Melting ice race
Experiment with temperature and watch which ice cube melts first.
Materials: Ice cubes, salt, warm water, bowls.
How to do it:
- Place one ice cube in each bowl.
- Add salt to one and warm water to another.
- Compare the melting speed and discuss why some melt faster.
4. Magic milk experiment
A vibrant way to explore surface tension and color movement.
Materials: Milk, food coloring, dish soap, cotton swabs, shallow plate.
How to do it:
- Pour milk into the plate and add food coloring drops.
- Dip a cotton swab in dish soap.
- Touch the milk surface and watch the colors swirl.
5. Bubble science
Discover the shape and structure of bubbles while having outdoor fun.
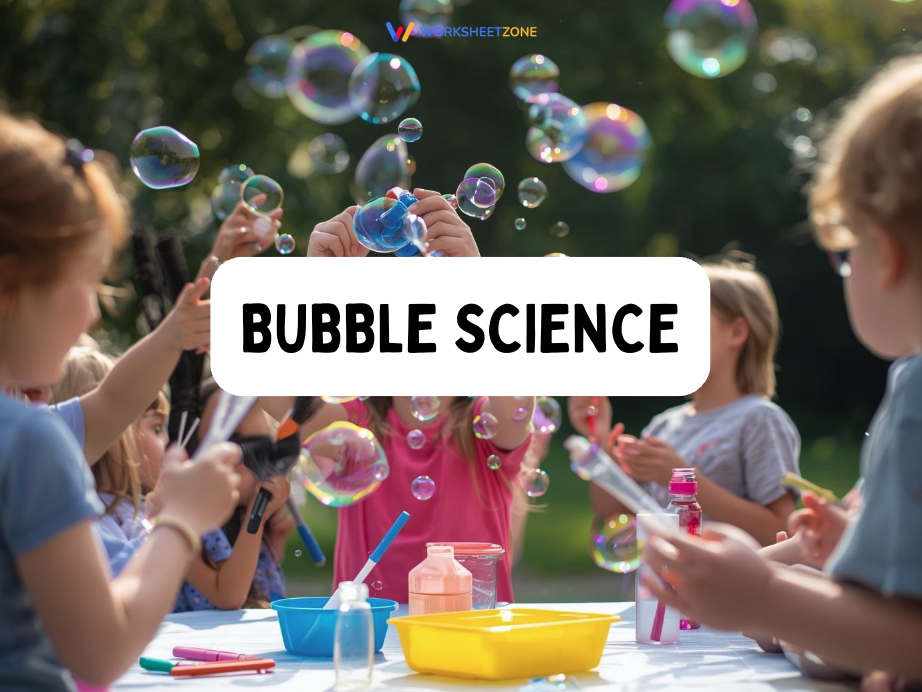
Materials: Bubble solution, bubble wands, shallow dish
How to do it:
- Dip the wand into the bubble solution.
- Blow gently and observe bubble shapes and reflections.
- Discuss why bubbles are always round.
6. Shadow play
Observe how light and objects create shadows that change over time.
Materials: Flashlight or sunlight, toys, paper, pencil.
How to do it:
- Place toys on a table near sunlight.
- Trace the shadow shapes on paper.
- Revisit later to see how shadows move.
7. Rainbow water cups
A simple experiment showing capillary action and color blending.
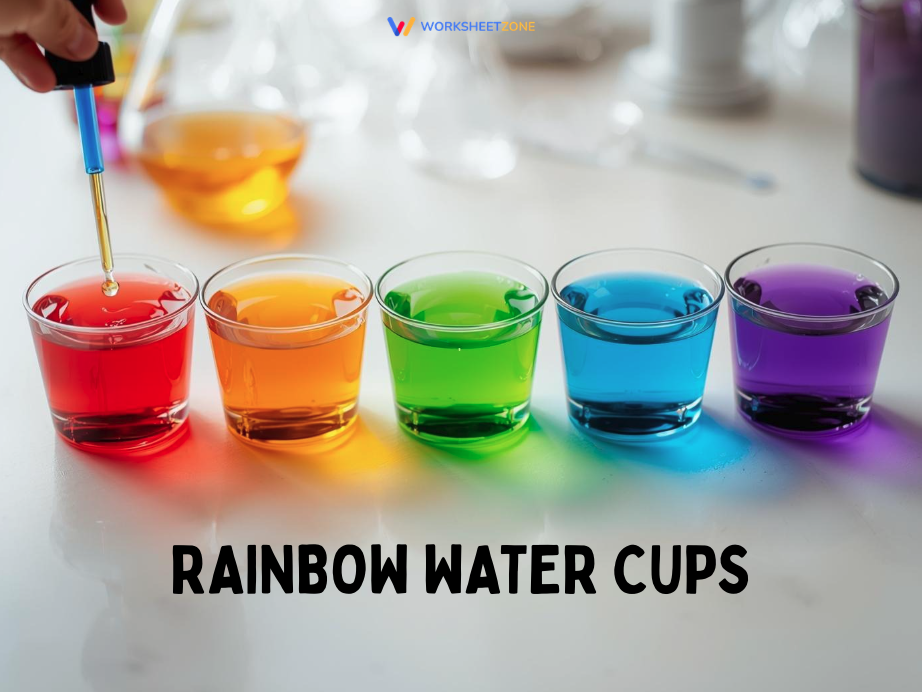
Materials: 6 clear cups, food coloring, paper towels, water.
How to do it:
- Fill every other cup with colored water.
- Connect cups with folded paper towels.
- Watch as colors “walk” through the paper and mix.
8. Balloon air power
Demonstrate motion and air pressure with an exciting balloon race.
Materials: Balloon, string, straw, tape.
How to do it:
- Thread the string through a straw and tie it between two chairs.
- Tape a blown-up balloon to the straw.
- Let go and watch the balloon race forward.
9. Magnifying glass hunt
Encourage observation and curiosity by viewing everyday items up close.
Materials: Magnifying glasses, small objects (fabric, leaves, paper)
How to do it:
- Provide each child with a magnifying glass.
- Examine textures and patterns in various items.
- Compare differences and share discoveries.
10. Paper towel color climb
See how water moves through paper using colorful capillary action.

Materials: Colored water, paper towels, clear cups.
How to do it:
- Fill cups with colored water.
- Place one end of a paper towel in each cup.
- Watch as colors climb up and mix in the paper.
Nature and outdoor science activities
Encourage kids to explore the natural world while developing observational skills and environmental awareness.
1. Plant a seed
Teach kids how plants grow by observing daily changes in a seed’s life.
Materials: Seeds, soil, small pots, water.
How to do it:
- Fill pots with soil and plant seeds.
- Water regularly and place it in sunlight.
- Record growth and changes over time.
2. Weather journal
Help children notice weather patterns while building daily observation habits.
Materials: Notebook, crayons, pencil.
How to do it:
- Step outside each morning and observe the weather.
- Draw or write symbols for sunny, cloudy, or rainy days.
- Compare results at the end of the week.
3. Bug safari
An adventure in discovering insects and learning about their habitats.
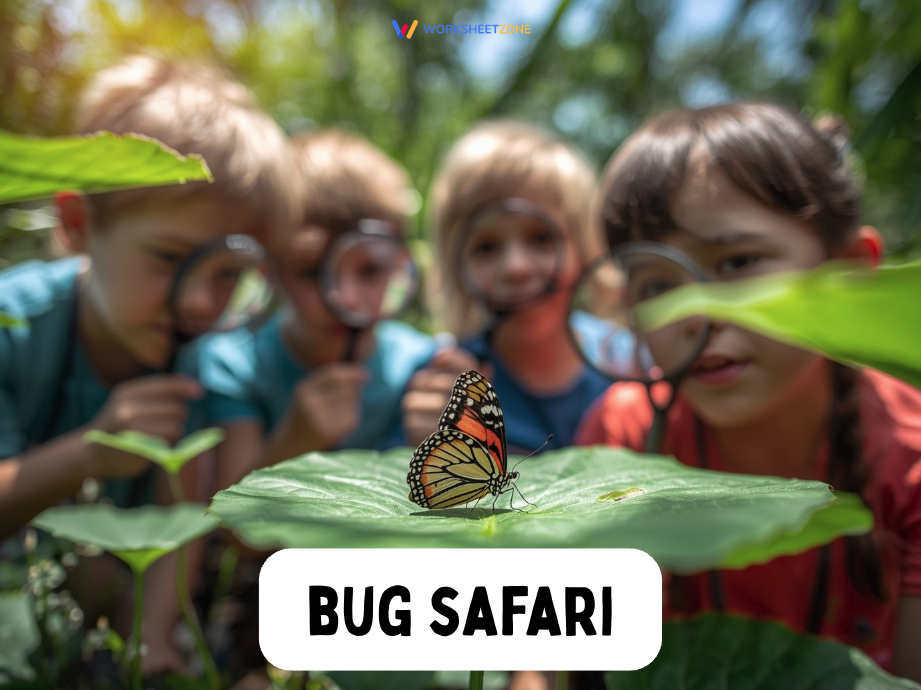
Materials: Magnifying glass, small jars, notebook.
How to do it:
- Search for insects outdoors.
- Observe their movements and colors.
- Record findings and release them safely.
4. Leaf sorting
A hands-on activity exploring plant diversity through color and texture.
Materials: Collected leaves, paper, glue.
How to do it:
- Gather leaves from trees or the ground.
- Sort them by color, size, or shape.
- Glue them onto paper and label their differences.
5. Mud kitchen play
Encourage creativity while exploring textures and mixtures in nature.
Materials: Soil, water, spoons, bowls, cups.
How to do it:
- Mix soil and water to make “mud”.
- Use kitchen tools to stir, pour, and create mud pies.
- Talk about how consistency changes with more or less water.
6. Rock sorting
Introduce geology by classifying rocks based on physical properties.

Materials: Rocks, magnifying glass, containers.
How to do it:
- Collect rocks of various sizes.
- Examine color, weight, and texture.
- Sort into labeled groups (smooth, rough, shiny).
7. Cloud observation
A relaxing way to learn about weather and cloud types.
Materials: Blanket, notebook, crayons.
How to do it:
- Lie down outdoors and look at clouds.
- Draw what you see and identify cloud types.
- Discuss how clouds move with the wind.
8. Bird feeder craft
Explore ecology by attracting and observing local birds.
Materials: Toilet paper roll, peanut butter, birdseed, string.
How to do it:
- Spread peanut butter on the roll.
- Roll it in birdseed and tie a string through it.
- Hang it on a branch and observe visiting birds.
9. Nature collage
Combine art and science with a creative nature-inspired craft.
Materials: Paper, glue, leaves, flowers, sticks.
How to do it:
- Collect natural materials outdoors.
- Arrange and glue them onto paper.
- Label each item and describe its texture.
10. Water the garden experiment
Understand plant needs by comparing watered vs. unwatered growth.

Materials: Two small plants, water, notebook.
How to do it:
- Water one plant daily, leave the other underwatered.
- Observe changes over several days.
- Record which plant grows stronger.
Fun chemistry and physics experiments
Introduce the magic of reactions, motion, and cause-and-effect through simple chemistry and physics demonstrations.
1. Baking soda volcano
A classic eruption experiment introducing chemical reactions.
Materials: Baking soda, vinegar, dish soap, food coloring, cup.
How to do it:
- Fill a cup with baking soda and dish soap.
- Add food coloring for effect.
- Pour in vinegar and watch the foamy “lava” erupt.
2. Balloon rocket
Show how air pressure and force can make objects move.
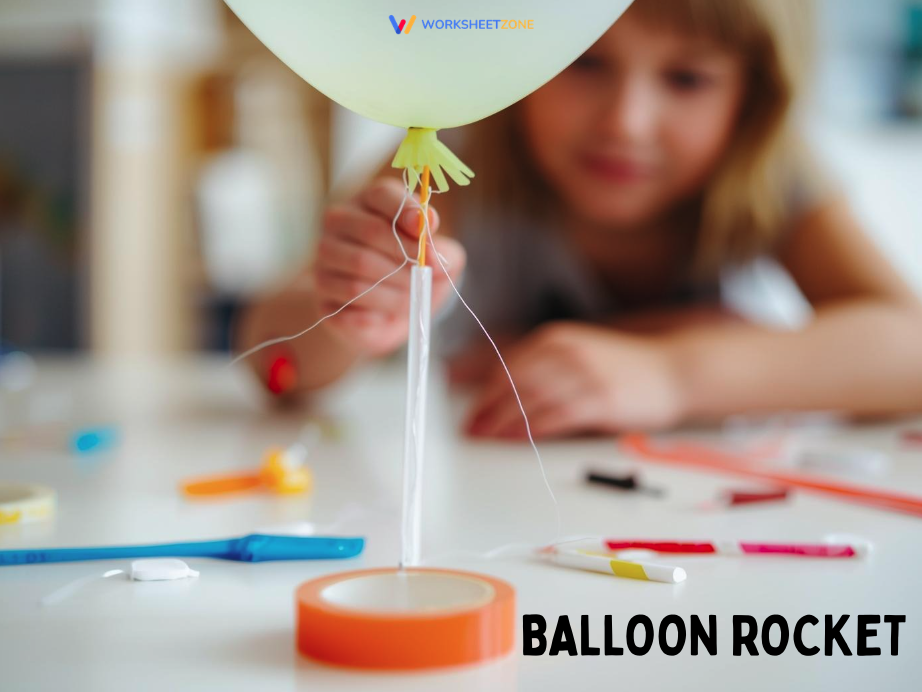
Materials: Balloon, string, straw, tape, chairs.
How to do it:
- Thread the straw through the string and tie it between chairs.
- Tape a blown-up balloon to the straw.
- Release and watch it zoom along the string.
3. Dancing raisins
Learn about buoyancy and gas with this simple soda trick.
Materials: clear soda, raisins, glass.
How to do it:
- Fill a glass with soda.
- Drop raisins into it.
- Watch them float up and sink as bubbles attach and release.
4. Magnetic treasure hunt
Discover which objects are magnetic through hands-on testing.
Materials: Magnets, metal and non-metal items.
How to do it:
- Gather various classroom or household items.
- Test each with a magnet.
- Sort into magnetic and non-magnetic groups.
5. Paper bridge challenge
Explore engineering concepts like structure and weight distribution.
Materials: Paper, books, small weights (coins).
How to do it:
- Build bridges using folded or flat paper.
- Place weights on top and see which holds the most.
- Discuss how folds add strength.
6. Spinning color wheel
Blend art and science by creating optical illusions.

Materials: Cardboard circle, markers, string.
How to do it:
- Color the circle with rainbow segments.
- Thread the string through the center and twist tightly.
- Spin fast and watch colors blend together.
7. Floating paper clip
Observe surface tension in a simple and surprising way.
Materials: Bowl of water, tissue, paper clip.
How to do it:
- Place the paper clip gently on a tissue.
- Let the tissue sink slowly.
- Watch the paper clip stay afloat on surface tension.
8. Lego ramp races
Teach motion, gravity, and friction using toy cars.

Materials: Toy cars, ramp (cardboard or books), tape measure.
How to do it:
- Build ramps at different angles.
- Race cars down and measure the distance.
- Compare how ramp height affects speed.
9. Water bottle tornado
A mesmerizing demonstration of vortex motion.
Materials: Two bottles, water, tape.
How to do it:
- Fill one bottle halfway with water.
- Tape the second bottle using down on top.
- Swirl to form a tornado as water flows down.
10. Sound vibration experiment
See sound waves in action using household materials.
Materials: Bowl, plastic wrap, rice, mental spoon.
How to do it:
- Stretch plastic wrap over the bowl.
- Sprinkle rice on top.
- Tap the spoon near the bowl and watch the vibrations move the rice.
Sensory and creative science activities
Let kid use their senses to explore texture, color, and motion while encouraging hands-on discovery and creativity.
1. Oobleck exploration
A fascinating experiment with a substance that’s both solid and liquid.
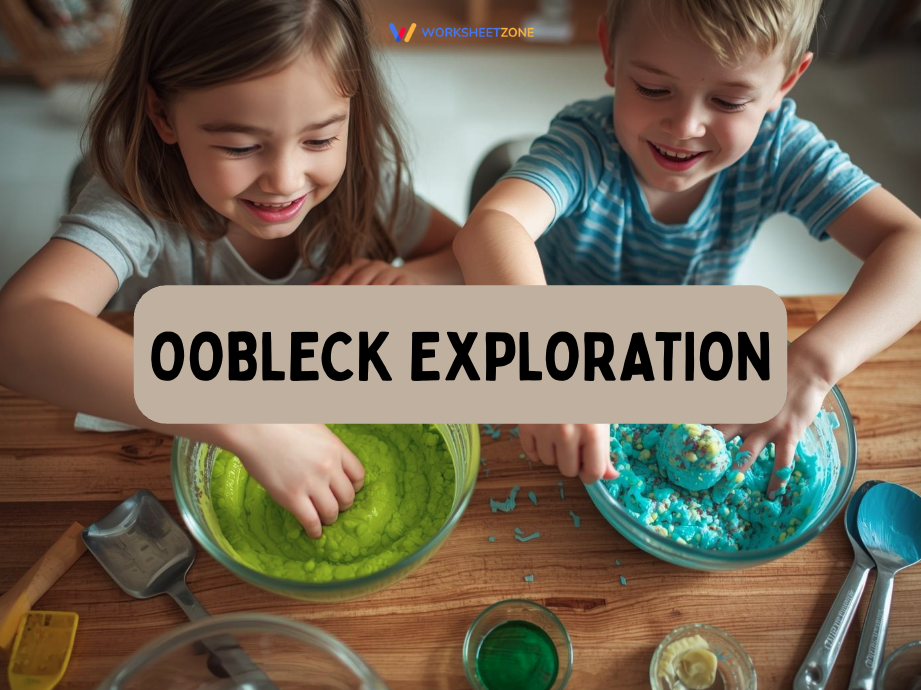
Materials: Cornstarch, water, bowl.
How to do it:
- Mix cornstarch and water in a 2:1 ratio,
- Press it firmly – it feels solid; release it – it flows like liquid.
2. Rainbow in a jar
Learn about liquid density while making a colorful rainbow,
Materials: Honey, dish soap, water, oil, food coloring, jar.
How to do it:
- Add each liquid slowly in layers, starting with honey.
- Color each layer differently.
- Watch the rainbow form as liquids separate by density.
3. Homemade playdough chemistry
Experiment with texture and chemistry while making playdough.
Materials: Flour, salt, oil, water, food coloring.
How to do it:
- Mix ingredients until smooth.
- Add color and knead until soft.
- Observe how consistency changes with more or less water.
4. Cloud in the jar
Demonstrate how condensation and clouds form in the sky.
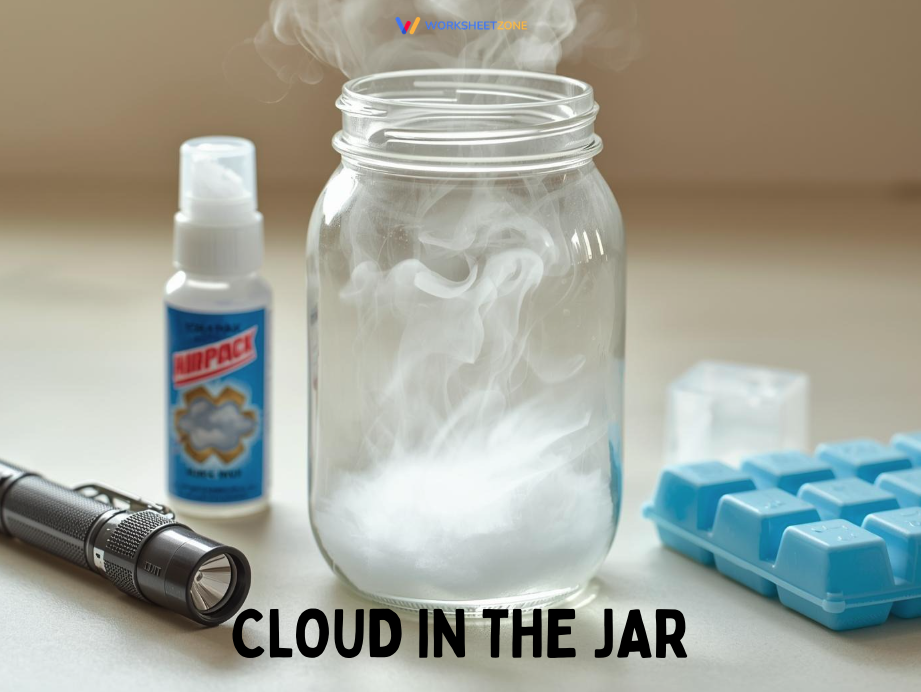
Materials: Jar, hot water, ice, aerosol spray.
How to do it:
- Pour hot water into the jar and spray inside.
- Cover with a lid of ice.
- Watch a cloud form under the lid.
5. Fizzing colors
An exciting reaction between baking soda and vinegar creates fizzing rainbows.
Materials: Baking soda, vinegar, food coloring, tray.
How to do it:
- Sprinkle baking soda on a tray.
- Add drops of colored vinegar.
- Observe fizzing and mixing colors.
6. Snow dough
Create cool, soft “snow” for sensory play and science talk.
Materials: Cornstarch, conditioner, bowl.
How to do it:
- Mix cornstarch with conditioner until it feels soft and moldable.
- Form shapes and discuss textures.
7. Sound shakers
Learn how sound changes with vibration and material type.
Materials: Small containers, rice, pasta, beads.
How to do it:
- Fill containers with different materials.
- Shake each and compare sounds.
- Discuss which materials make louder or softer noises.
8. Ice excavation
Practice observation and melting while rescuing frozen toys.
Materials: Ice cubes with small toys, salt, warm water.
How to do it:
- Freeze small toys in ice cubes.
- Use salt or warm water to melt ice.
- Free the toys and discuss the melting process.
9. Shadow drawing
Combine art and science by tracing shadows throughout the day.

Materials: Paper, pencil, toys, sunlight.
How to do it:
- Place toys in sunlight.
- Trace their shadows on paper.
- Repeat later to see how shadow lengths change.
10. Soap bubble prints
Make art from science with colorful bubble patterns.
Materials: Bubble solution, food coloring, paper, and straws.
How to do it:
- Mix the bubble solution with food coloring.
- Blow bubbles onto paper and let them pop.
- Let the prints dry for vibrant bubble art.
FAQs
1. Why are science activities important for kindergarteners?
Science activities are essential for young children because they foster critical thinking and curiosity about the natural world. At the kindergarten level, these hands-on experiences help students develop foundational STEM skills such as observation, prediction, and analysis. By engaging in simple experiments, children learn that they can find answers to their own questions through trial and error.
2. What materials are needed for basic kindergarten science?
Most kindergarten science projects can be completed using common household items that are safe and easy to find. Typical materials include water, food coloring, baking soda, vinegar, dish soap, and cornstarch. Outdoor activities often require simple tools like magnifying glasses, small containers, and notebooks. Using familiar items makes science feel accessible and encourages children to explore in any environment.
Final thoughts
Engaging in science activities for kindergarten goes beyond play – it nurtures critical thinking, curiosity, and a lifelong love for discovery. Each experiment gives children the chance to explore, question, and learn through direct experience. Teachers and parents can guide kids to see science not as a subject but as an adventure in understanding the world around them. By encouraging wonder and hands-on exploration, these activities lay the foundation for future learning and help every child see themselves as capable, creative young scientists ready to explore more.
Explore dozens of fun, printable, and engaging science worksheets for kindergarten at Worksheetzone. Give your young scientists more ways to explore, experiment, and grow every day.


