These lines worksheets give students in grades 2–6 structured practice identifying, drawing, and classifying lines, line segments, rays, and the relationships between them — the geometric vocabulary that underpins everything from area and perimeter to coordinate geometry in middle school. Each page targets a specific concept so teachers can match the worksheet to exactly where a class is in the unit rather than hunting through mixed-skill packets.
Concepts Across the Lines Practice Worksheets
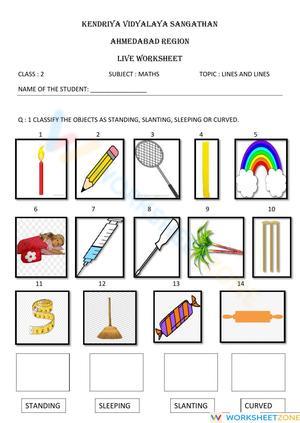
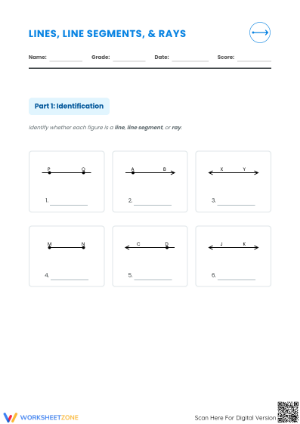
The collection moves through the core vocabulary in a logical sequence. Early pages focus on distinguishing a line (extending in both directions, represented with two arrows) from a line segment (two endpoints, measurable length) and a ray (one endpoint, one arrow). Students mark endpoints, draw each figure from written descriptions, and practice the notation — AB with a bar for a segment, AB with an arrow for a ray — because notation errors are some of the most persistent in fourth-grade geometry assessments.
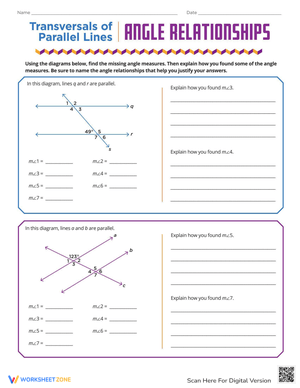
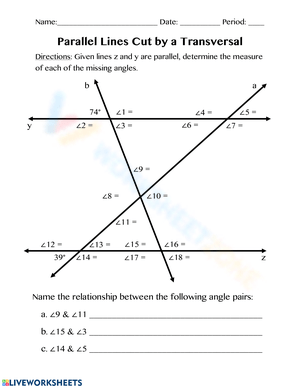
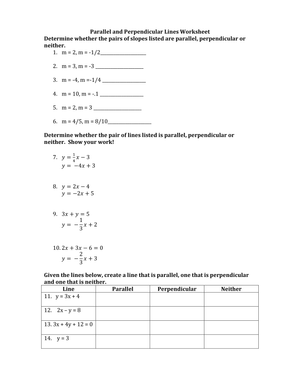
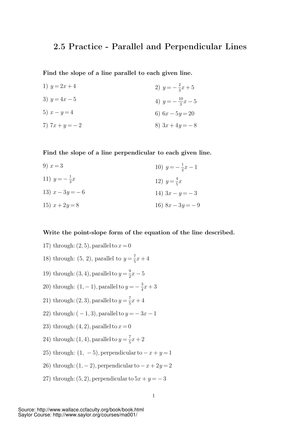
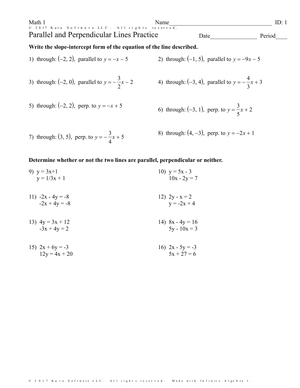
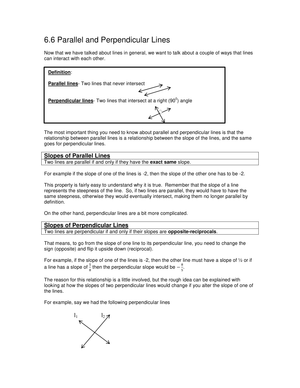
Later pages introduce the three line relationships students need to recognize and produce: parallel lines that stay equidistant and never intersect, perpendicular lines that meet at a right angle, and intersecting lines that cross at a point. Several pages ask students to identify which relationship exists in a diagram, then name the lines using proper notation. A separate set asks students to draw parallel or perpendicular lines through a given point using a straightedge — a spatial task that reveals whether a student understands the concept or has only memorized the definition.
Where Students Struggle Most
The conceptual gap that trips up more students than any other in this unit is the difference between a ray and a line segment. Both have an endpoint; both are drawn starting from a fixed point. What students miss is the directionality — a ray keeps going. On paper, this distinction lives entirely in whether there's an arrowhead, and students who are still developing left-to-right reading attention will reverse the arrow or place it on both ends and call it a line. Worksheets that include deliberate near-miss examples — a segment and a ray side by side, differing only in the arrowhead — give students practice slowing down to check both ends before labeling.
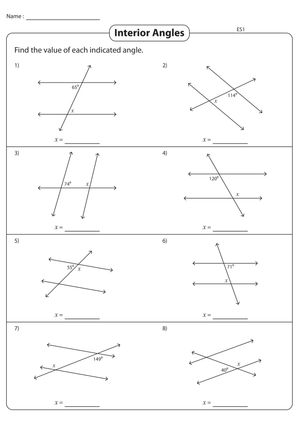
With parallel and perpendicular lines, the most common slip is confusing perpendicular with intersecting. Students see two lines crossing and reach for the first category that applies. Worksheets that include intersecting-but-not-perpendicular pairs alongside actual perpendicular pairs — and that require students to mark a right-angle square before labeling anything perpendicular — catch this error before it calcifies. The small right-angle marker is not decorative; making students draw it themselves forces the visual check.
How This Fits the 4.G.A.1 Standard
Common Core standard 4.G.A.1 asks fourth graders to draw points, lines, line segments, rays, angles, and parallel and perpendicular lines, then identify these figures in two-dimensional drawings. This is the primary grade where the vocabulary is formally introduced, though teachers in grades 2–3 can use the simpler pages for early exposure, and grades 5–6 teachers reach for these during review or with students who entered the year with weak geometry foundations. The standard's emphasis on drawing as well as identifying is worth taking seriously — a student who can circle the right answer on a multiple-choice item but cannot produce a ray with a straightedge hasn't fully met the standard. The pages in this set include both recognition and production tasks to close that gap.
Fitting These Into Your Classroom Lesson Plan
The single-page format is built for the transitions that teachers actually have: a five-minute warm-up before the lesson gets going, an exit ticket in the last eight minutes before dismissal, or the Monday review block after a concept was introduced the previous week. A full worksheet takes most fourth graders ten to twelve minutes, which makes it workable as independent practice while you pull a small group, or as a short homework page that doesn't bleed into family time.
One color-coding approach that works well in the middle of a unit: ask students to trace parallel lines in one color and perpendicular lines in another before they write any labels. The act of moving a marker along the full path of each line forces students to follow where it goes — which is the geometric thinking the task is trying to build — rather than glancing at an intersection and guessing. This doesn't require additional materials beyond what most classrooms already have at tables, and it gives you a visual scan of the room to see who is tracking correctly before anyone writes an answer.
Adapting the Worksheets for Different Learners' Level
For students who finish quickly and accurately, the most productive extension is geometric notation written in complete form: labeling ray CD with the correct symbol, then writing a sentence explaining why it is a ray and not a segment. Writing the reasoning in words presses students to articulate the difference rather than rely on visual pattern-matching alone — a skill they'll need when problems embed lines inside more complex figures.
For students who struggle, the pages with larger diagrams and fewer items per row reduce the visual crowding that causes misreads. These students often know the definitions but lose track of which figure they're examining when six or eight small diagrams are packed onto a page. Presenting two or three items per page is not a conceptual accommodation; it's a perceptual one, and it lets the concept land without the confusion of a cluttered field.
Frequently Asked Questions
At what grade should I introduce parallel and perpendicular lines?
Grade 4 is the standard entry point, aligned to 4.G.A.1. That said, many teachers introduce informal versions of parallel lines in second or third grade when discussing rectangles — opposite sides are parallel — even if they don't formalize the vocabulary yet. That informal exposure makes the grade 4 introduction faster for most students.
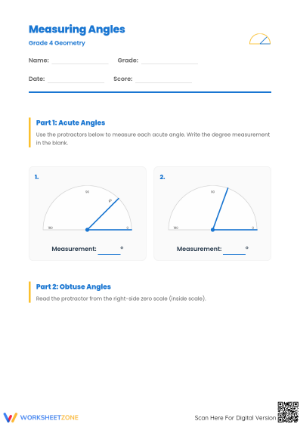
Do students need a protractor for these pages?
No. The perpendicularity tasks on these pages use the right-angle marker rather than degree measurement. Students confirm a right angle by marking it with a small square, which is the appropriate tool at this stage. Protractor work comes later, when students measure angles — a related but distinct skill.
Can I use these as formative assessments?
A single page works well as an exit ticket. Ask students to complete one identification problem and one drawing problem before leaving. The combination tells you whether a student can recognize the figure and also whether they can produce it — two different things that a multiple-choice-only check misses entirely.