Printable microscope worksheets give Grade 6 teachers a clear way to teach one of the most common lab tools in life science. Students often see a microscope in class before they fully understand what each part does, so a focused worksheet helps slow the lesson down and turn a hands-on lab into visible learning. Instead of only watching a demonstration, students can label the instrument, connect each part to its function, and review safe use before they begin viewing specimens.
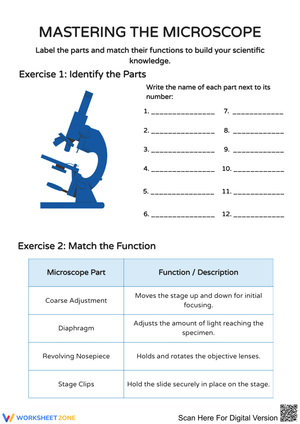
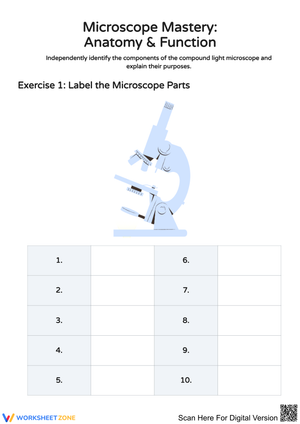
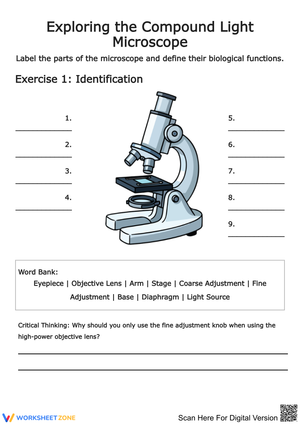
These worksheets are especially useful when teachers want students to do more than memorize terms. A strong page can ask students to identify the eyepiece, body tube or head, revolving nosepiece, objective lenses, stage, diaphragm, light source, arm, coarse adjustment, fine adjustment, and base. It can also ask what each part does during viewing, which helps students connect structure and purpose rather than treating microscope parts as isolated labels.
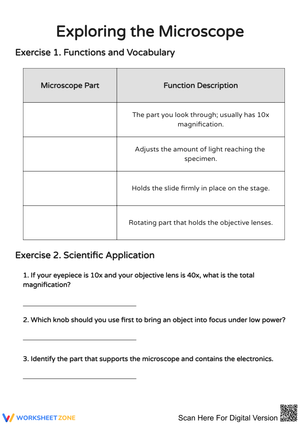
What should a strong printable worksheet include?
The most effective microscope printables usually combine several kinds of practice on one page or across a short set. A simple labeling task is helpful, but it works even better when paired with function questions and a short safety check. This gives teachers a more complete picture of what students understand before they work with real equipment.
- Diagram labeling: Students label a microscope image using a word bank or fill in names from memory.
- Parts and functions matching: Students match each structure to its job, such as which part changes magnification or which part holds the slide.
- Safety and care review: Students identify correct routines like carrying the microscope with two hands and starting on low power.
- Observation prompts: Students answer short questions after viewing a specimen or a sample image.
- Magnification practice: Students multiply the eyepiece magnification by the objective lens magnification to find total magnification.
This mix supports both vocabulary growth and lab readiness. It also helps teachers check whether a student can move from naming a part to actually using the microscope correctly.
Key microscope parts students should know
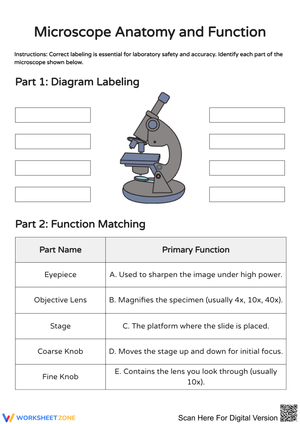
In Grade 6, teachers usually focus on the major parts that students can identify and use during a basic lab. A worksheet should keep the list manageable and classroom relevant. The eyepiece is where students look into the microscope. The body tube or head connects the eyepiece to the rest of the instrument. The revolving nosepiece holds the objective lenses and lets students switch powers. The objective lenses change magnification for closer viewing.
Students should also know the stage, where the slide rests, and the diaphragm, which helps control the amount of light. The light source provides illumination. The arm supports the upper portion of the microscope and is one of the places students hold when carrying it. The base supports the microscope at the bottom.
Focusing parts are also important. The coarse adjustment brings the image into general focus, usually when starting on low power. The fine adjustment sharpens the image, especially when using higher power. A worksheet that asks students to compare these two knobs can prevent common errors during lab work.
When students know these parts well, they are more prepared to solve routine problems. If an image is too dark, they can think about the diaphragm or light source. If the image is blurry, they can think about focus. If magnification needs to change, they know to turn the nosepiece carefully.
Teacher Tips
Begin with direct teaching of the major parts using a projected microscope diagram. Next, give students a labeling page with a word bank. After that, move to a function-matching section and a short safety review. If microscopes are available, end with a brief viewing task where students apply what they practiced on paper.
Another useful approach is differentiation by task type. Some students may only need a clear diagram and a word bank. Others are ready for more independent work, such as writing the function of each part or explaining why coarse adjustment should not be used on higher power. A challenge section can include magnification questions using values such as a 10x eyepiece and different objective lenses.
A practical insight for teachers is to keep one “trouble spots” mini-sheet attached to the main worksheet. Students often mix up the stage and base, or the coarse and fine adjustment knobs. A small box with side-by-side comparisons can reduce repeated lab confusion and save class time once microscopes are on desks.
These worksheets also work well as station activities. At one station, students label the microscope. At another, they sort part names and functions. At a third, they solve magnification problems. This format keeps students active while giving the teacher time to check microscope handling in a smaller group.
Using magnification practice in a simple way
Many Grade 6 microscope lessons introduce total magnification in a basic, concrete form. Students do not need a long lecture to begin. They only need to know that the total magnification is found by multiplying the eyepiece magnification by the objective lens magnification. A worksheet can show one worked example and then provide a few short problems.
For instance, if the eyepiece is 10x and the objective lens is 4x, students multiply to find the total magnification. Teachers can then add one or two more examples with other common objective lens values. Keeping this section short helps students focus on the idea without losing sight of the larger goal, which is learning to use the microscope with confidence and accuracy.
Magnification questions are most effective when tied to actual viewing decisions. Instead of isolated math only, a worksheet can ask which lens a student would begin with, or which setting gives a closer view after an object is first located. This keeps the science context clear.
Frequently Asked Questions
1. What microscope parts should Grade 6 students be expected to know?
Most Grade 6 lessons focus on the main parts of a compound light microscope: eyepiece, body tube or head, revolving nosepiece, objective lenses, stage, diaphragm, light source, arm, coarse adjustment, fine adjustment, and base. A good worksheet asks students to identify each part and explain its job.
2. How can teachers explain the difference between coarse and fine adjustment?
The coarse adjustment is used first to bring the image into general focus on low power. The fine adjustment is used to sharpen the image, especially on higher power. On a worksheet, this works well as a compare-and-contrast question or a lab safety reminder.
3. What safety rules should students follow when using a microscope?
Students should carry the microscope with two hands, place it on a stable surface, start on low power, and use coarse focus only on low power. They should use fine focus as magnification increases, handle slides carefully, and keep the microscope clean and steady during use.
4. How do students calculate total magnification on a worksheet?
Students multiply the eyepiece magnification by the objective lens magnification. A short set of examples is usually enough for Grade 6. This is a strong addition to a printable because it connects microscope parts to how the tool actually works in class.
For teachers planning a microscope unit, printable worksheets offer a dependable way to build vocabulary, safe lab habits, and basic magnification skills in one place. They fit warm-ups, direct instruction, stations, review days, and quick assessments, making them a useful part of any Grade 6 science classroom.