2nd grade flower worksheets pdf
These 2nd grade flower worksheets give students a structured way to move from casual observation — "it's red, it has petals" — to the kind of labeled, sequenced understanding that early elementary science actually demands. Each worksheet targets a specific slice of plant biology: part identification, life cycle sequencing, pollinator relationships, or basic function. Together, the set covers the core concepts most second-grade science units expect students to master before third grade, when ecosystems and food chains build directly on this foundation.
What's Inside the Set
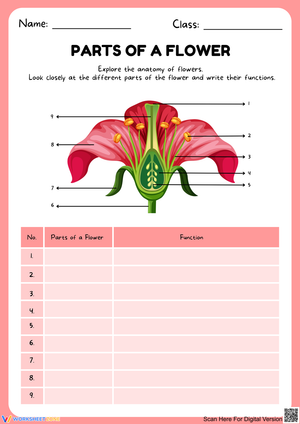
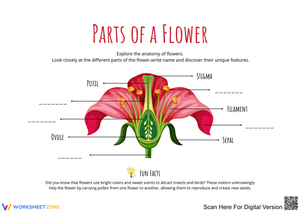
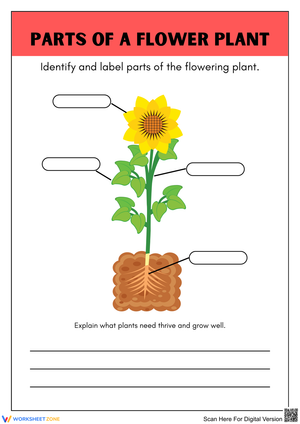
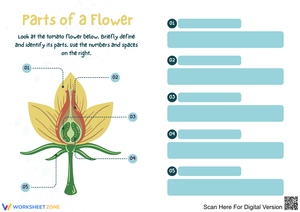
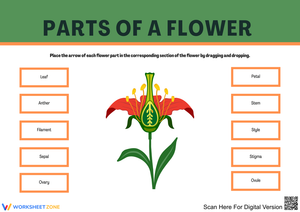
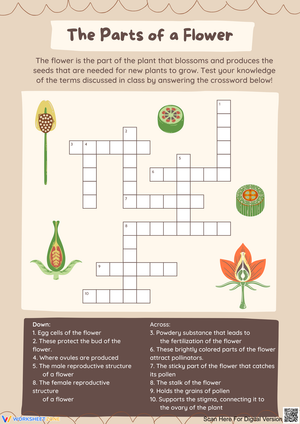
The worksheets address four main content areas. Flower anatomy is the heaviest focus: students label diagrams identifying petals, sepals, stamen, pistil, and stem, then connect each part to its function. A separate group of worksheets targets the flowering plant life cycle — seed, germination, seedling, mature plant, flower, seed dispersal — through cut-and-sequence activities and fill-in diagrams. Pollination worksheets ask students to explain how pollen moves and to match pollinators (bees, butterflies, hummingbirds) to the flower structures that attract them. A smaller group extends into photosynthesis at an introductory level, explaining what the leaves do while the flower does its reproductive work. The result is a set that covers plant biology as a connected system rather than a list of isolated vocabulary words.
Standard Alignment
These worksheets align with NGSS 2-LS2-2, which asks second graders to develop a model that mimics how plants depend on animals for pollination and seed dispersal. The labeling and pollinator-matching activities function as exactly that — low-tech models of a biological relationship. Many state frameworks also map this content to structure-and-function expectations at the K-2 band, where students are expected to connect an organism's physical features to what those features do. The pistil-and-stamen identification work addresses that expectation directly, and the life cycle sequencing supports the related idea that organisms go through predictable patterns of growth and change.
Mistakes Students Make That These Worksheets Help You Catch
The most persistent error in second-grade plant work is conflating the stamen and pistil — students learn both words the same day and swap them constantly on follow-up activities. What makes this stickier than it looks: students who can point to each part correctly on a diagram will still write "the pistil makes pollen" in a sentence because the labels haven't transferred to functional understanding. The labeling worksheets are designed to surface this confusion early, before it compounds into the life cycle work where the distinction actually matters for explaining seed formation.
A second pattern worth watching is how students sequence the life cycle. Most can identify a seed and a flower as endpoints, but they routinely place germination after seedling rather than before it, and they frequently omit seed dispersal entirely — as though the cycle just stops at the bloom. The sequencing worksheets include dispersal explicitly and require students to draw an arrow returning to "seed," reinforcing that the cycle is a loop. Students who skip that arrow almost always need a follow-up conversation about what happens after the flower dies.
How to Build These Worksheets Into Your Lesson Plans
The anatomy labeling worksheets earn their keep as a Monday warm-up after a weekend break — five minutes of low-stakes retrieval before a new lesson begins. Students who blanked on "stamen" Friday afternoon often surprise themselves by writing it correctly Monday morning, which is a useful conversation starter about how memory works.
The life cycle sequencing worksheets pair naturally with a classroom germination observation. Keep a bean seed in a damp paper towel visible in the classroom window and assign the sequencing worksheet the day students first see the sprout emerge. The concrete event gives the abstract diagram an anchor. For the pollination worksheets, a live flower dissection — a tulip or lily works well because the stamen and pistil are large enough to handle — lets students place physical flower parts directly alongside the worksheet diagram. This is not a decorative activity: the tactile comparison is what moves the labeling from "I copied it" to "I understand what I'm looking at."
If your science block is short, the individual worksheets also work well as exit tickets. A single part-labeling diagram takes about eight minutes, which fits the transition window before lunch or end-of-day pickup without requiring students to drop a longer activity mid-task.
Adjusting the Worksheets for a Range of Learners
For students who need more support, limit the anatomy worksheets to the three most visible parts — petal, stem, leaf — and introduce stamen and pistil only after those three are solid. A word bank printed at the bottom of the page removes retrieval pressure without removing the identification task itself. Students who struggle with the sequencing activity often do better with photographs than line drawings; if you have access to a printer, substituting real plant photos for the diagrammatic cards can make the sequence feel more intuitive.
Students who finish early and need extension can annotate each flower part with a function explanation in their own words, which is a different cognitive demand than labeling alone. The pollinator-matching worksheets also extend naturally into a research task: students identify one local pollinator, find out what it eats, and add it to a hand-drawn food web. That work can run several days without requiring any additional purchased materials.
Frequently Asked Questions
Are these worksheets appropriate for advanced first graders or struggling third graders?
The anatomy and life cycle content sits squarely in second-grade scope and sequence, but the scaffolding in the early worksheets makes them accessible for first graders who have had some plant observation experience. For third graders who are still building this vocabulary, the same worksheets serve as a no-frustration review — the format is age-neutral enough that it doesn't feel remedial, which matters for students who are sensitive about working below grade level.
Can these be used without a live plant or garden access?
Yes. The diagrams are detailed enough to support instruction using images alone. That said, if you can bring in a single grocery-store flower — a lily from a corner store works fine — the dissection activity described above dramatically improves retention. Even one flower shared between a group of four students is enough to make the parts concrete.
How do the labeling worksheets work for students who can't yet read the vocabulary independently?
The word bank format on the early worksheets keeps the reading demand manageable — students are recognizing and matching rather than recalling and spelling. For students who need more support, reading the word bank aloud as a group before students work independently removes the decoding barrier without removing the science task. The goal at this stage is part identification, not spelling assessment.
Do the worksheets cover seed dispersal, or just pollination?
Both. The life cycle worksheets include seed dispersal as a named stage, and one worksheet in the set asks students to sort dispersal methods — wind, water, animal — with examples of each. This is where the "burs stick to a dog's fur" detail tends to produce the most engagement; students almost always have a personal experience with a sticky seed, and connecting that experience to a scientific process is worth the brief detour it takes.
Clear All