


Teaching just got a whole lot easier! If you’re looking for a simple, effective way to manage your classroom online, WSZ Classie is here to help. In this guide, we’ll walk you through how to create your first class on WSZ Classie, a powerful new class management tool on Worksheetzone. Whether you’re assigning worksheets or tracking student progress, this guide gives you every step you need to take control of your class with ease. Let’s get started!
What is WSZ Classie?
Worksheetzone is an online platform designed to empower teachers, students, and parents by providing thousands of ready-made worksheets and interactive tools across all major subjects and grade levels. From printable worksheets to custom worksheet creation, it offers a one-stop hub for modern education needs.

Now, meet WSZ Classie—Worksheetzone’s new class management system built specifically for teachers. WSZ Classie allows you to:
- Create virtual classrooms within minutes.
- Add students with a class code or URL.
- Assign interactive worksheets and tasks directly from your library or custom creations.
- Track student performance in real-time using powerful AI-powered analytics.
These tools help save time, improve instruction through data insights, boost student engagement, and simplify classroom organization. Whether you’re teaching in a physical classroom or running a hybrid model, WSZ Classie simplifies how you teach, assign, and evaluate.
Step-by-Step to Create Your First Class on WSZ Classie
Whether you’re organizing a single class or multiple grade groups, WSZ Classie gives you a simple but powerful way to manage everything from student invites to assignment tracking. Here’s how to set it all up—step by step.
Step 1: Log In or Sign Up
To begin using WSZ Classie, you’ll first need to log in to Worksheetzone:
- Visit https://worksheetzone.org in your desktop browser.
- Click the “Log In” button at the top right of the homepage.

- If you already have a Worksheetzone account, enter your email to log in.
- If you’re new to the platform, just easily create a new account with your preferred email
Useful Trick: During registration, you might select “Teacher” as your role; by this, the contents are suggested more likely to fit with teachers’ needs.
- Check your email for a verification link and click it to complete the setup.
Step 2: Access the Class Management Feature
- Once you’ve logged in, navigate to your Dashboard.
- Look for the “Class Management” section in the left-hand sidebar or under your profile menu.
- Click Class Management to open the WSZ Classie interface.

On this page, you’ll see two main sections:
- New Class (for teachers to create and manage classrooms)
- Join Class (for students to enter a class using an invitation code or link)
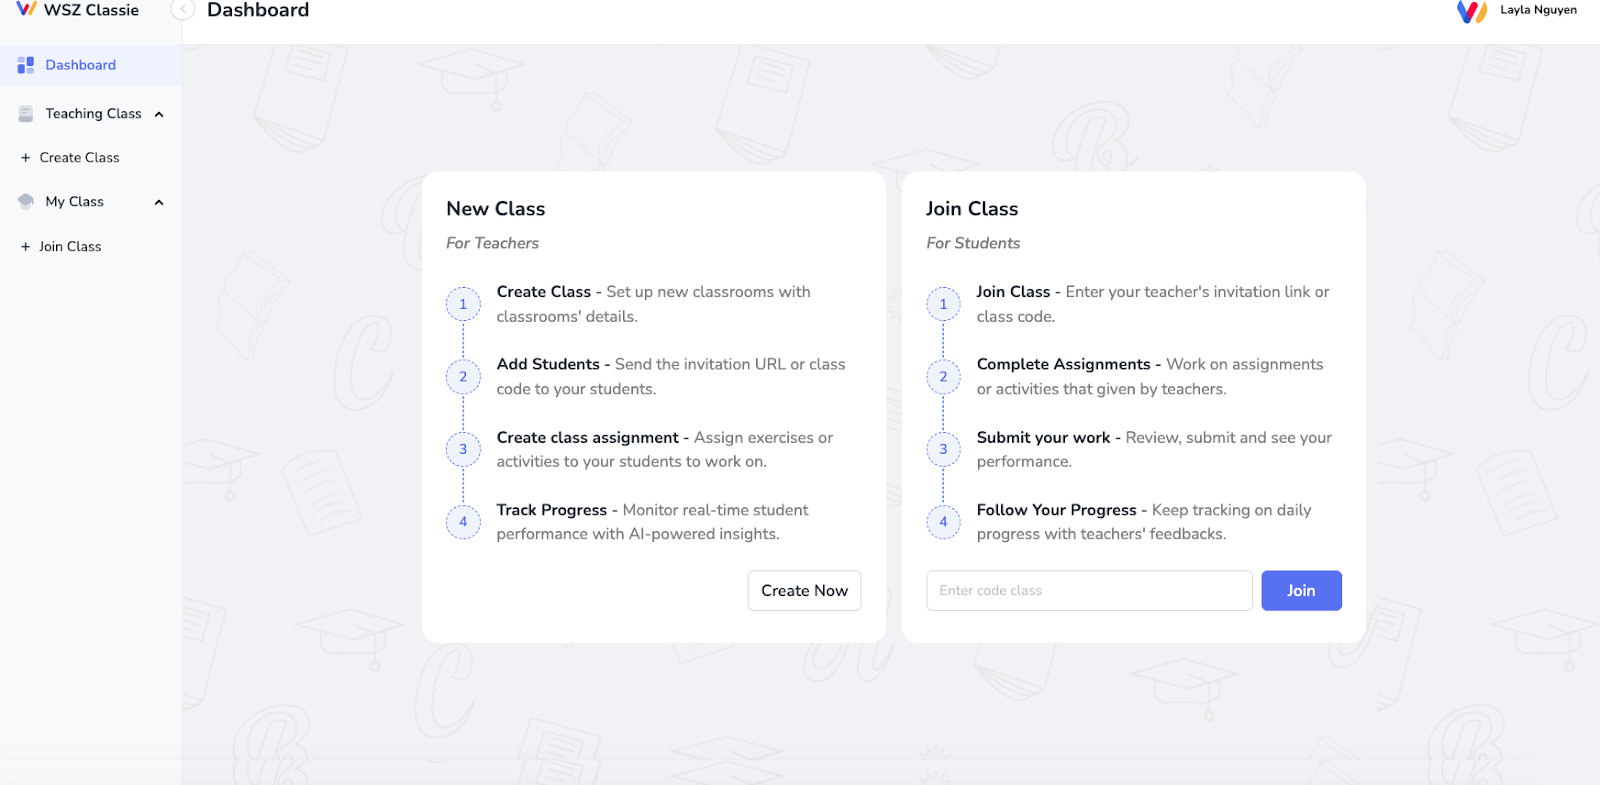
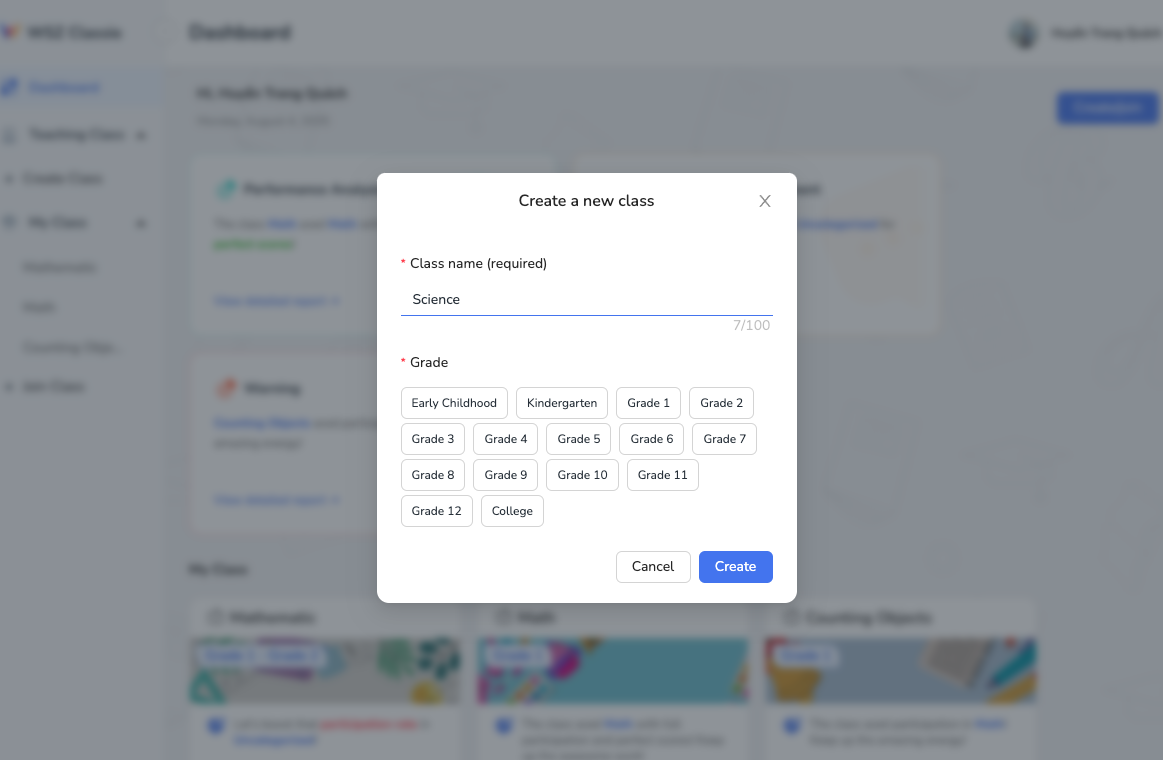
Step 3: Create Your First Class
To start setting up your classroom, click on the “Create Now” button under the New Class card.
- After clicking “Create Now,” a simple form will appear.
- Enter the following details:
- Class Name: e.g., “Science”
- Grade: Select the grade level from the dropdown menu.
- Once filled in, click the “Create” button.
That’s it! You’ve now created your first digital classroom on WSZ Classie.
Step 4: Add Students to Your Class
After creating the class, you’ll see a screen with class details and options.
- Look for the Invitation URL and Class Code at the top of your class page.
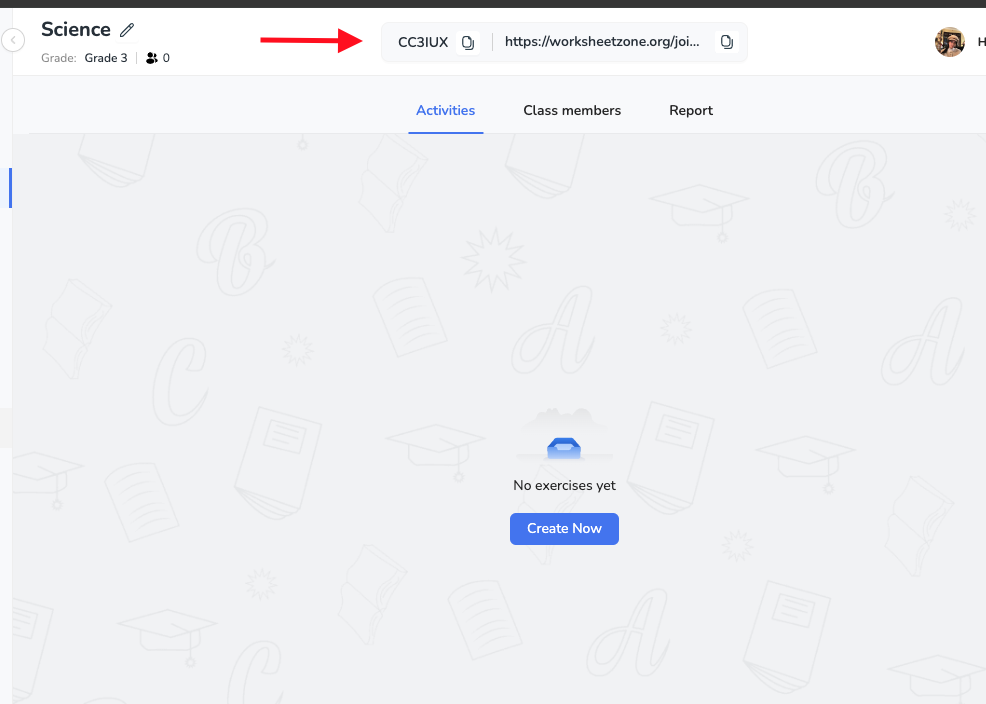
- Copy and share this link or code with your students. You can send it:
- Via school email
- Through a messaging app (like WhatsApp, Messenger, or X (formerly Twitter))
- Written on the board for in-person classes
- Click on the link or go to the site and select Join Class
Students will:
- Click on the link or go to the site and select Join Class
- Enter the code and their name
- Request to join your class
- As students send join requests, you’ll receive a notification.
- Go to the Class Members tab → Pending Approval List
- Click Approve or Deny for each student.

Step 5: Create and Assign Activities
WSZ Classie allows you to assign ready-made or custom exercises directly to your class. Here’s how:
1. Go to the Activities Section
- In your class view, find the Activities area.
- Click “Create Now” to begin setting up an exercise or worksheet.
2. Choose a Worksheet to Assign
You’ll be prompted to select where you want to pull the exercise from. Choose one of the following:
- My Worksheets – worksheets you’ve already created
- My Downloads – worksheets you’ve previously downloaded
- My Likes – worksheets you’ve saved from browsing
- Worksheet Studio – create your own worksheet from scratch

Once selected, click “Assign Now”.
3. Set Up the Assignment
Now it’s time to configure how students will interact with the worksheet:
- Start Date – when the assignment becomes available
- Due Date – when students must submit their work
- Timer (optional) – limit how long students can spend
- Participant Attempts – the number of times students can try the worksheet
- Show Feedback – choose if students see results after submitting
- Late Submissions – allow students to submit after the due date

Click Continue when ready.
4. Add Topic Name
To organize your exercises, enter a Topic Title such as:
- “Unit 2: Fractions Practice”
- “Grammar Review – Week 3”
This helps categorize assignments and makes them easier to locate later.
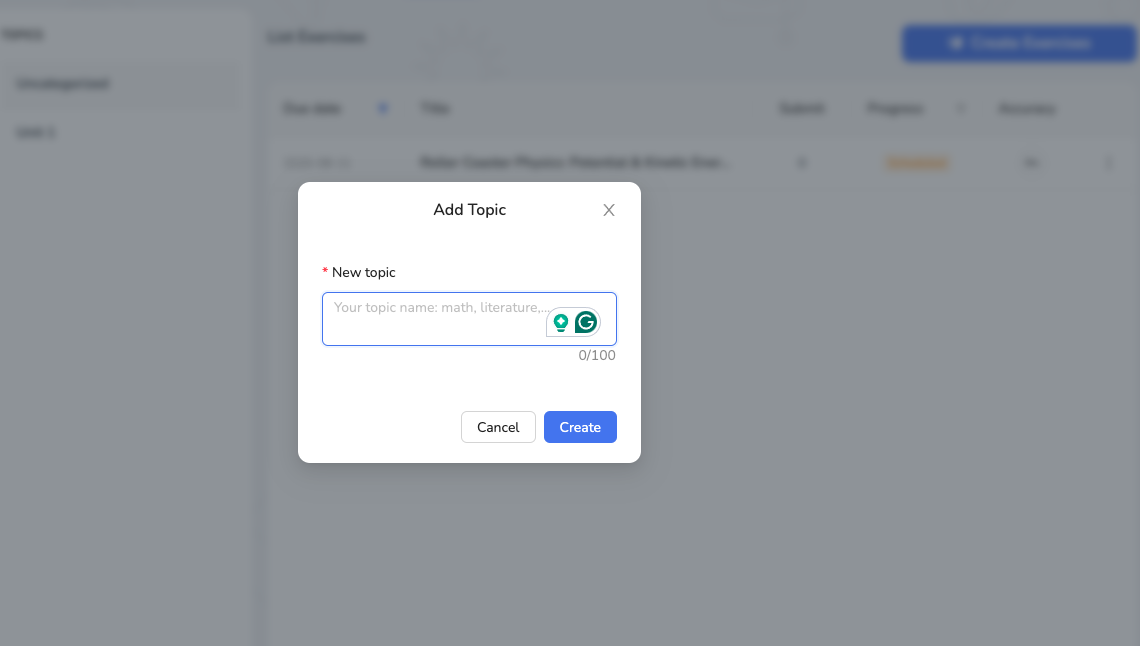
Click Create to finalize your assignment.
Step 6: Track Student Progress in Real Time
One of WSZ Classie’s most powerful features is its real-time performance tracking. You can see exactly how your students are doing with every assignment.
1. In the Overview Section
You can see:
- How many students completed each assignment
- Average accuracy rate
- Class performance graphs (score distribution, participation)
- Time range for completion

2. In the Participants Section
Click any student’s name to view:
- Their correct, incorrect, and skipped questions
- Their overall score and rank in class
- Time taken and number of attempts
- A personal report link to share with families or for parent-teacher meetings


3. In Report Tab
This section gives you deep insights into your class:
- Average score (with a trend chart)
- Participation rate (% of students who participated)
- Score over time graph (to see improvement)
- Score distribution pie chart (how many got A, B, C, etc.)

Teachers can use this data to adjust lesson plans, support struggling students, and recognize top performers.
You’re Ready to Go!
Creating your first class on WSZ Classie is not only simple—it’s a game changer. With just a few clicks, you can organize your students, assign interactive worksheets, and track performance like never before. Whether you’re managing one class or multiple grades, WSZ Classie gives you the tools to teach smarter, not harder.
Ready to take control of your classroom? Head over to Worksheetzone.org and create your first class on WSZ Classie today. The future of classroom management is here!