


There’s a chill in the air, costumes are filling the shelves, and Halloween is near. It is the perfect time to explore Halloween STEM activities for kids that mix festive fun with learning. From classroom games and creative math tasks to bubbling science experiments, these ideas will keep young minds active and engaged all October. With so many spooky and educational activities to choose from, kids can enjoy something new every day throughout the Halloween season.
10+ Halloween STEM Activities for Kids
These Halloween STEM activities for kids mix spooky fun with hands-on learning, from bubbling potions to simple engineering challenges.
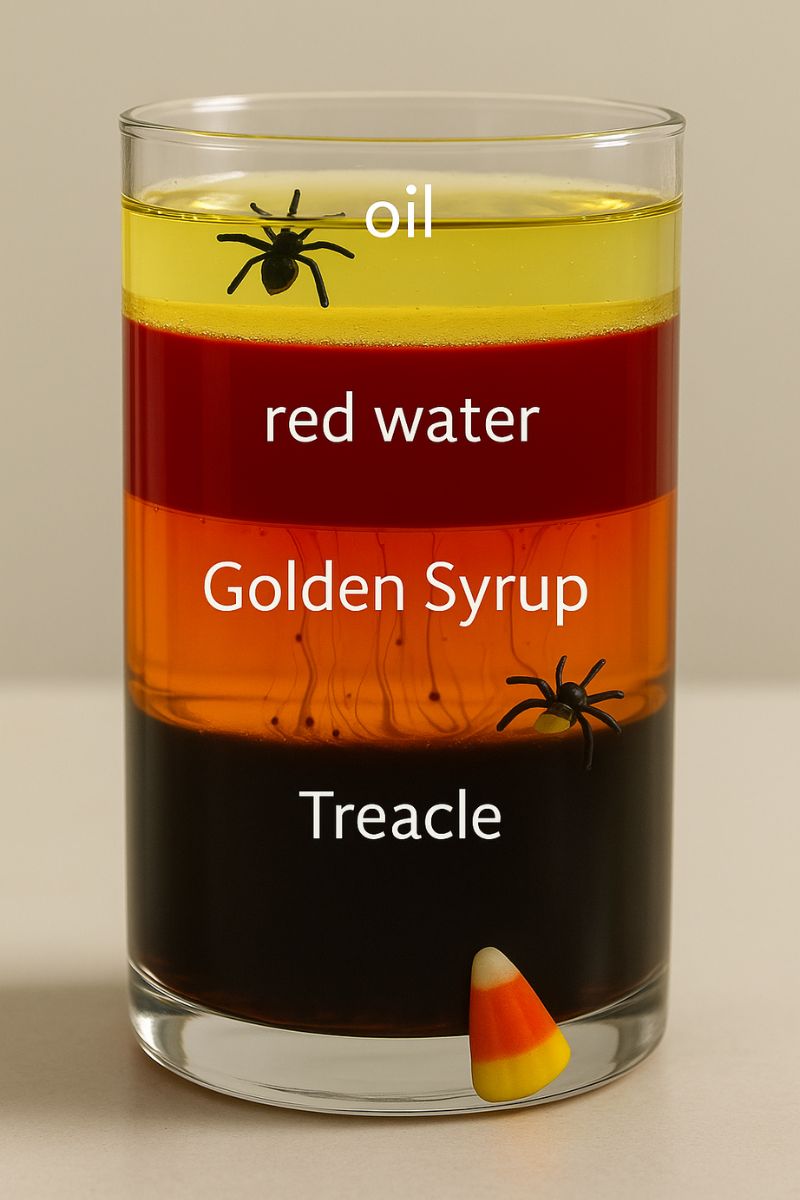
1. Spooky Density Column
Explore how liquids of different densities stack up to create a cool visual effect that looks like a Halloween potion! This is a great way to introduce the concept of density in a colorful and easy-to-understand way.
Materials:
- Tall, clear glass or bottle
- Different liquids (like honey, corn syrup, dish soap, water, vegetable oil, rubbing alcohol)
- Food coloring (Halloween colors like green, purple, and orange work well)
- Small Halloween-themed objects (plastic spiders, candy corn, small erasers)
How to Do:
- Gather your liquids. It’s helpful to arrange them from most dense to least dense (you can find this information online, but generally, thicker liquids like honey are denser than thinner ones like rubbing alcohol).
- Carefully pour the densest liquid into the bottom of your glass.
- Slowly and carefully pour the next densest liquid on top. A good trick is to pour it over the back of a spoon held against the side of the glass to help it layer gently.
- Continue layering your liquids one by one.
- Observe how the liquids stack without mixing.
- Gently drop in your small Halloween objects and see where they settle in the different layers based on their own density.
2. Fizzing Jack-o’-Lanterns
Get ready for a bubbling, erupting good time! This classic science experiment uses a simple chemical reaction between a baking soda (a base) and vinegar (an acid) to create a spooky, fizzy eruption perfect for Halloween.
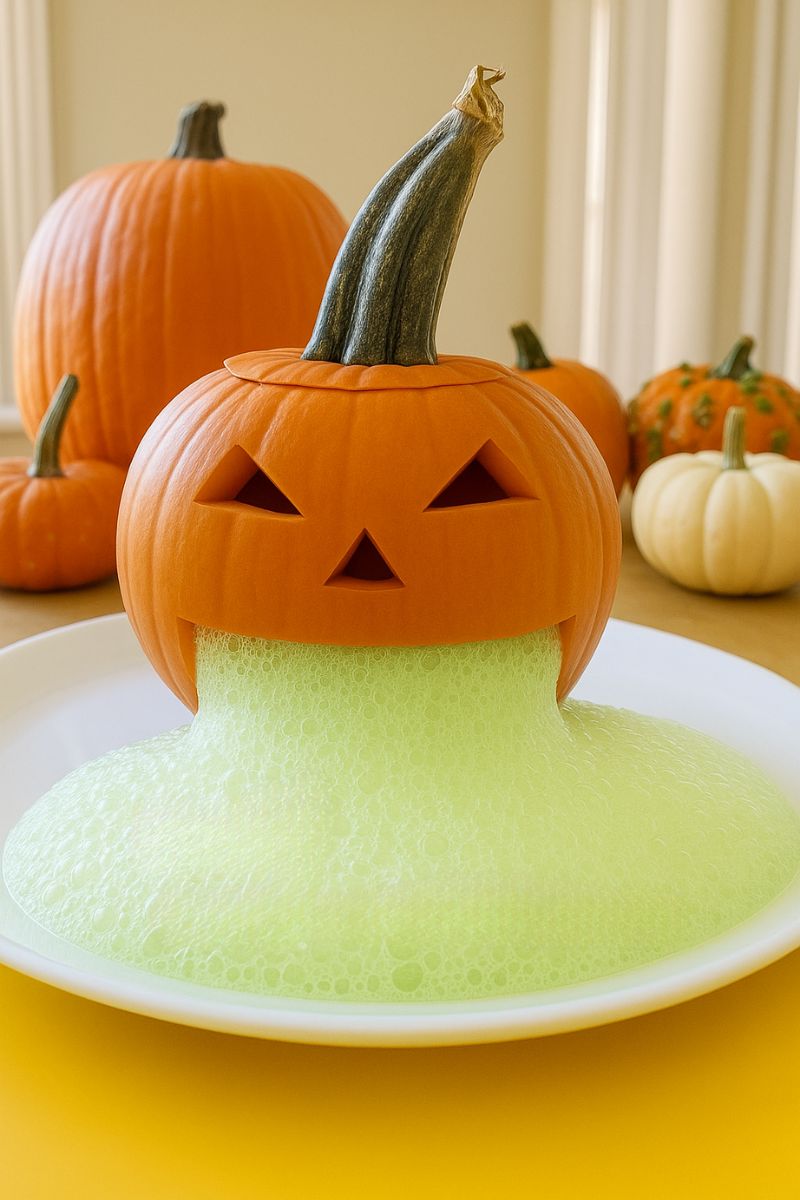
Materials:
- Small pumpkins or gourds (you can carve small faces or just use them whole)
- Baking soda
- Vinegar
- Liquid dish soap (optional, for more bubbles)
- Food coloring (orange or green are fun)
- A tray or container to catch the mess!
- Spoon
- Small cup or bowl
How to Do:
- If using pumpkins, carefully carve a small opening at the top and scoop out the seeds and pulp. You can also carve a face!
- Place the pumpkin or gourd on your tray or in a container.
- Put a few spoonfuls of baking soda inside the pumpkin.
- Add a few drops of food coloring and a squirt of dish soap (if using).
- In a separate cup, pour some vinegar.
- Pour the vinegar into the pumpkin and watch the spooky eruption!
- You can add more baking soda and vinegar to make it erupt again.
3. Haunted Hand Hypothesis
Explore the properties of matter and observe a cool physical change as you create spooky, frozen hands. This activity is simple but provides a great visual for understanding how liquids turn into solids.

Materials:
- Disposable rubber or latex gloves
- Water
- Food coloring
- Small plastic spiders or other spooky items (optional)
- Rubber bands or twist ties
- Freezer
How to Do:
- Add a few drops of food coloring to some water.
- Carefully pour the colored water into a disposable glove. You can add small plastic spiders or other items inside the glove before filling.
- Secure the top of the glove with a rubber band or twist tie, making sure it’s sealed tightly.
- Place the filled glove in the freezer and leave it until it’s completely frozen solid.
- Once frozen, carefully peel or cut away the glove to reveal your spooky ice hand!
- Observe how the water changed from a liquid to a solid. You can also experiment with how fast it melts in different conditions.
4. Pumpkin Pulley Power
Let’s get engineering! Design and build a simple pulley system to lift a mini pumpkin. This activity introduces basic physics concepts like simple machines and how they can make work easier.

Materials:
- Mini pumpkin
- Strong string or thin rope
- A sturdy support to hang your pulley from (like a broomstick held between two chairs, a doorframe, or a tree branch)
- A wheel or spool that the string can run over easily (an empty thread spool, a small wheel, or even just a smooth branch can work)
- Something to attach the pumpkin to the string (like a small net bag or by tying the string securely around the stem)
How to Do:
- Set up your sturdy support.
- Attach the wheel or spool to your support so it can spin freely.
- Thread the string over the wheel or spool.
- Attach one end of the string to your mini pumpkin.
- Hold onto the other end of the string and pull down to lift the pumpkin.
- Experiment with different setups. Does it feel easier to lift the pumpkin with the pulley than just lifting it directly?
5. Static Electricity Ghosts
Make ghosts dance with the power of static electricity! This fun and slightly magical-feeling experiment demonstrates how static charges can attract and repel objects.

Materials:
- Tissue paper
- Scissors
- An inflated balloon
- Your hair or a piece of wool fabric
How to Do:
- Cut ghost shapes out of the tissue paper. Make them lightweight!
- Place the tissue paper ghosts on a flat surface.
- Rub the inflated balloon vigorously on your hair or the piece of wool fabric. This builds up a static charge on the balloon.
- Slowly bring the charged balloon close to the tissue paper ghosts (without touching them).
- Watch as the ghosts “dance” and are attracted to the balloon! You might even get them to float up and stick to the balloon.
6. Oobleck Monster Lab
Dive into the weird and wonderful world of non-Newtonian fluids! Oobleck is a substance that acts like a liquid when being poured but like a solid when force is applied. Add a spooky Halloween twist to this classic science demo.

Materials:
- Cornstarch
- Water
- Food coloring (monster colors like green or purple)
- A bowl
- Measuring cups
How to Do:
- In your bowl, mix about 2 parts cornstarch to 1 part water.
- Add a few drops of food coloring and mix thoroughly. It’s best to mix with your hands!
- Observe the Oobleck. Try stirring it slowly (it acts like a liquid) and then try hitting it or squeezing it quickly (it feels like a solid).
- Have fun playing with your Oobleck monster goo! What happens when you try to grab a handful? What happens when you let it drip through your fingers?
7. Candy Chromatography
Discover the hidden colors in Halloween candy coatings! This activity uses chromatography to separate the different dyes used to color candy, revealing a rainbow of colors you didn’t know were there.

Materials:
- White coffee filters or chromatography paper
- Washable markers (black works well to see separation, but candy is more fun!)
- Halloween candy with colored coatings (like Skittles, M&M’s, candy corn – test a few types!)
- Rubbing alcohol or water
- Pencils or craft sticks
- Tape
- Glasses or jars
How to Do:
- Cut strips of the coffee filter or chromatography paper.
- Draw a thick line with a washable marker about an inch from the bottom of a paper strip. Alternatively, you can place a candy on the line and add a tiny drop of water to let some color soak into the paper.
- Tape the top of the paper strip to a pencil or craft stick so that the strip hangs down into a glass or jar.
- Pour a small amount of rubbing alcohol or water into the glass, making sure the liquid level is below the marker line or candy spot on the paper strip.
- Rest the pencil or stick across the top of the glass so the paper strip hangs down and the very bottom tip is in the liquid.
- Watch as the liquid travels up the paper, separating the colors from the marker or candy coating.
- Try this with different colors of markers and different types of candy!
8. DIY “Blood” (Edible!)
Explore the science behind fake blood using kitchen ingredients! This activity is a fun way to look at mixtures and viscosity, and the best part is, it’s taste-safe!

Materials:
- Corn syrup
- Red food coloring
- Cocoa powder (for darkening and thickening)
- Water (optional, for adjusting consistency)
- Bowl and spoon
How to Do:
- Pour a generous amount of corn syrup into a bowl. This will be the base for your “blood” because of its thick consistency (viscosity).
- Add red food coloring a few drops at a time and stir until you get a bright red color.
- Add a small amount of cocoa powder and stir. This helps to darken the red and give it a more realistic, less translucent look.
- If the mixture is too thick, add water a tiny bit at a time until you reach your desired consistency.
- Mix thoroughly, making sure there are no lumps of cocoa powder.
- Now you have your own edible fake blood for spooky fun! Discuss how the different ingredients change the color and thickness of the mixture.
9. Glow-in-the-Dark Potions
Mix up some glowing concoctions and learn about fluorescence! This activity uses materials that glow under a blacklight to create eerie, glowing Halloween potions.

Materials:
- Tonic water (contains quinine, which glows)
- Highlighter pens (the ink glows – remove the felt ink strip)
- Various clear containers or bottles
- Water
- Food coloring
- Blacklight (UV light)
How to Do:
- In different containers, create various liquid bases. You can use plain water, tonic water, or a mixture.
- For extra glow, you can carefully take apart a highlighter pen and put the felt ink strip into a container with a little water to let the ink soak out, creating a glowing liquid.
- Add food coloring to some of your liquids to create different colored potions.
- In a dark room, shine a blacklight on your potions.
- Observe which liquids glow and which don’t. Discuss why the tonic water and highlighter ink glow under the blacklight (they are fluorescent and absorb UV light, then re-emit it as visible light).
10. Spider Web Engineering Challenge
Become a civil engineer and build a strong spider web! This challenge encourages kids to think about structural integrity and design as they create a web using simple materials.

Materials:
- Craft sticks, straws, or pipe cleaners
- String, yarn, or tape
- Scissors
- Optional: small plastic spiders to test the web’s strength
How to Do:
- Challenge yourselves to build a spider web structure using the provided materials.
- Think about how real spider webs are built – strong anchor points and a network of (silk).
- Experiment with different ways to connect your materials to create a stable web. Will you build a frame first? How will you create the web pattern?
- Use string or yarn to create the web threads, tying or taping them to your frame.
- If using, carefully place plastic spiders on your finished web to test its strength and see if it can hold them.
11. Candy Catapult Construction
Design, build, and test a catapult to launch Halloween candy! This is a fun engineering and physics activity that introduces concepts like levers, trajectories, and force.

Materials:
- Craft sticks
- Rubber bands
- A plastic spoon or bottle cap
- Something for a base (a small block of wood, a stack of books, or just the table)
- Halloween candy for launching (candy corn, pumpkin candies, marshmallows work well)
- Optional: a target!
How to Do:
- Build a simple lever by stacking several craft sticks together and securing one end with a rubber band. This will be the arm of your catapult.
- Create a fulcrum (the pivot point) by placing another craft stick or small object under the stack of sticks, closer to the secured end.
- Attach the plastic spoon or bottle cap to the free end of the lever using rubber bands or tape. This will be where you place your candy.
- Secure your catapult to a base if needed to keep it stable.
- Place a piece of candy in the spoon, press down on the spoon end of the lever, and release to launch your candy!
- Experiment with changing the position of the fulcrum, the number of craft sticks in the arm, or the tension of the rubber bands to see how it affects how far your candy flies.
As the fall season continues, keep the creativity flowing with these Thanksgiving STEM Activities for Kids — perfect for your November classroom experiments!
FAQs
1. Why are Halloween STEM activities beneficial for classroom learning?
Halloween STEM activities provide a high-engagement context for exploring complex scientific concepts like chemical reactions and physics. By integrating seasonal themes, educators can maintain student interest while meeting curriculum standards. These hands-on experiments encourage critical thinking and problem-solving, allowing children to visualize abstract theories through tangible, spooky results that make the educational experience more memorable.
2. Are these STEM activities safe for young children to perform?
Most of these activities use common household and kitchen ingredients, making them safe for elementary-aged children. However, adult supervision is always recommended, especially when using materials like rubbing alcohol, scissors, or small plastic parts that could be choking hazards. For activities involving edible ingredients like the DIY “blood,” always verify food allergies before allowing students to taste the mixtures.
Final thoughts
Halloween STEM activities for kids are the perfect blend of spooky fun and educational value. From bubbling potions to pumpkin-powered experiments, these hands-on projects spark curiosity, promote critical thinking, and turn science into an exciting adventure. Whether you’re a teacher looking to enrich your lesson plans or a parent planning a festive learning day, these activities make Halloween both meaningful and memorable. To keep the momentum going, check out our collection of Halloween worksheets on Worksheetzone—packed with fun, themed resources that reinforce key skills while keeping kids in the holiday spirit.


