


Halloween science experiments turn spooky fun into exciting hands-on learning experiences for kids. Each activity combines bubbling chemistry, eerie physics, and playful engineering to spark curiosity and creativity in every young scientist. Whether you are teaching in a classroom, homeschooling, or organizing a Halloween party, these experiments are simple to prepare, affordable to run, and guaranteed to bring laughter, discovery, and a touch of spooky magic to your science lessons.
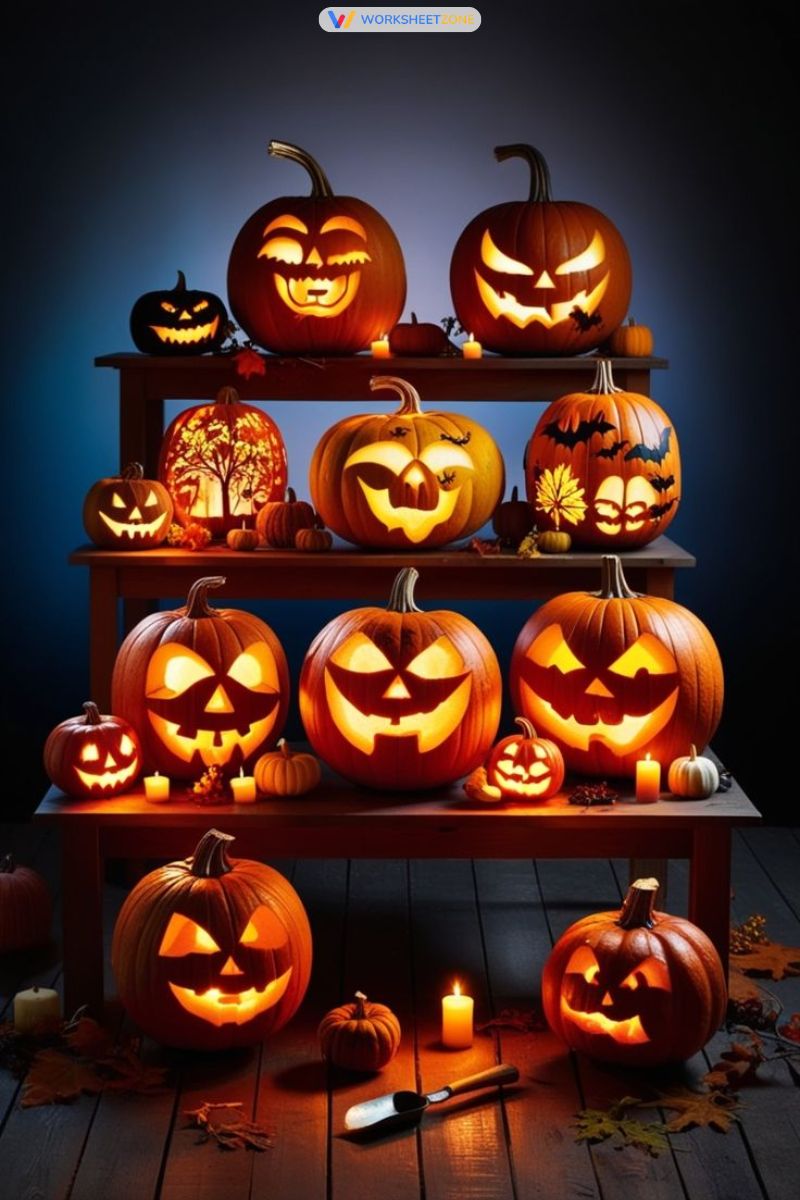
30+ Halloween science experiments
Get ready to mix spooky fun with real science! These Halloween science experiments let kids explore bubbling potions, glowing slime, and ghostly reactions while learning through play.
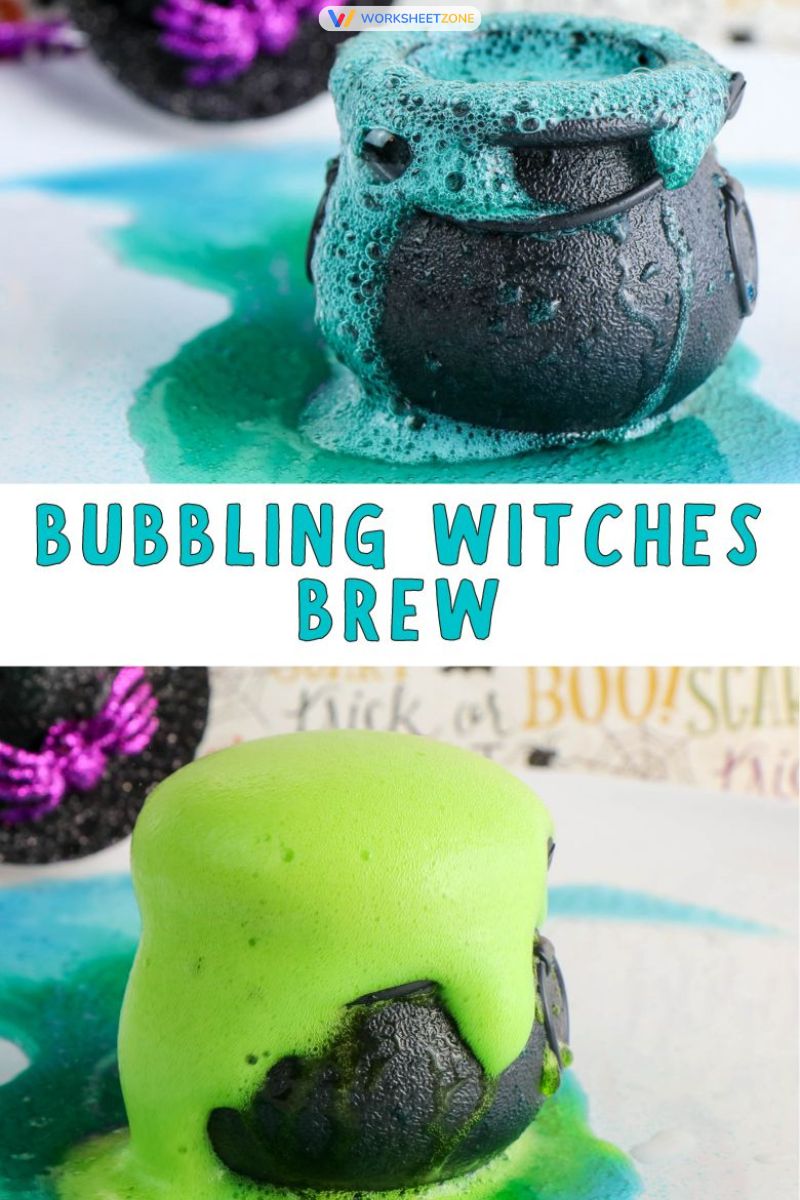
1. Bubbling Witch’s potion
This fun Halloween experiment turns simple chemistry into magic. Kids love watching bubbles rise like a witch’s brew while learning how vinegar and baking soda create carbon dioxide gas.
Materials needed:
- Small plastic cauldron or bowl
- Baking soda
- Vinegar
- Food coloring (green or purple)
- Measuring spoons
Instructions:
- Fill the cauldron halfway with vinegar and add a few drops of food coloring.
- Spoon baking soda into the liquid and watch the bubbling potion come to life.
- Challenge kids to predict what happens if they add more baking soda or use warm vinegar.
- Explain that the fizzing comes from carbon dioxide gas released in the reaction.
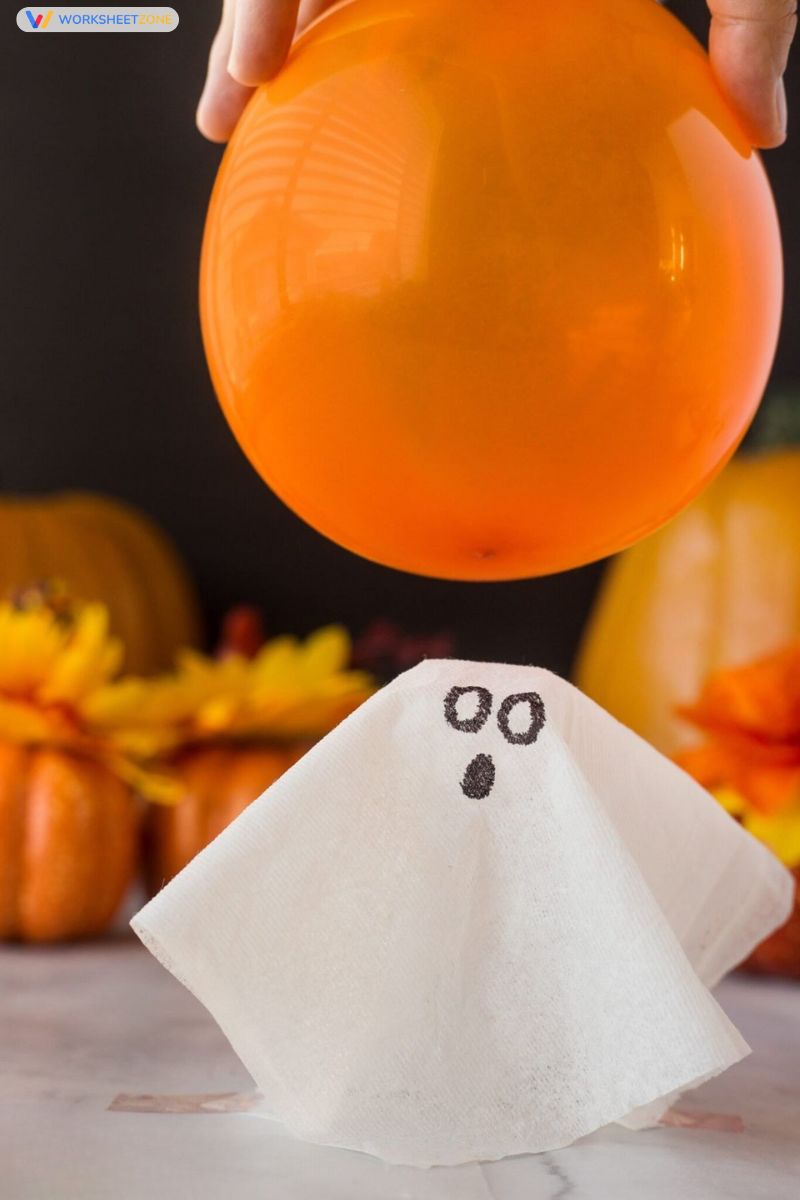
2. Ghost balloons
Ghost balloons make invisible gases come to life. When vinegar and baking soda react, carbon dioxide fills the balloon like a floating ghost, creating spooky science fun for kids.
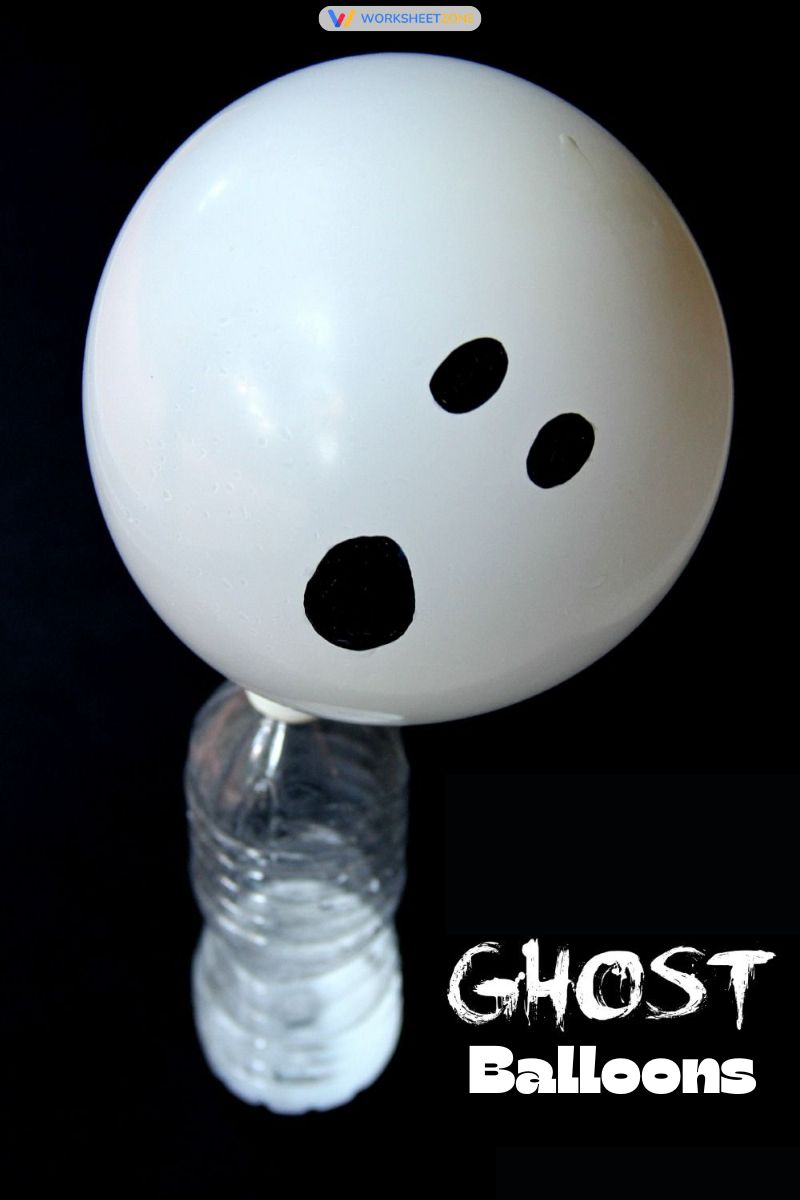
Materials needed:
- White balloons (draw ghost faces with a marker)
- Plastic bottles
- Baking soda
- Vinegar
- Funnel
Instructions:
- Pour vinegar halfway into each plastic bottle.
- Using a funnel, spoon baking soda into the balloon.
- Secure the balloon over the bottle’s mouth and hold it upright.
- Watch as the balloon inflates by itself, powered by science, not spooky spirits.
- Ask students why the balloon rises and introduce the idea of gas expansion.
3. Glowing slime
Nothing captures the spirit of Halloween science better than glowing slime. In this fun experiment, kids learn about stretchy polymers while creating a slime that shines in the dark. The glowing effect adds a spooky touch, making it perfect for sensory play, science lessons, or classroom demonstrations.
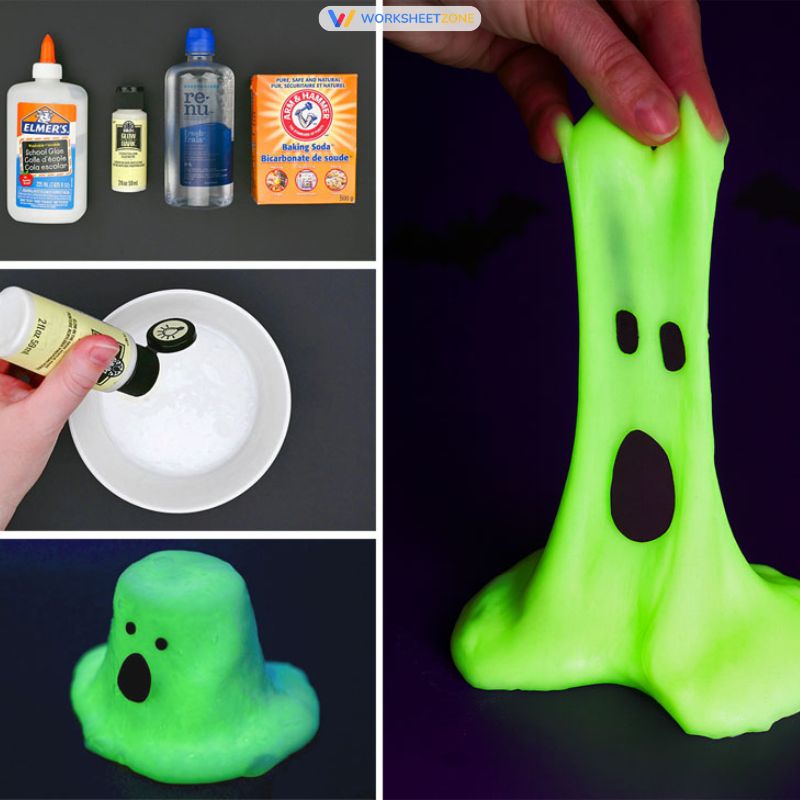
Materials needed:
- Clear glue
- Baking soda
- Contact lens solution (contains boric acid)
- Glow-in-the-dark paint or powder
- Mixing bowl and spoon
Instructions:
- Mix ½ cup of clear glue with 1 tablespoon of baking soda in a bowl.
- Add glow paint and stir until evenly colored.
- Slowly add contact lens solution and knead until stretchy slime forms.
- Charge under bright light, then turn off the lights to see it glow!
- Discuss how chemical bonds between glue and borate ions create a polymer network.
4. Erupting pumpkin volcano
Turn your pumpkin into a bubbling science lab. This exciting experiment combines the classic baking soda and vinegar reaction with a festive Halloween twist. Kids will love carving funny or spooky faces into pumpkins and watching colorful foam burst out like real lava, all while learning about gas expansion and chemical reactions.

Materials needed:
- Small carved pumpkin (Jack-o’-lantern)
- Baking soda
- Vinegar
- Orange food coloring
- Tray to catch overflow
Instructions:
- Scoop out the pumpkin and carve a spooky face if desired.
- Place it on a tray and fill halfway with baking soda.
- Mix vinegar with orange food coloring in a cup.
- Pour the mixture into the pumpkin and watch it erupt with foamy lava!
- Encourage children to describe the changes they observe and guess what’s happening.
5. Flying tea-bag ghosts
This fun experiment shows how hot air rises. When the empty tea bag burns, it heats the air inside until it becomes lighter than the air around it. The ghost then lifts off the ground, turning a simple reaction into a magical science moment.
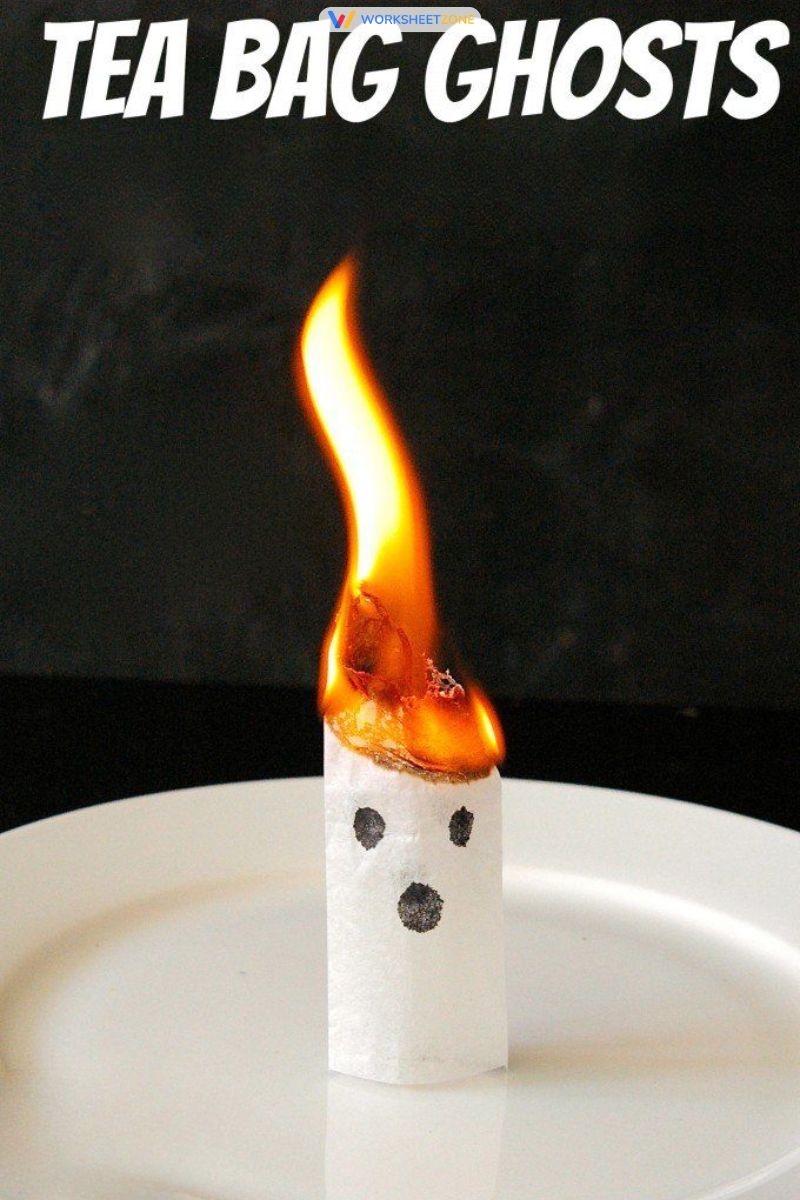
Materials needed:
- Empty tea bags (made of paper, not nylon)
- Scissors
- Marker to draw ghost faces
- Lighter or match (adult supervision required)
- Fireproof surface
Instructions:
- Cut open the tea bag and empty out the tea.
- Draw a ghost face, then shape it into a tall cylinder and stand it upright.
- Carefully light the top and watch it burn down.
- As it nears the bottom, the ghost lifts off the surface and floats upward!
- Discuss how heated air becomes less dense, causing lift.
6. Dancing ghosts (Static electricity)
This fun physics experiment makes paper ghosts “dance” through the invisible power of static electricity. By rubbing a balloon on your hair, you build up negative charge that attracts the lightweight tissue paper ghosts. It’s an exciting and visual way to learn about electrical forces.
Materials needed:
- Tissue paper or napkin
- Balloon
- Scissors
- Marker
Instructions:
- Cut ghost shapes from tissue paper and draw faces on them.
- Blow up a balloon and rub it on your hair or a wool sweater for 30 seconds.
- Hold the balloon close to the paper ghosts without touching and watch them jump, twist, and dance.
- Explain how opposite charges attract, causing the movement.
7. Spooky density tower
Liquids can be spooky too. In this bright and colorful experiment, children layer different liquids to form a magical tower of colors. As they drop in tiny toys to see where they float, they learn how each liquid has its own unique density.
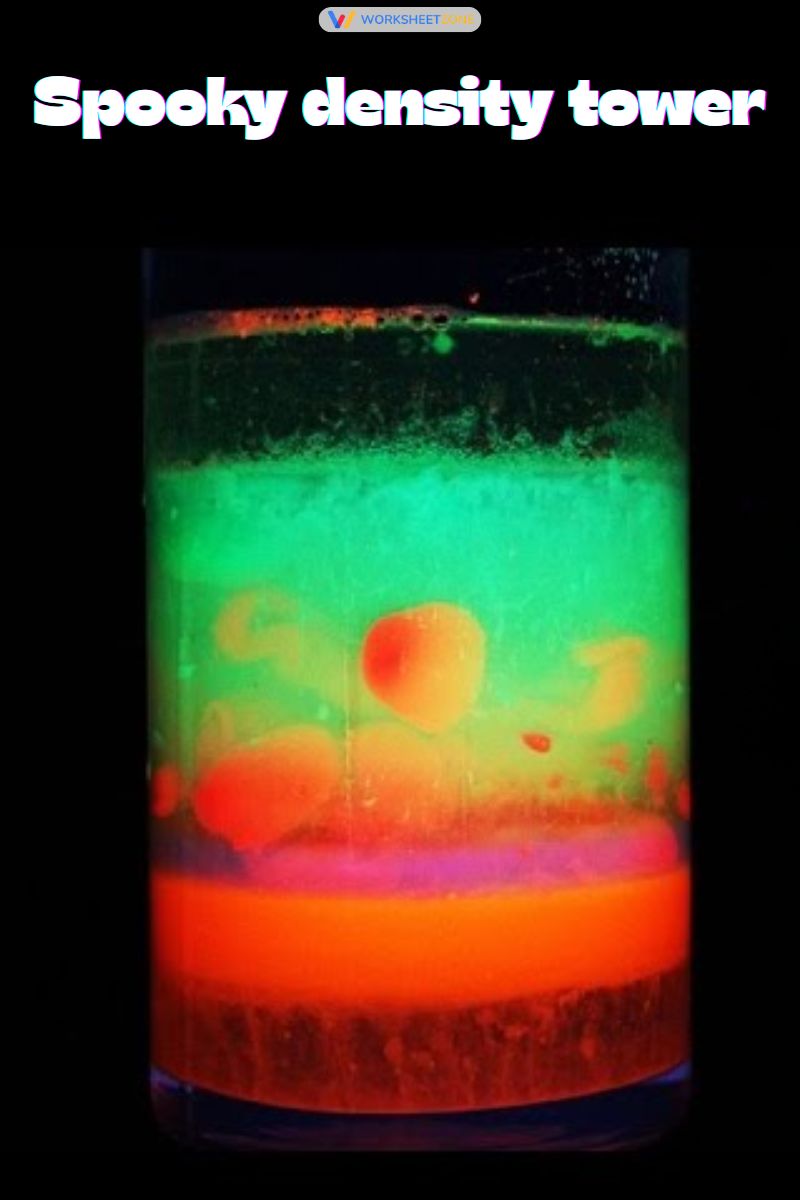
Materials needed:
- Tall clear glass
- Honey, dish soap, water, oil, rubbing alcohol
- Food coloring
- Small Halloween-themed objects (plastic spiders, candy corn)
Instructions:
- Slowly pour each liquid into the glass, starting with the heaviest (honey).
- Add different colors for each layer to make it vibrant.
- Drop in small toys and observe where they stop, which shows their density point.
- Explain that liquids separate because heavier ones sink and lighter ones float.
8. Candy corn dissolving race
This simple experiment tests which liquid dissolves candy corn the fastest and introduces kids to solubility. They observe how water, vinegar, and oil interact with sugary candy while practicing recording and comparing results.

Materials needed:
- Candy corn pieces
- 3 clear cups or jars
- Water, vinegar, and oil
- Stopwatch or timer
- Notebook for recording results
Instructions:
- Fill each cup with a different liquid.
- Drop one candy corn into each and start the timer.
- Observe every few minutes and note changes.
- After 30 minutes, compare which liquid dissolved the candy the most.
- Discuss why water-based liquids dissolve sugar better than oil.
9. Monster oobleck
Monster Oobleck is slimy, weird, and scientifically fascinating! This non-Newtonian fluid acts like a solid when squeezed but flows like a liquid when released. It’s a wonderful sensory experiment that helps children understand states of matter in a hands-on, Halloween-themed way.

Materials needed:
- 2 cups cornstarch
- 1 cup water
- Green food coloring
- Mixing bowl
Instructions:
- Mix cornstarch and water until smooth, adding green color for a monster look.
- Squeeze it tightly and feel it turn solid, then release it to watch it flow like slime.
- Encourage kids to explore freely and describe what they feel.
- Explain that oobleck’s molecules rearrange under pressure, changing its behavior.
10. Melting monster hands
This fun experiment mixes science with sensory play as kids rescue frozen monsters trapped in ice. It helps them explore melting, freezing, and how salt changes ice temperature while enjoying a spooky Halloween activity.
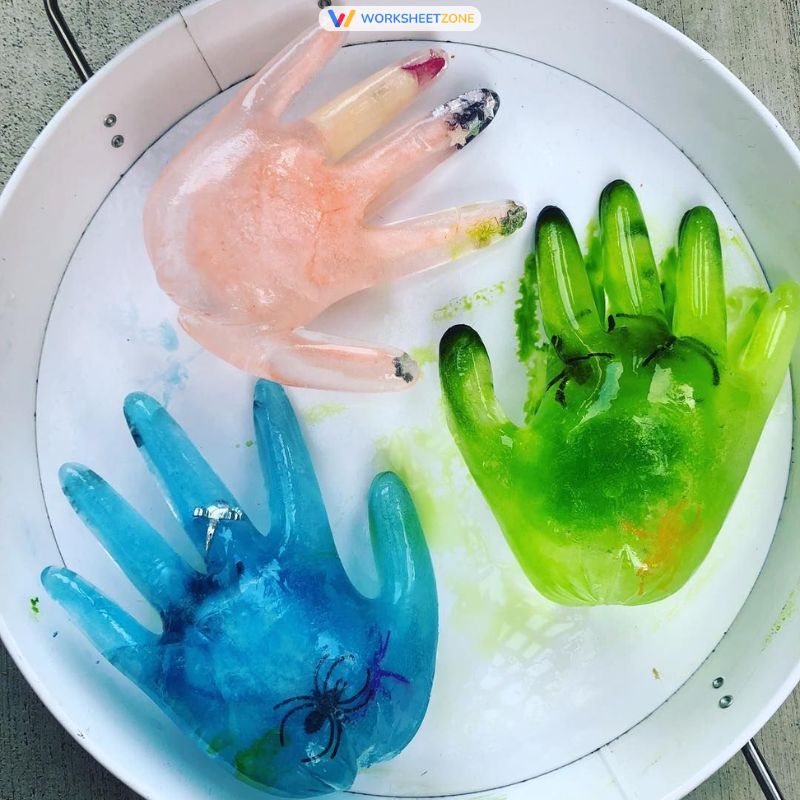
Materials needed:
- Disposable gloves
- Water
- Green food coloring
- Small plastic toys (spiders, skeletons, eyeballs)
- Salt
- Tray or bowl
Instructions:
- Fill gloves with colored water and drop small toys inside. Tie them closed and freeze overnight.
- Once frozen, peel off the gloves and place the icy hands on a tray.
- Sprinkle salt over the surface and observe melting patterns.
- Try comparing one hand with salt and one without to see which melts faster.
- Discuss how salt lowers the freezing point of water.
11. Floating ghost drawing
This magical experiment makes ghost drawings float across water as if they were alive. It introduces kids to surface tension and shows how dry erase marker ink lifts off the surface, turning simple art into spooky science fun.
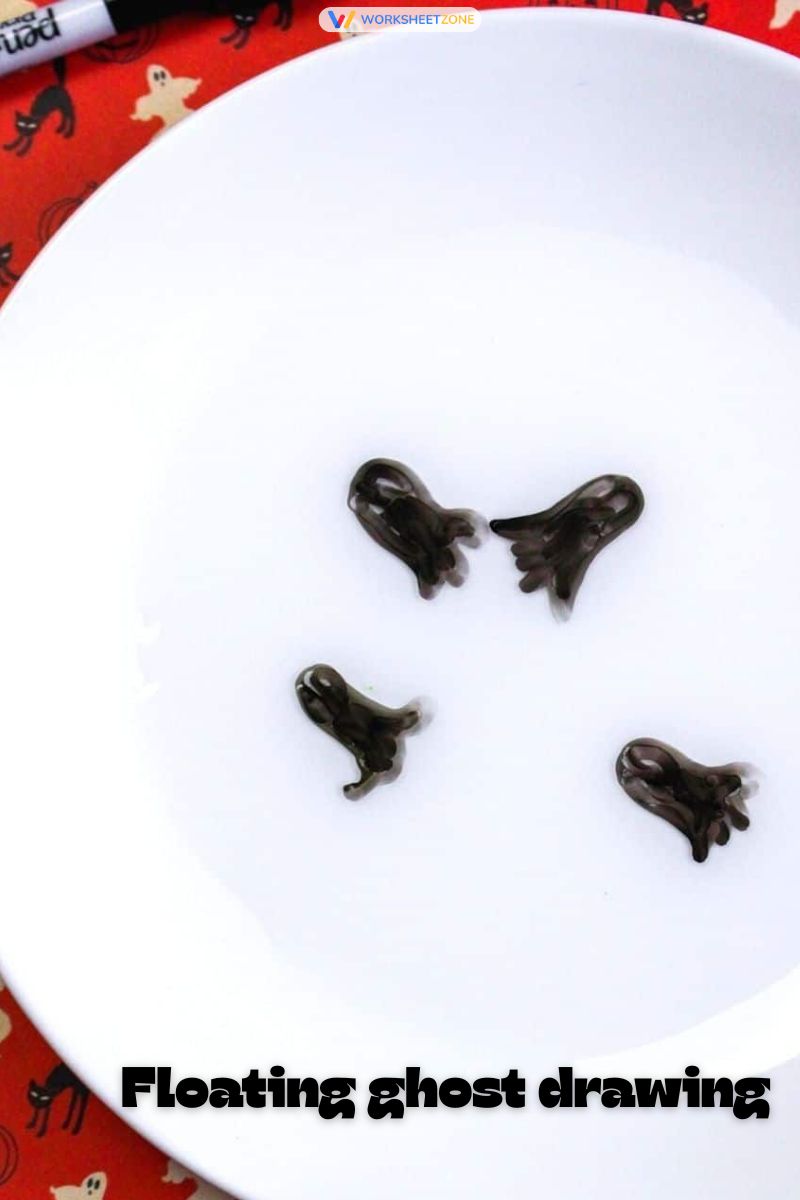
Materials needed:
- Dry-erase marker (whiteboard marker)
- Smooth ceramic plate or glass dish
- Cup of warm water
Instructions:
- Draw ghost shapes, pumpkins, or bats on the plate with the marker.
- Slowly pour warm water into the dish and tilt it slightly.
- Watch as the ghost drawings lift off the surface and “swim” on the water!Explain that the marker’s ink contains alcohol and resin that do not dissolve in water, which allows the drawing to float.
12. Magic color-changing potions
Create a potion that mysteriously changes colors right before your eyes. This experiment is a fun way to explore the chemistry of acids and bases.

Materials needed:
- Red cabbage (or red cabbage powder)
- Hot water
- Blender and strainer (adult supervision required)
- Several clear cups
- “Secret Ingredients”: lemon juice (or vinegar) in one cup, and a baking soda/water solution in another.
- Optional: Droppers
Instructions:
- First, an adult should blend the red cabbage with hot water and then strain the liquid. This deep purple juice will be your “magic base.”
- Next, pour a small amount of this purple base into two or three clear cups.
- Have the kids “cast the first spell” by adding a few drops of lemon juice to one cup. It will instantly change to a bright pink or red!
- Now, “cast the second spell” by adding a few drops of the baking soda solution to the second cup. Watch as it turns a spooky blue or green.
13. Glowing pumpkins
Give your jack o lanterns a scientific twist with glowing chemistry. By using tonic water that contains quinine, kids can explore fluorescence, the light created when a substance absorbs ultraviolet rays. Under a blacklight, the pumpkins glow a bright blue, making Halloween shine with spooky science.
Materials needed:
- Carved pumpkin
- Tonic water (contains quinine)
- Blacklight flashlight
Instructions:
- Pour tonic water inside or around the pumpkin.
- Dim the lights and turn on the blacklight.
- Watch as your pumpkin glows brightly, as if it has come to life from the inside.
- Explain that quinine absorbs UV light and emits visible blue light (fluorescence).
14. Ghostly sound waves
Ghostly Sound Waves let kids see sound in action. With a bowl, plastic wrap, and rice grains, they can watch vibrations move with each sound. It is a fun and simple way to explore physics while adding a spooky Halloween twist.

Materials needed:
- Large bowl
- Plastic wrap
- Uncooked rice
- Rubber band
- Metal baking tray or pot
Instructions:
- Stretch plastic wrap tightly over the bowl and secure with a rubber band.
- Sprinkle a few rice grains on top.
- Hit a baking tray or pot near the setup or shout “BOO!” loudly.
- Watch the rice jump! The sound waves travel through the air and make the plastic vibrate.
- Challenge kids to test louder vs. softer sounds.
15. Sticky spider web challenge
Turn engineering into Halloween fun by designing sticky spider webs! This experiment encourages creative problem-solving as kids build and test web designs for strength and flexibility. It’s great for teamwork, spatial awareness, and basic engineering principles.

Materials needed:
- Masking tape or yarn
- Doorway or two chairs
- Small paper “flies” or cotton balls
- Stopwatch
Instructions:
- Stretch tape or yarn between two points to create a web pattern.
- Drop or toss the paper flies and see which parts catch them best.
- Time how long the web holds each object before breaking.
- Discuss how real spiders engineer webs for strength and balance.
16. Halloween lava lamp
This spooky Halloween lava lamp blends art and chemistry in one colorful experiment. It teaches kids about liquid density and gas formation as Alka Seltzer reacts with water, creating bubbles that lift and drop colored droplets through the oil like magic.

Materials needed:
- Clear plastic bottle or glass
- Vegetable oil
- Water
- Food coloring (orange, green, purple)
- Alka-Seltzer tablets
Instructions:
- Fill the bottle ¾ with oil, then add water to near the top.
- Add a few drops of food coloring (it will sink through the oil).
- Break an Alka-Seltzer tablet into pieces and drop them in.
- Watch bubbles rise and fall like a haunted lava lamp!
- Explain that oil floats on top because it is lighter and less dense than water.
17. Frozen brain experiment
Cool, creepy, and educational, this experiment helps kids explore states of matter by freezing and melting a pretend brain. It is a fun way to learn how temperature changes affect solids and liquids while introducing ideas like melting points and heat transfer.
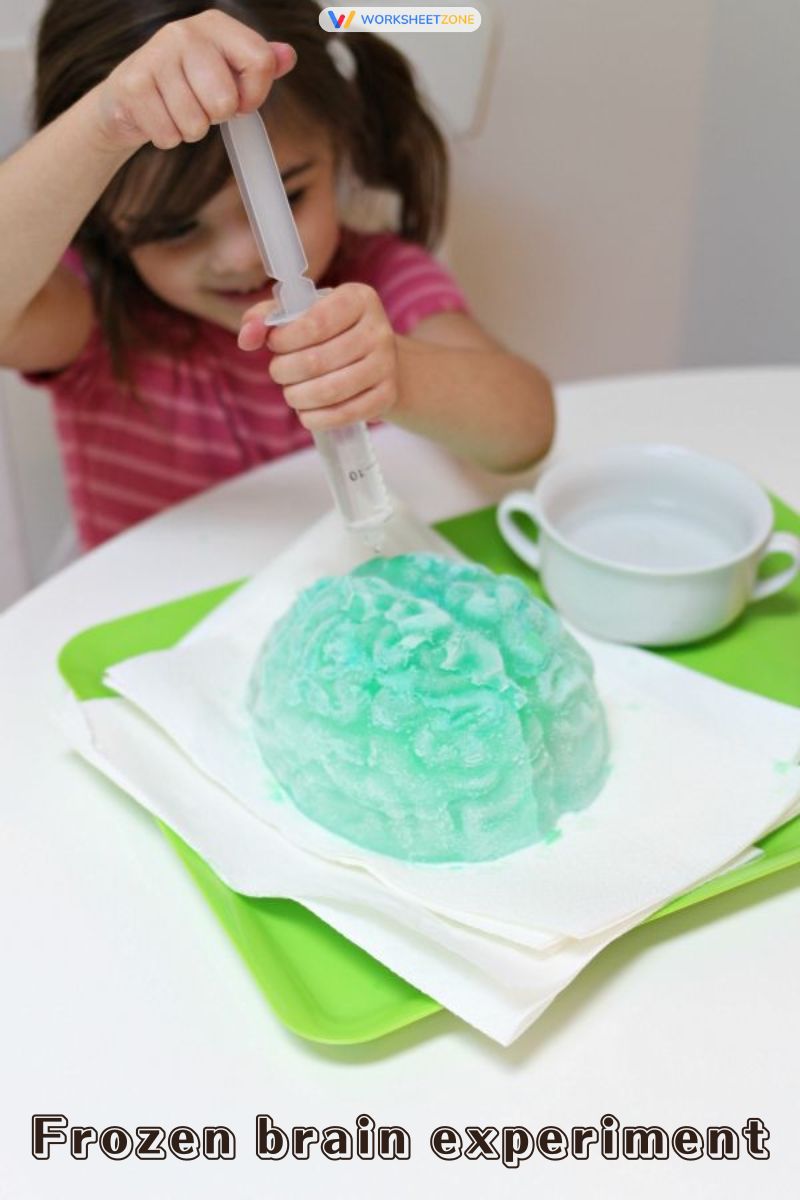
Materials needed:
- Brain-shaped ice mold or balloon
- Water
- Food coloring (optional)
- Salt
- Tray
Instructions:
- Fill the mold with colored water and freeze overnight.
- Remove and place the frozen “brain” on a tray.
- Sprinkle salt and observe cracks forming as ice melts faster.
- Discuss how salt lowers the freezing point of water, a principle used in real life to melt ice on roads during winter.
18. Skeleton bridge challenge
This engineering challenge combines physics and Halloween creativity. Kids build bridges strong enough to support a toy skeleton using only simple materials. It teaches balance, structure, and load-bearing concepts while promoting teamwork.
Materials needed:
- Popsicle sticks
- Tape or glue
- Toy skeleton or small figure
- Books or blocks (for bridge supports)
Instructions:
- Build a bridge between two stacks of books using sticks and tape.
- Place the skeleton on top and test if the bridge holds.
- Add more sticks or supports to make it stronger.
- Measure how much weight it can hold before collapsing!
- Discuss why triangles are strong structural shapes.
19. Ghost bubbles
Amaze kids with foggy, smoke filled bubbles made from dry ice. This Halloween experiment shows sublimation, the process where a solid changes directly into gas. It is visually exciting, educational, and should always be done with adult supervision.
Materials needed:
- Dry ice pellets
- Warm water
- Large bowl
- Dish soap
Instructions:
- Place dry ice into a bowl of warm water to create fog.
- Add a few drops of dish soap and watch bubbles form on top.
- Carefully touch the bubbles to see them burst with smoky vapor.
- Discuss how solid carbon dioxide (dry ice) turns into gas directly.
20. Pumpkin life cycle observation
Bring biology into Halloween with this simple observation experiment! Kids can study how a pumpkin grows from seed to sprout, learning about plant life cycles and environmental needs. It’s a quiet, thoughtful activity that connects science with the spirit of fall.

Materials needed:
- Pumpkin seeds
- Clear plastic cup
- Cotton balls or paper towels
- Water
- Sunlight
Instructions:
- Dampen cotton balls and place them inside the cup.
- Add pumpkin seeds along the side so roots are visible.
- Keep them moist and observe growth daily.
- Record the changes in a science journal, noting the roots, shoots, and leaves as they grow.
- Extend the lesson by planting them outdoors later.
21. Edible fake blood chemistry
This creative Halloween experiment lets kids make safe, edible fake blood while learning about mixtures and viscosity. They can test different ingredient ratios to see which looks most realistic and discover how each substance changes the texture and flow of the mixture.

Materials needed:
- Corn syrup
- Chocolate syrup
- Red food coloring
- Spoon and small cups
Instructions:
- Combine corn syrup and chocolate syrup in a cup.
- Add a few drops of red coloring and stir well.
- Adjust the mixture to make it darker or thicker.
- Let kids compare which version looks more like real blood and discuss how thickness changes when ingredients are added.
22. Spider races
This Halloween science experiment turns ordinary plastic spiders into speedy racers. It helps children learn about friction, air pressure, and the science of motion while having a great time competing with friends.
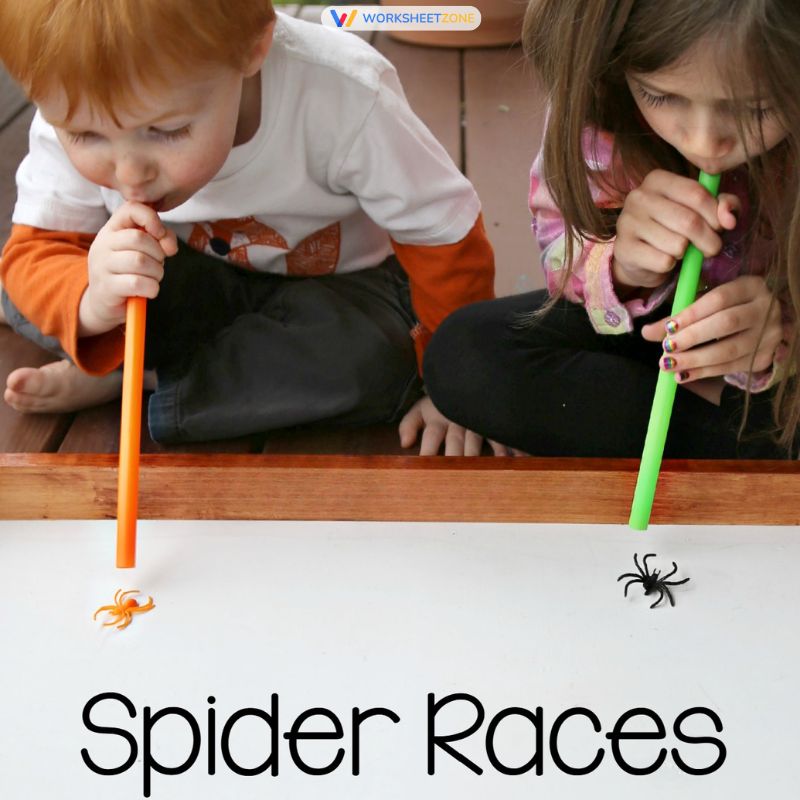
Materials needed:
- String or thread
- Plastic spiders
- Drinking straws
- Tape
Instructions:
- Cut a long piece of string and thread it through a straw.
- Attach the straw to a plastic spider using tape.
- Hold each end of the string tight and blow through the straw to push the spider forward.
- See which spider moves the fastest and talk about how air pressure and friction affect movement.
23. Candy chromatography
Candy Chromatography lets kids become real scientists by separating the colors inside candies. It introduces the concept of chemical separation and solubility using water and paper. The colorful results make it one of the most eye catching Halloween science experiments.
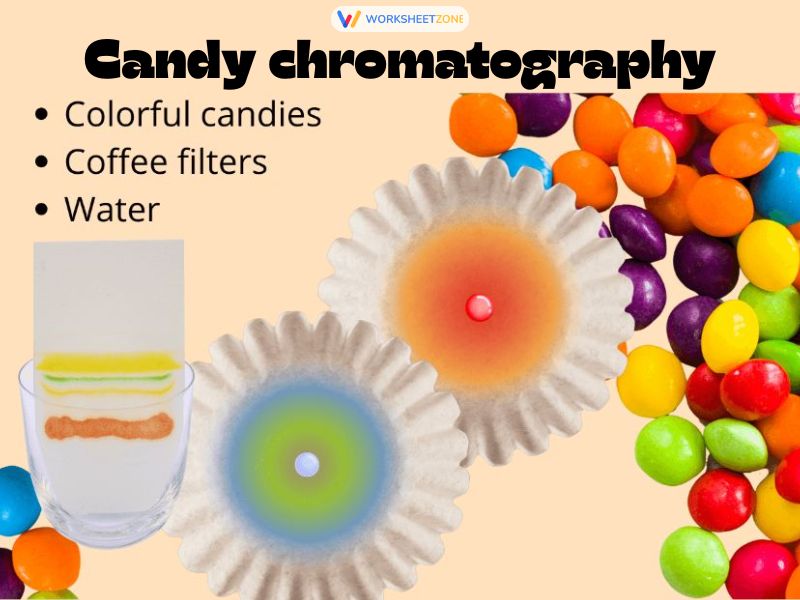
Materials needed:
- Coffee filters
- Water
- Washable markers or candy coatings
- Cups and spoons
Instructions:
- Cut the coffee filter into strips and draw a line with colored markers near the bottom.
- Dip the end into water without letting the ink touch the liquid.
- Watch as colors travel up the paper and separate into different shades.
- Explain that water dissolves dyes at different speeds, allowing them to separate.
24. Bat gliders
Kids can explore aerodynamics and forces of flight while making their own paper bats. This experiment connects Halloween fun with science lessons about air resistance, weight, and balance.
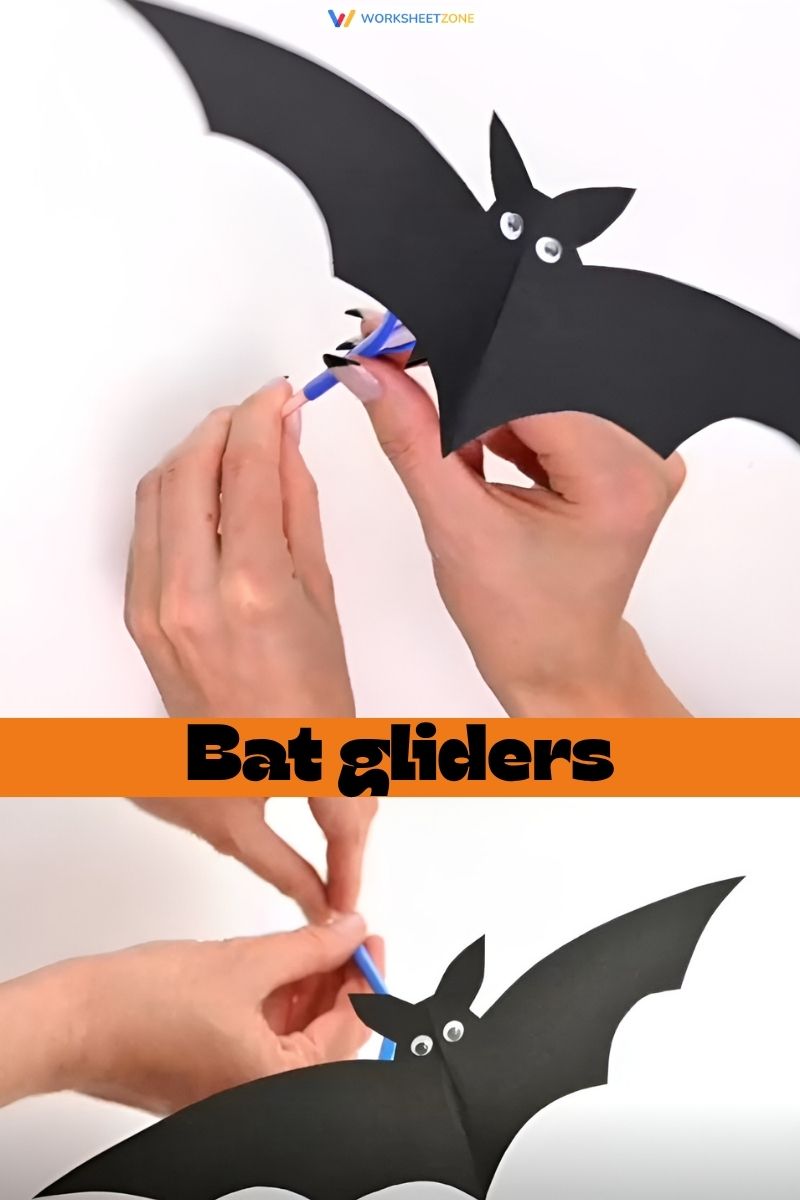
Materials needed:
- Construction paper
- Scissors
- Tape
- Paper clips
Instructions:
- Cut out bat shapes from paper, keeping the wings wide.
- Add a small paper clip to the nose of the bat for weight.
- Toss the bats gently through the air and observe how they glide.
- Try bending the wings up or down to see how the flight changes.
25. Magic milk monsters
This experiment is full of color, movement, and surprise. When dish soap touches milk mixed with food coloring, the fat molecules move away, creating swirling monster-like patterns. It teaches about chemical reactions and surface tension in a fun and visual way.

Materials needed:
- Whole milk
- Dish soap
- Food coloring
- Cotton swabs
- Shallow dish
Instructions:
- Pour milk into the dish until the bottom is covered.
- Add drops of different food colors around the surface.
- Dip a cotton swab into dish soap and touch it to the milk.
- Watch as colors spread and swirl like a living monster.
- Explain that the soap breaks up the fat molecules, causing motion.
26. Glowing ghost rockets
Launch ghost rockets into the sky and explore chemical reactions that create gas pressure. This Halloween themed experiment teaches kids about propulsion and energy using simple materials.
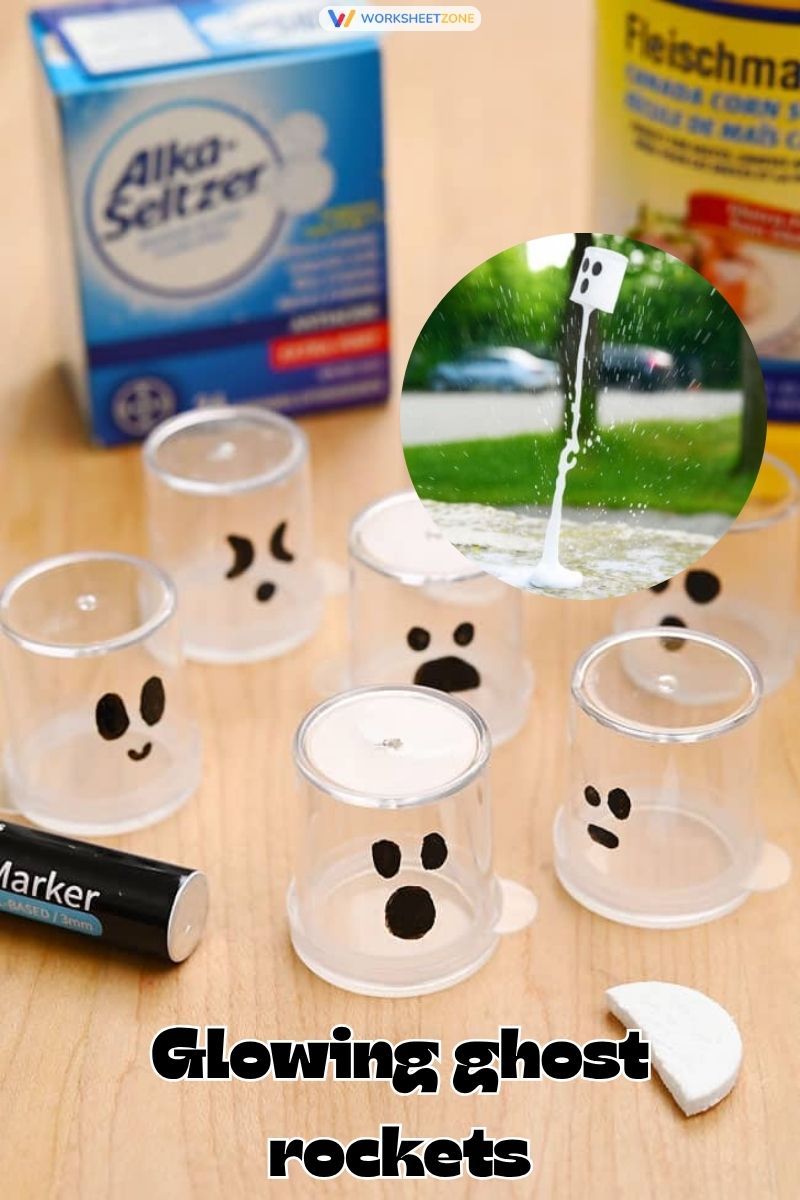
Materials needed:
- Small film canisters with lids
- Water
- Alka Seltzer tablets
- White paper for wrapping and decorating
Instructions:
- Fill each canister one third full of water.
- Add half of a tablet and quickly snap the lid shut.
- Turn the canister upside down and stand back.
- Within seconds, pressure builds up and launches the ghost rocket.
- Talk about how the reaction produces carbon dioxide gas that pushes against the lid.
27. Creepy candle vacuum
Watch air pressure in action as a candle “magically” pulls spooky-colored water into a glass! This classic experiment demonstrates how heated air expands and contracts, creating a vacuum effect that kids can see in real time.

Materials needed:
- Small candle or tealight
- Shallow plate
- Food coloring (red or green)
- Water
- Clear glass cup
- Matches or lighter (adult supervision required)
Instructions:
- Pour a thin layer of colored water into the plate.
- Place the candle in the middle and light it.
- Carefully place the glass upside down over the candle.
- Watch as the flame goes out and the water rises into the glass!
- Explain that the flame heats the air, and when it goes out, the cooling air creates a vacuum that pulls the water up.
28. The uncanny balancing bat
Watch a paper bat magically balance on the tip of your finger, defying gravity with a spooky secret.

Materials needed:
- Cardstock or thin cardboard
- Scissors
- A bat template (optional)
- Two coins (pennies or dimes work well)
- Tape
- A pencil or your fingertip
Instructions:
- Start by drawing and cutting a bat shape from the cardstock. Make sure it has wide wings.
- Next, tape one coin to the very tip of each wing.
- Once the coins are secure, try to balance the bat by its nose on the eraser of a pencil or the tip of your finger.
- It will balance perfectly, as if by magic, even if you tilt your hand slightly.
29. The screaming ghost cup
Make a simple cup produce a loud, wailing ghost sound using the science of sound vibrations.
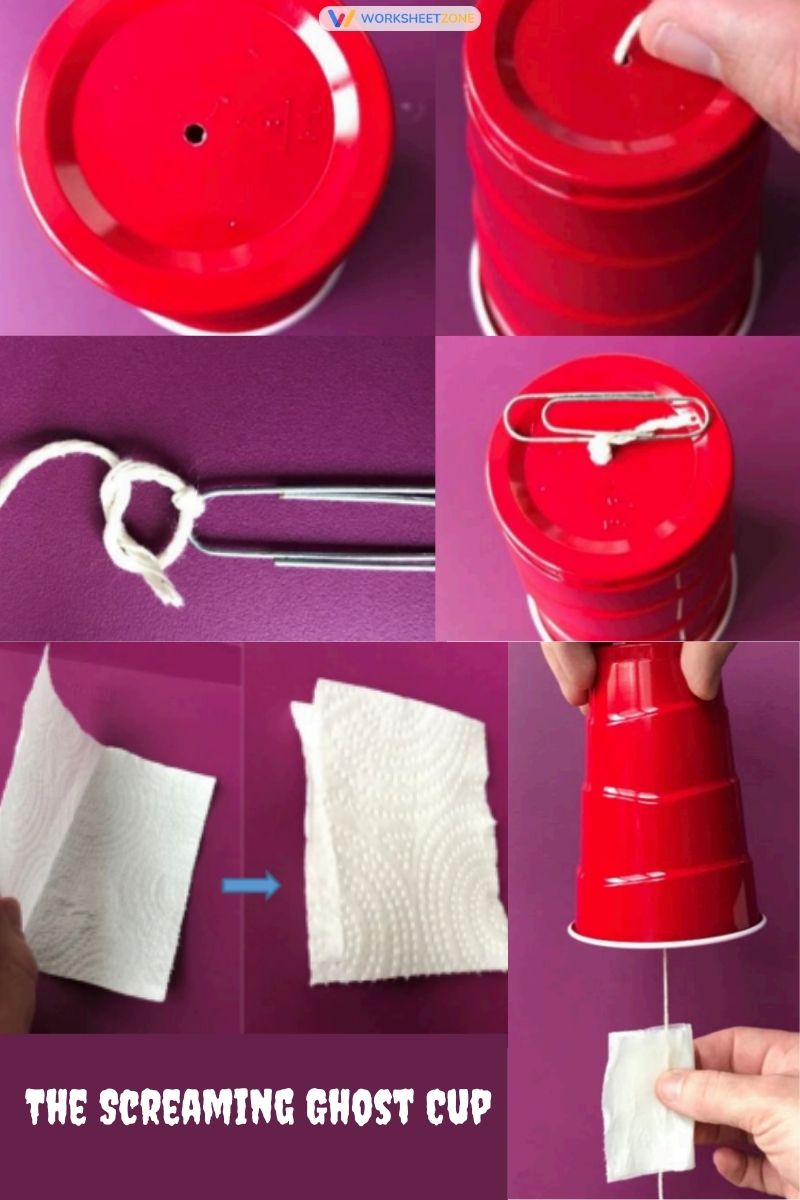
Materials needed:
- A paper or plastic cup
- A sharp pencil or nail
- A paperclip
- About 2 feet (60 cm) of cotton string
- A small piece of paper towel
- A small amount of water
Instructions:
- An adult should carefully poke a small hole in the center of the cup’s bottom.
- Thread one end of the string through the hole from the outside, then tie that end to the paperclip inside the cup so it can’t be pulled back out.
- Hold the cup firmly in one hand, with the string dangling down.
- Lightly dampen the small piece of paper towel with water.
- Pinch the string near the cup with the damp paper towel and pull down in short, quick, jerking motions.
- Listen as the cup amplifies the vibrations into a loud, “screaming” ghostly sound.
30. Pumpkin geoboard
This creative STEM activity combines art, geometry, and hands on learning. Kids build shapes and patterns on the surface of a real pumpkin using rubber bands and pins. It strengthens fine motor skills while reinforcing geometry concepts.
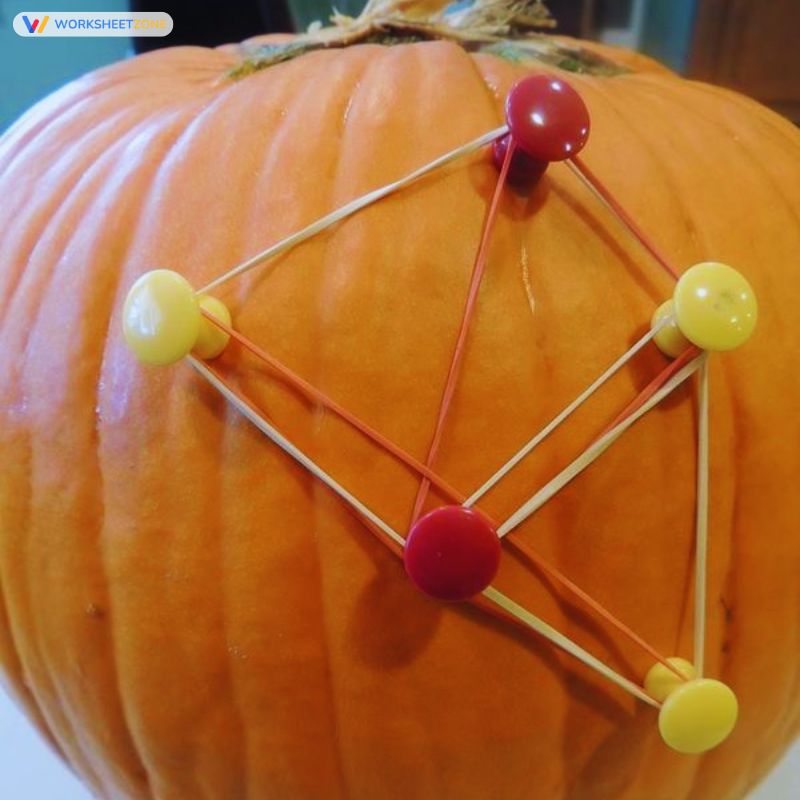
Materials needed:
- Medium-sized pumpkin
- Pushpins
- Rubber bands
Instructions:
- Gently push pins into the pumpkin in a circular pattern.
- Stretch rubber bands around the pins to create triangles, squares, or spider web shapes.
- Encourage kids to count sides and angles for each design.
- Ask what happens when rubber bands are stretched tighter or looser.
31. Spidery ice melt
Spidery Ice Melt is a chilling sensory experiment where kids free frozen spiders using salt and warm water. It demonstrates the effect of temperature and salt on melting speed while keeping the Halloween atmosphere exciting.

Materials needed:
- Small plastic spiders
- Ice cube trays
- Salt
- Warm water
- Droppers
Instructions:
- Freeze the spiders inside ice cubes overnight.
- Place the cubes on a tray and give children droppers of warm water and salt.
- Let them test which melts the ice faster.
- Record the results and discuss why salt lowers the freezing point of water.
Final thoughts
Halloween science experiments turn ordinary lessons into moments of wonder. Through bubbling potions, flying ghosts, and glowing slime, kids not only have fun but also explore real science in creative ways. These activities inspire curiosity, imagination, and a love for discovery that lasts long after Halloween is over.
Keep the learning magic alive! Try more hands-on fun with these Halloween STEM activities for kids packed with spooky experiments and exciting discoveries.


